Exporting Movies
Introduction
A movie can be exported from Cue Pro with or without embedded overlays, and with any preferred audio content. This is useful for preparing work-in-progress audio drafts for directorial review, supplying edited dialogue stems to an ADR recording studio, providing video with embedded overlays to studios that cannot offer these natively or to actors recording from home, and delivering a subtitled translation of foreign dialogue to help a sound post team understand the context of the content.
The procedure for exporting a movie differs significantly depending on the operational mode.
In Pro Tools Integrated Mode, video and audio reside in Pro Tools®, so movie export is performed in Pro Tools® using its Bounce Mix feature. The Cue Pro Connect plug-in renders Cue Pro's overlays live into the Avid® Video Engine (AVE) video stream, so the overlays visible in the Pro Tools® video window at the moment of the bounce are embedded in the exported movie.
In Media Mode, video and audio reside in Cue Pro's Timeline, so movie export is performed within Cue Pro using File → Export → Active Timeline. The Export Current Timeline window provides control over codec, overlay selection, fade in/out, audio tracks, and audio beeps from a single window.
Exporting in Pro Tools Integrated Mode
Choosing Which Overlays Appear in the Exported Movie
Because the exported movie contains exactly the overlays visible in the Pro Tools® video window at the moment of the bounce, it is worth confirming that the correct Timeline is active in Cue Pro and that the desired overlay categories are enabled for the Pro Tools® AVX video device in the DISPLAY tab of Preferences / Settings. In most cases these will already be set from normal working - but if, for example, the Timecode overlay should be excluded from the export while the ADR Cue overlays are kept, adjust the per-device overlay settings before bouncing. See the Display Setup chapter for details.
Bouncing from Pro Tools
Before bouncing, confirm the desired video track is set as the main video track - its Video Online button should be highlighted blue. To bounce a portion of the session, make a timeline or edit selection; to bounce the entire session, click Return to Zero in the Transport.
Choose File → Bounce Mix to
open the Bounce Mix window. Select
MOV as the File Type, enable
Include Video in the Video pane, and choose a
codec and audio settings as required. The bounce writes the
mixed audio and the AVE video stream - including the embedded
Cue Pro overlays - to a single QuickTime .mov file.
For full details on the Bounce Mix window and its codec, audio,
and location settings, refer to the Pro Tools® Reference Guide.
Note: Audio beeps generated by Cue Pro are played through the Cue Pro Connect plug-in inside the Pro Tools® session. To include the beeps in the bounce, route the Cue Pro Connect plug-in track to the bus selected as the Mix Source. To exclude them, mute the Cue Pro Connect track or route it away from that bus before bouncing.
Note: Video is bounced at Pro Tools®' current engine Frame Rate and Raster Size. Confirm these match the session and the Cue Pro Timeline before bouncing - a mismatch can cause overlays to render at the wrong position or frame rate.
Exporting in Media Mode
To export a movie in Media Mode, first make a selection in the active Timeline - either by dragging in the Timeline, by clicking on one or multiple video files in the Timeline, or by entering values in the Timeline selection In & Out Timecode fields on the Controller Bar. If no selection is made, the In and Out Points can still be entered numerically in the export window.
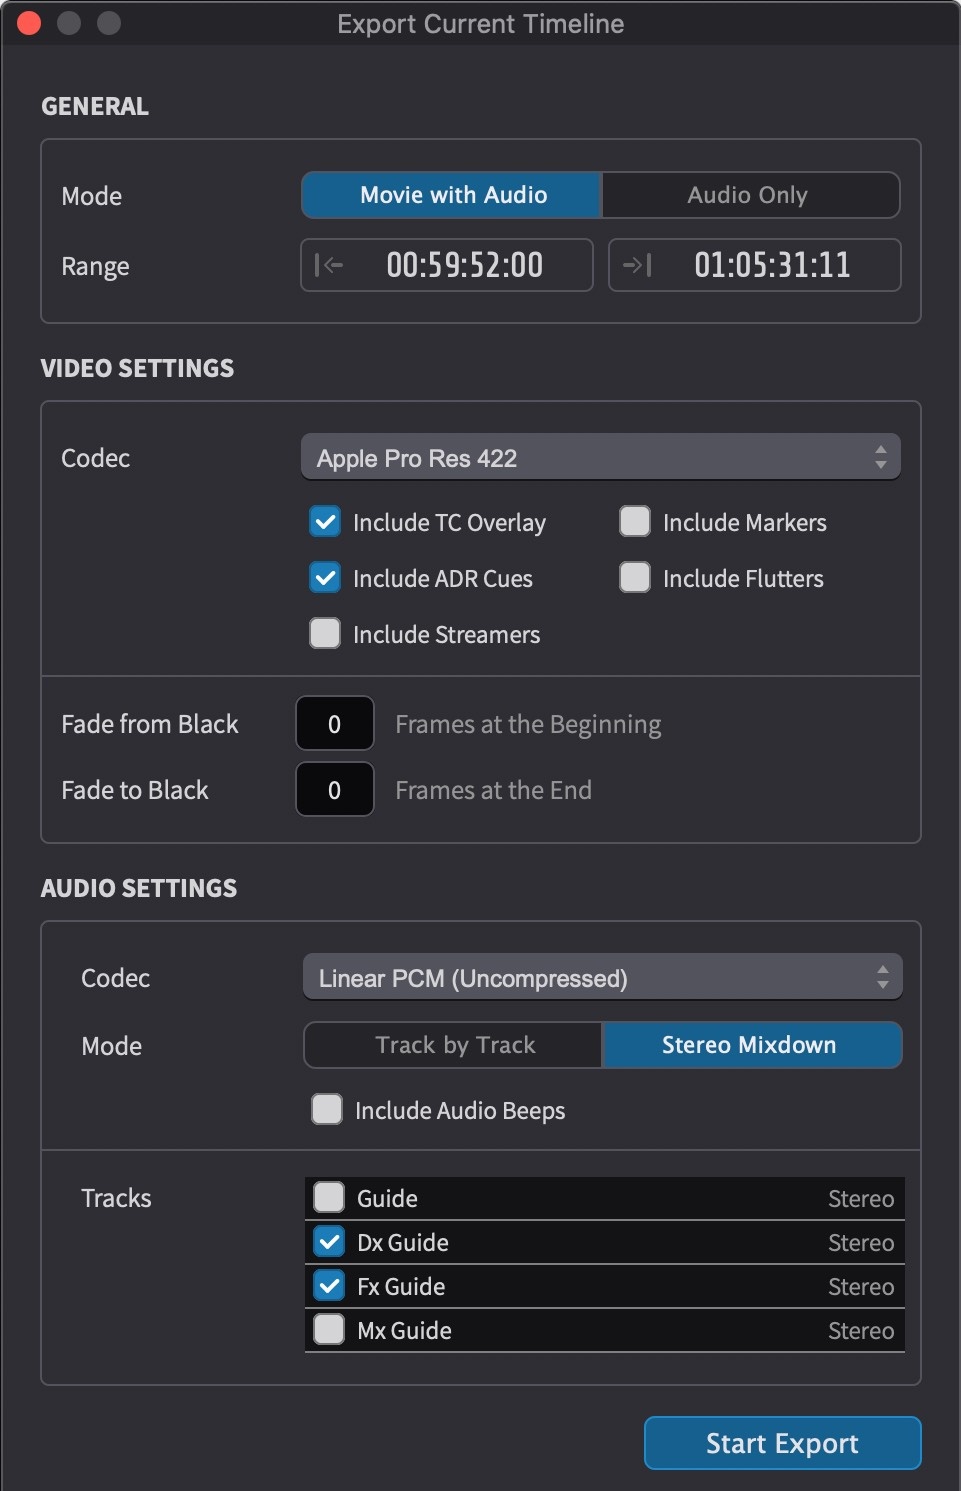
Go to File → Export → Active Timeline. The Export Current Timeline window appears, split into three sections: GENERAL, VIDEO SETTINGS and AUDIO SETTINGS.
Note: The Active Timeline export option is only available when the Timeline contains video. If the exported range includes sections with no video on the Timeline, those sections are exported as black video with any active overlays still rendered.
 {width=60%}
General
In the GENERAL section, set the Mode to choose whether to export video and audio together, or audio only.
Set the Range to define the timecode range to export. By default, this is set to the selection made in the Timeline.
Note: Selections and event ranges are treated as exclusive at the end. The end timecode marks the first frame after the selection or event - the range includes the start timecode but does not include the frame at the end timecode.
Video Settings
In the VIDEO SETTINGS section, choose a Codec for the exported video. The available codecs are H.264, H.265/HEVC and Apple ProRes (LT, Standard or HQ).
Use the Overlays checkboxes to select which overlay types (Visual Events) to embed in the export. Only the overlay categories enabled here are rendered into the exported movie.
Set the Fade In/Out at In/Out Points values to add picture fades - the number of frames of fade in from black at the start, and fade out to black at the end of the exported range.
Audio Settings
In the AUDIO SETTINGS section, choose an audio Codec - either PCM (uncompressed) or AAC (compressed).
Set the Mode to either Stereo Mixdown or Track by Track. Stereo Mixdown folds the selected audio tracks down to a single stereo pair and is recommended when creating review versions, as not all media players handle multiple audio tracks well. Track by Track includes each selected audio track as a separate track in the output movie.
Enable Include Audio Beeps to include Streamer and ADR Cue audio beeps in the exported movie. The beep volume is taken from the setting in the Audio Settings window.
Use the Tracks checkboxes to select which audio tracks to include in the export.
Starting the Export
Once all settings are configured, click the Start Export button. Choose an export location in the window that appears. The export begins, showing a progress indicator and an estimated remaining export duration.