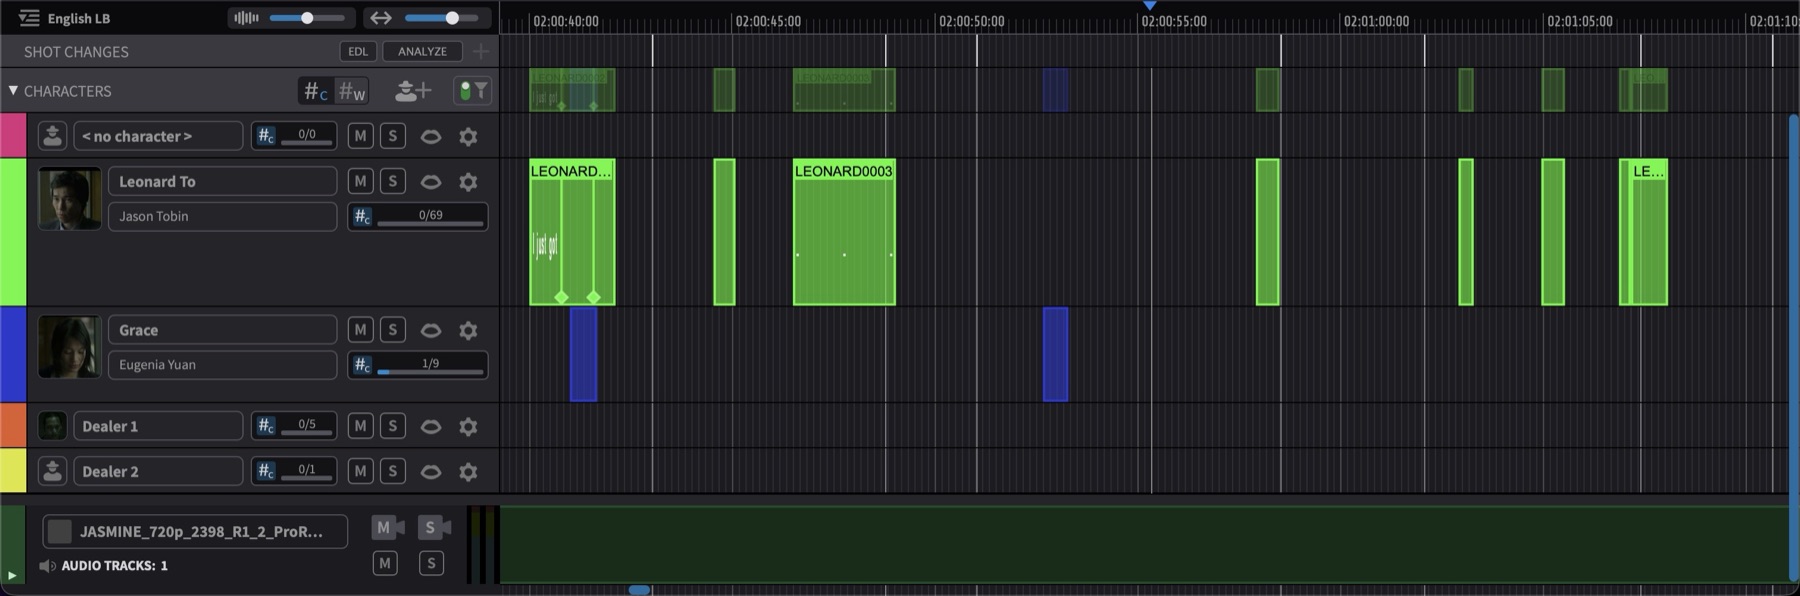
Shot Change Track
The SHOT CHANGES track marks the frames where the video content transitions from one shot to another - hard cuts, transitions, and scene boundaries. Laying the cut points out directly on the timeline makes it quick to orient to the edit structure of the programme material when spotting cues, lining up dialogue, or stepping through ADR work cut by cut.
Shot changes can be detected automatically from the video content or imported from a CMX3600 EDL or a TTAL file.
Shot changes are displayed as thin vertical lines on the SHOT CHANGES track in the Ruler Track section, and as faint vertical lines across all other tracks - providing a quick visual reference for the edit structure without obstructing the content of those other tracks. When the SHOT CHANGES track is hidden, both the track itself and the faint lines across the other tracks are hidden.
 {width=100%}
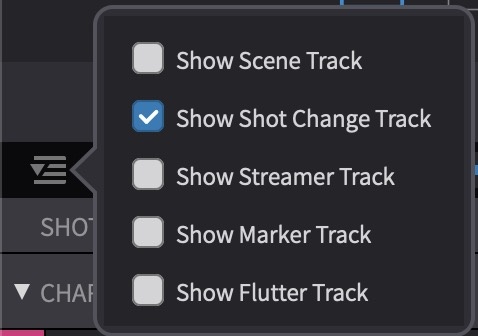
Showing and Hiding the Shot Change Track
The SHOT CHANGES track can be shown or hidden using the track visibility pull-down at the top left of the Ruler Track section. Click the pull-down and enable or disable the Show Shot Change Track toggle. When enabled, the SHOT CHANGES track appears in the Ruler Track section below the SCENES track (if visible) and above the STREAMERS, MARKERS, and FLUTTERS tracks.
The faint vertical lines drawn across other tracks are tied to the track visibility - they appear when the SHOT CHANGES track is shown and disappear when it is hidden. The visibility state is saved per timeline and persists across save/load cycles.
 {width=30%}
Detecting Shot Changes Automatically
Note: Automatic shot change detection using video analysis is currently available on macOS only.
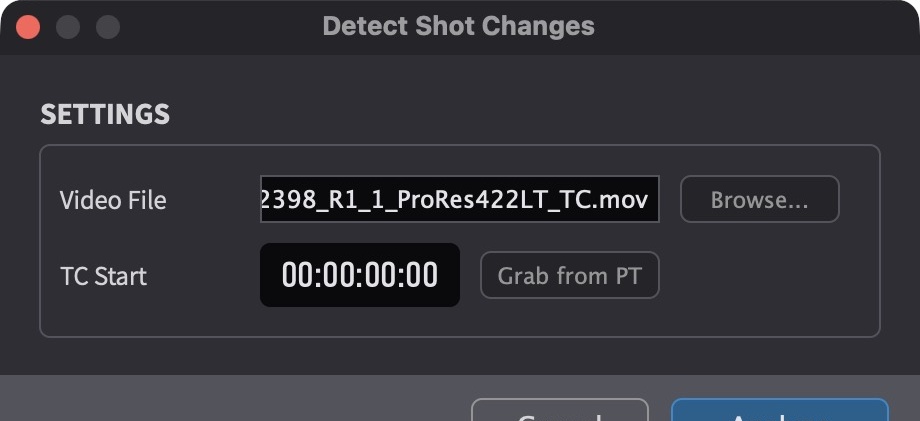
To detect shot changes from the video content, click the ANALYZE button on the SHOT CHANGES track header. This opens the Detect Shot Changes window, where the analysis source and timecode reference are configured before running the detection.
Pro Tools Integrated Mode
In Pro Tools Integrated Mode, the video is played back by Pro Tools® and is not directly available to Cue Pro, so both the source video file and its start timecode on the Pro Tools® timeline must be supplied to the analyser.
 {width=60%}
Click the ANALYZE button on the SHOT CHANGES track header to open the Detect Shot Changes window.
Click the Browse... button next to Video File and select the source video file that was imported into the Pro Tools® session.
Set the video's start timecode in the TC Start field using either of the following methods:
- Enter manually - type the video's start timecode directly into the TC Start field.
- Capture from Pro Tools® - place the Pro Tools® edit cursor at the first frame of the video file on the Pro Tools® timeline, then click the Grab from PT button. The current Pro Tools® playhead position is copied into the TC Start field.
Click Analyze to run the detection (see Running the Analysis below), or click Cancel to close the window without running.
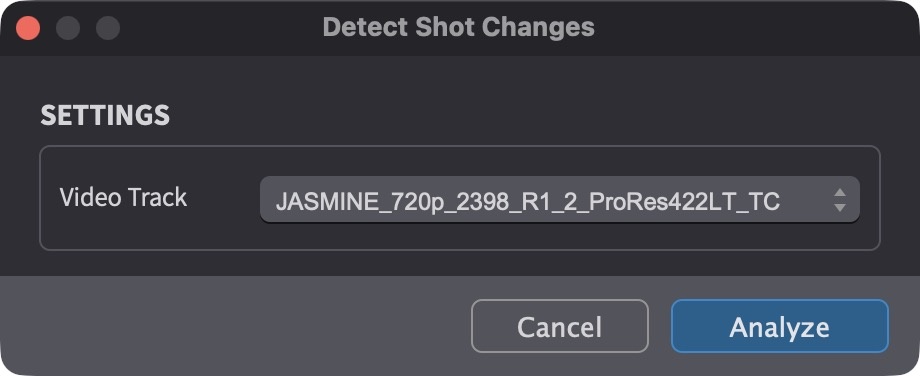
Media Mode
In Media Mode, the Detect Shot Changes window presents a Video Track pull-down to select which video track to analyse. The analysis covers the full extent of the first video region on the selected track.
 {width=50%}
Running the Analysis
Click the Analyze button to begin the detection. A progress bar is displayed showing the estimated remaining time and a speed multiplier indicating how fast the analysis is running relative to real-time playback (for example, 3.2x means the analysis processes 3.2 seconds of material per second).
The analysis processes each video frame and detects significant visual changes between consecutive frames. Dissolves and transitions are handled gracefully and do not generate false shot changes.
Click Cancel at any time to abort the analysis. No partial results are applied when cancelled.
When the analysis completes, a summary dialog reports the number of detected shot changes. If shot changes already exist on the timeline, a confirmation dialog offers the option to replace the existing shot changes or cancel before the new results are applied. After the results are applied, the SHOT CHANGES track is automatically made visible if it was hidden.
Importing Shot Changes from a Video EDL
As an alternative to automatic detection, shot changes can be imported from a CMX3600 EDL. This is useful when a conform EDL is already available from the editorial department - the EDL's cut points correspond directly to shot change positions, so no video analysis is needed.
Requesting an EDL from the Video Editing Department
The EDL must be exported from the NLE with specific settings for the shot change import to work correctly. The text below can be copied and sent directly to the video editor when requesting the EDL:
Please export an EDL with the following settings:
- Format: CMX3600
- Tracks: Video only - no audio tracks, effects layers, subtitles, or other non-picture elements. Ideally just the actual footage tracks (V1, or V1 and V2 if applicable), so the EDL reflects real editorial cuts rather than compositing or graphics layers.
- Comments: Not required. Optionally, the comments field may be enabled and populated with scene and take information only.
Scene and take comments are not needed for shot change import - only the edit timecodes are used to determine cut positions. However, if the same EDL will also be used to populate the SCENES track, including scene and take comments in the export is useful, as a single EDL can then populate both tracks in one go.
Importing the EDL
To import shot changes from an EDL, click the EDL button on the SHOT CHANGES track header (to the left of the ANALYZE button). Multiple EDL files can be selected and imported at once. The import extracts edit timecodes from the EDL and creates corresponding shot change events on the SHOT CHANGES track.
 {width=60%}
Importing and Exporting Shot Changes via TTAL
Shot changes round-trip through the TTAL (Timed Text Authoring
Lineage) file format via its shotChanges array - on
import, shot changes from the TTAL file are added to the
SHOT CHANGES track, and on export, all shot
changes present on the timeline are written to the output TTAL
file. TTAL is currently the only import/export format that
supports shot change data.
Unlike the ANALYZE flow, TTAL import is additive - shot changes from the TTAL file are stored alongside any existing shot changes on the timeline, with no replace-or-cancel prompt.
For the full TTAL import and export workflow, see the How to use TTAL with Cue Pro chapter.
Navigating Shot Changes
In Timeline Range Mode, shot changes can be navigated on the timeline using the Tab key. Press Tab to move the playhead forward to the next event boundary, and Option & Tab to move backward. The playhead stops at each shot change position, making it straightforward to navigate through the edit structure of the programme material - pressing Tab repeatedly moves the playhead from cut to cut across the entire timeline.
Hold Shift while pressing Tab to make a timeline selection as the playhead advances, extending the selection from the current position to the next event boundary. Shift & Option & Tab extends the selection in the opposite direction.
Removing Shot Changes
Shot changes can only be created through automatic detection or EDL import - they cannot be added manually. The + button on the SHOT CHANGES track header is inactive.
Shot changes are point events - they mark a single frame and have no duration. They cannot be moved, trimmed, or edited, and they carry no editable data: there is no name, text, number, or colour field associated with a shot change, and they do not appear in the Event List or the Properties tab / Edit Event window. Individual shot changes cannot be clicked or selected directly on the SHOT CHANGES track.
To remove shot changes, make a timeline selection encompassing the shot changes to be removed and press Delete. All shot changes that fall within the selection are removed. To remove all shot changes from the timeline, select the entire timeline range before pressing Delete.