ADR Cue Overlays in Rhythmo Bande Mode
Introduction to Overlays
Overlays are graphical elements rendered into the video output that provide visual information during sound post-production sessions. Cue Pro offers several overlay types, each serving a different purpose:
- Timecode - displays the current timeline position
- Markers - annotate and identify sections of a project
- Streamers - provide visual countdowns to sync points
- Flutters - mark Hit Points and tempo with flashing visual cues
- ADR Cues - dialogue cueing and recording workflows
In addition to overlays, Cue Pro provides the SCENES track and SHOT CHANGES track for timeline-based navigation and edit structure reference - see the Scenes Track and Shot Change Track chapters.
This chapter covers ADR Cues in Rhythmo Bande overlay mode - how to configure scrolling text overlays, define characters, create and edit cues, and work with anchors. For ADR Cues in Line Based overlay mode, see the ADR Cues in Line Based Mode chapter. For TTAL import, export, and detection symbol workflows, see the How to use TTAL with Cue Pro chapter.
ADR Cues are primarily used by ADR supervisors, dialogue editors, and dubbing mixers to manage dialogue recording sessions. They provide a structured cueing system - with numbered lines, character assignments, and visual countdowns - that helps voice talent anticipate and deliver lines in sync with the picture. The same cueing system is also used in foley and other sound post-production workflows that require line-by-line cueing.
ADR Cue Overlays
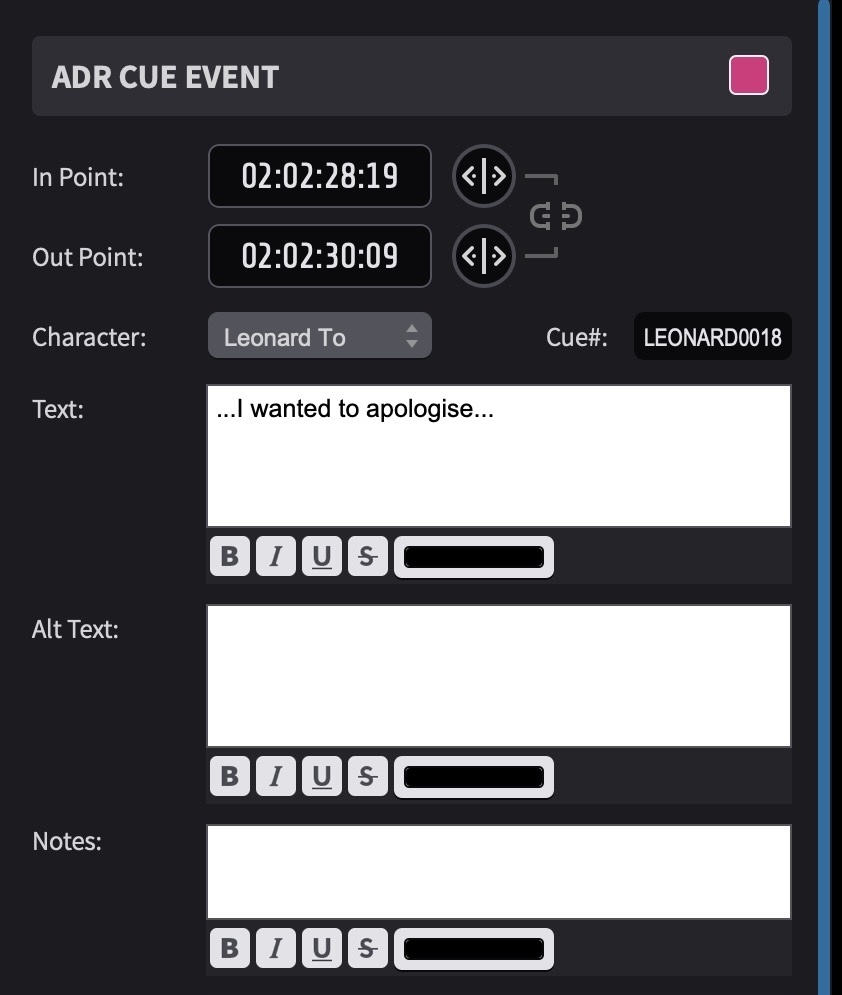
ADR Cues are the most comprehensive overlay type in Cue Pro. An ADR Cue represents a single line of dialogue to be recorded. Each ADR Cue contains an In Point, an Out Point, dialogue text, an alternate text field for translations, a character assignment, a cue number, notes and engineering notes, a reason code explaining why the line requires ADR, an on/off screen indicator, and a recording track assignment. Each cue also carries a Done checkbox indicating the cue has been recorded.
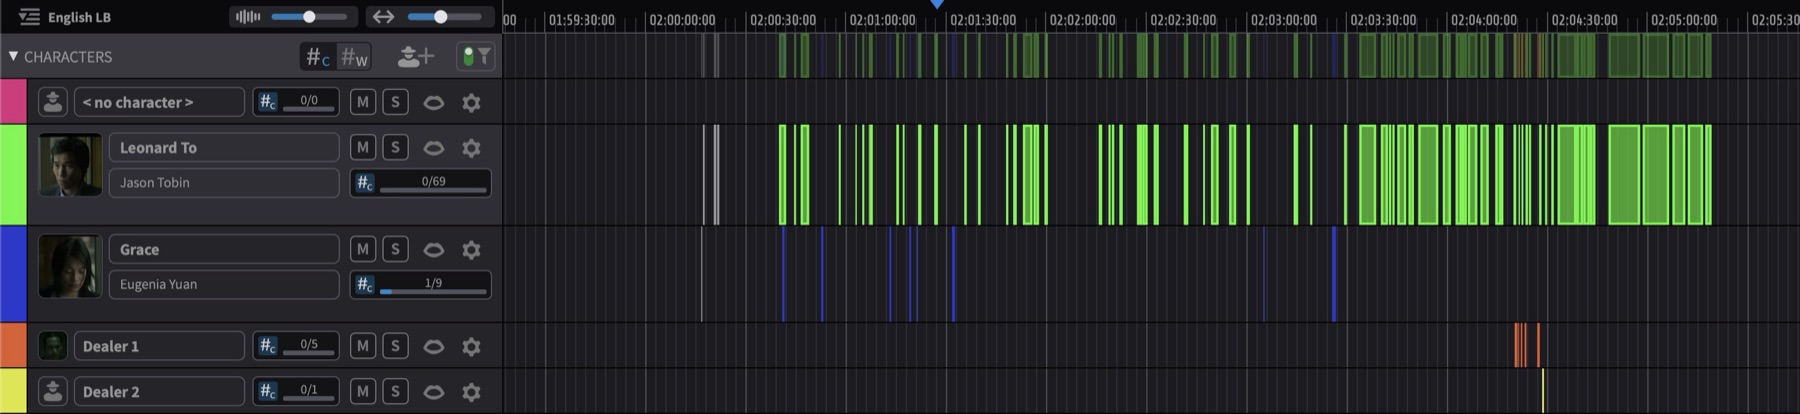
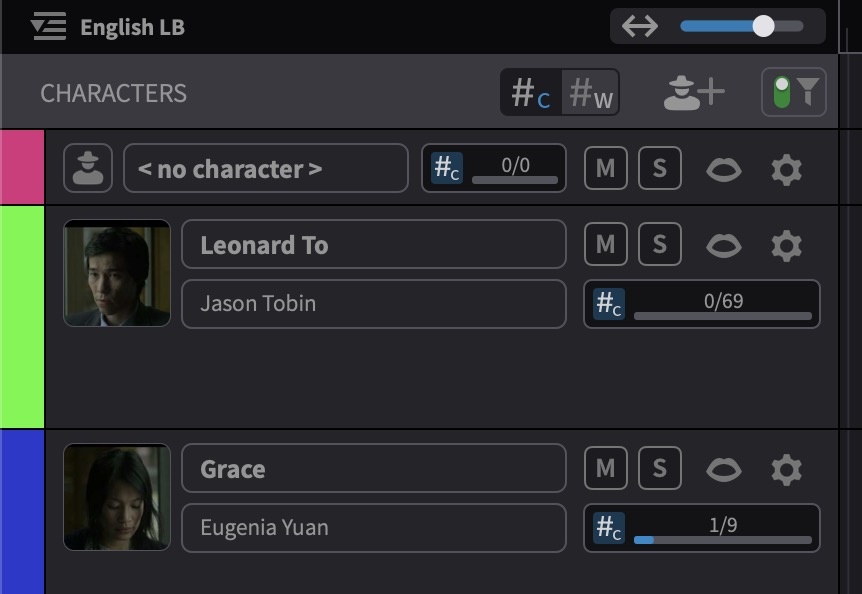
ADR Cues appear as Visual Events on dedicated Character Tracks in the Visual Events section. Each Character Track corresponds to a defined character in the project and has its own unique settings - including a character name, actor name, cue number prefix, and track colour. The Character Track header also displays line and cue count summaries. Each ADR Cue is displayed as a region spanning from its In Point to its Out Point on the corresponding Character Track. The colour of each ADR Cue matches the colour assigned to its character.
 {width=100%}
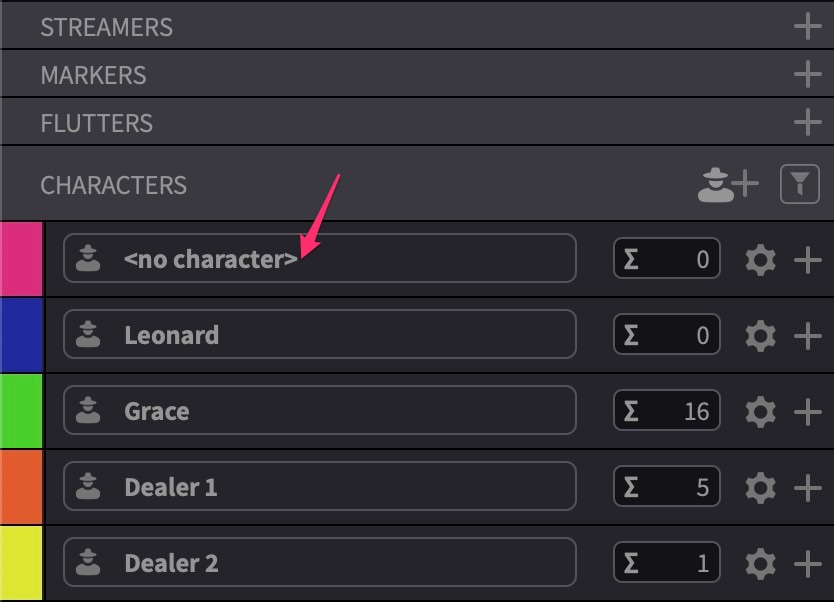
The Character Tracks section can be collapsed to show only the Character Summary Track, or expanded to show each individual Character Track, using the arrow to the left of the CHARACTERS header.
Rhythmo Bande Overview
Rhythmo Bande is a scrolling text overlay system designed for foreign language dubbing and voice-over workflows. Unlike Line Based overlays that appear at fixed screen positions, Rhythmo Bande presents dialogue text that scrolls horizontally across the screen in synchronisation with the video. As text passes a central reference point - the Sync Marker - the voice talent speaks the corresponding words, achieving natural lip-sync with the original performance.
This overlay mode originated in the French dubbing industry and has become widely adopted in European localisation workflows. Cue Pro brings Rhythmo Bande capabilities to a broader range of users through its support for industry-standard file formats including TTAL (Timed Text Authoring Lineage).
In a Rhythmo Bande session, dialogue text scrolls from right to left across the video display. The Sync Marker marks the point at which each syllable or word should be spoken. Voice talent reads the approaching text and times their delivery so that each word crosses the Sync Marker at the correct moment.
The scrolling speed is determined by the timing information embedded in the cue data. Words that need to be spoken quickly are spaced closer together, while words with more time between them are spaced further apart. This visual representation of timing helps voice talent match the rhythm and pacing of the original dialogue without needing to memorise line timings.
Note: Overlays are enabled by default. If ADR Cue overlays are not visible during playback, see Enabling ADR Cue Overlays later in this chapter.
Viewing and Editing ADR Cue Properties
ADR Cue properties can be viewed and edited in two places:
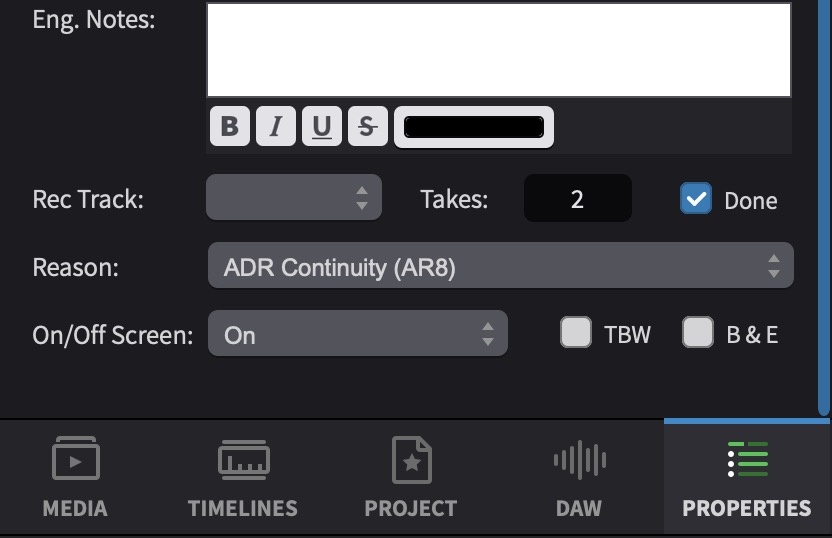
- The Properties tab (Media Mode) shows the selected ADR Cue's details. Double-click an ADR Cue to open it, or click the PROPERTIES tab at the top left of the Visual Events section.
- The Edit Event window (Pro Tools Integrated Mode) shows the same details in a separate window. Double-click an ADR Cue to open it.
- The Event List shows all events in a table format, allowing multiple ADR Cues to be viewed and edited at once. Press Shift & L, or select Event List from the Window menu, to show or hide it.
All three are used throughout this chapter for creating, editing, and managing ADR Cues.
ADR Cue Properties
The available properties for each ADR Cue are:
- In and Out - the timecodes defining the start and end of the dialogue line
- Character - the character assignment (selectable from defined characters)
- Cue# - the cue number, including the character prefix
- Text - the dialogue line to be recorded
- Alt Text - an alternate text field, commonly used to hold a translated version of the dialogue (see Translation later in this chapter)
- Notes - notes visible to the engineer on cue sheets
- Eng. Notes - engineering notes
- Takes: # - the take count
- Rec Track - the recording track assignment
- Done - a checkbox indicating the cue has been recorded
- Reason - the reason code explaining why the line requires ADR (see Reason Codes later in this chapter)
- TBW - a checkbox marking the cue as "To Be Written"
- B&E - a checkbox marking the cue as "Breaths & Efforts"
- On/Off Screen - whether the line is visible on screen and requires lip-sync matching (pull-down: On, Off, On → Off, Off → On)
- Open Ended - a checkbox enabling open-ended recording past the Out Point (see Open-Ended Cues later in this chapter)
The following additional properties are exclusive to the Event List and are not available in the Properties tab or Edit Event window:
- On - mute state (unchecked when muted)
- Actor - the actor name (inherited from the Character Track)
- Type - the event type
- Takes: Sel - the selected take
- Takes: Alt - the alternate take
- Forced Narrative - enables Forced Narrative for the cue (see Forced Narrative later in this chapter)
- FN Region - the Forced Narrative subtitle position
- Pre Roll Color - overrides the default Pre Roll Streamer colour for the selected event
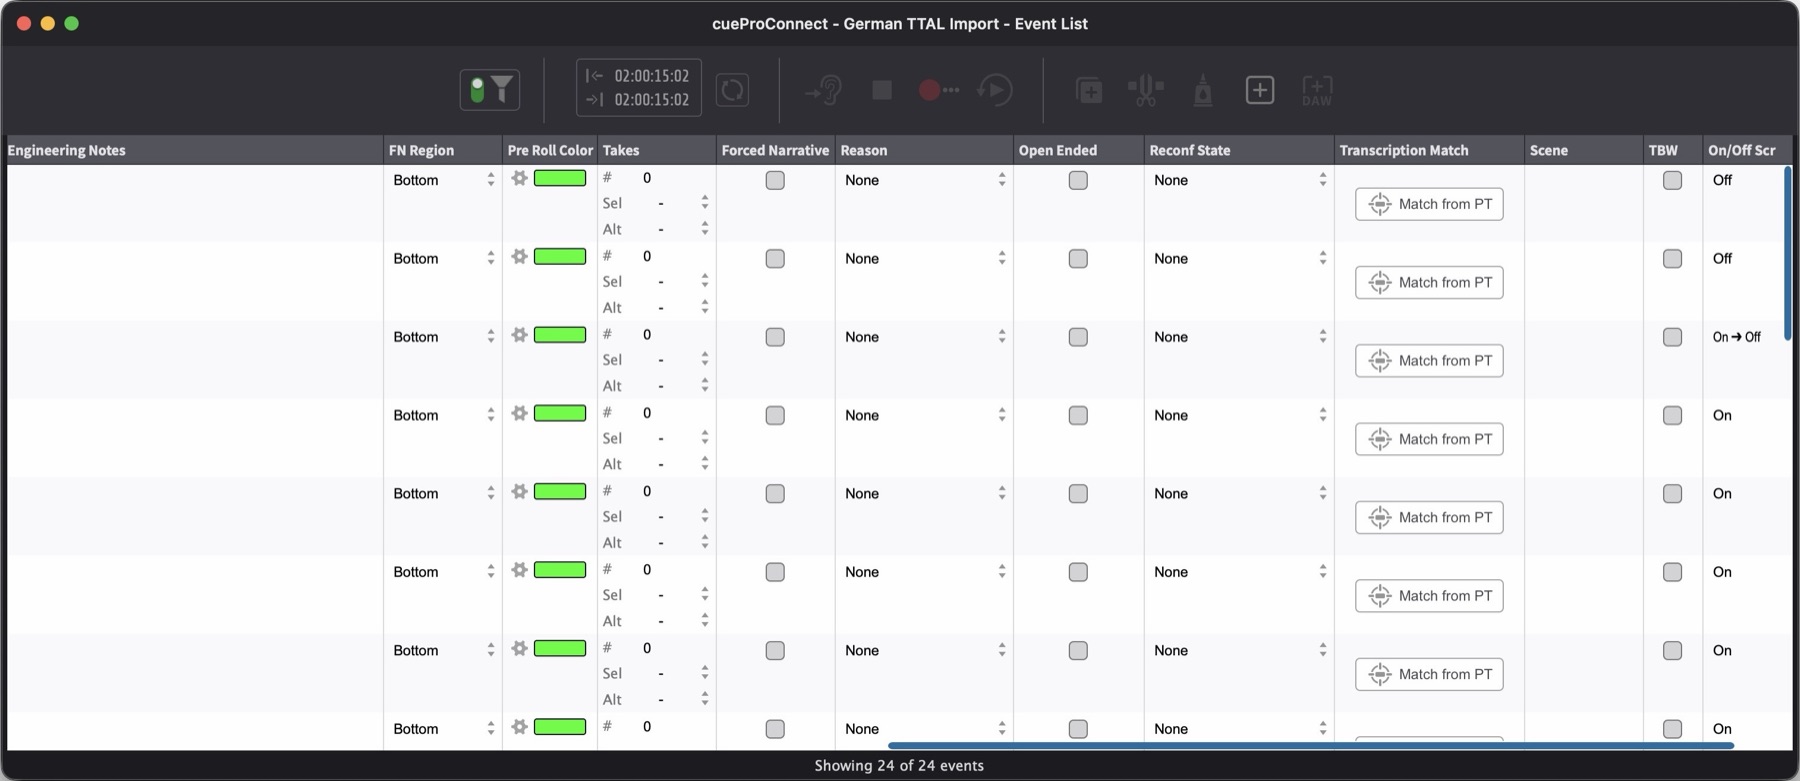
- Reconf State - the reconform state of the cue, indicating whether it has been affected by a reconform operation (pull-down: None, or a reconform status)
- Transcription Match - provides a Match from PT button that matches the cue to a corresponding clip in Pro Tools and populates the Text field from the clip name or transcription data
 {width=50%}
 {width=50%}
Switching Between Timecode and Feet+Frames
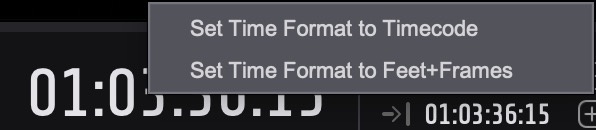
To switch between Timecode and Feet+Frames display, right-click the main counter when it is not highlighted. Select either Set Time Format to Timecode or Set Time Format to Feet+Frames. This changes the display format of the Timelines, counters, and the Timecode overlay simultaneously.
 {width=60%}
Defining Characters
 {width=60%}
ADR Cues are placed on Character Tracks in the Visual Events section. A permanent default track labelled no character always exists at the top of the Character Tracks section - ADR Cues that have not been assigned to a character appear on this track. While it is possible to create ADR Cues directly on the no character track, it is advisable to set up dedicated Character Tracks first and create cues directly on the appropriate track, or move cues from the no character track to a Character Track once characters have been defined.
 {width=50%}
Adding a New Character
To add a new Character Track, click the Add New Character Track button on the CHARACTERS header bar, or select Add Character Track from the Track menu. A new track is created with the default name "name". [TODO: VSADRM-541 - Once implemented, update default name to "character 1" / "character 2" etc.] To configure the character's name and other details, click the gearbox icon on the track header to open the Edit Character Settings window (see Editing Character Settings below).
 {width=60%}
Editing Character Settings
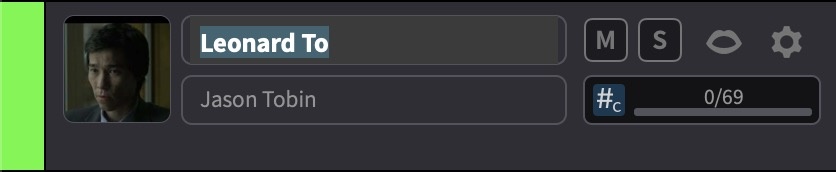
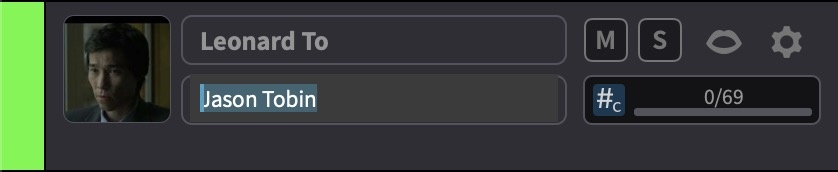
To rename a character, click directly on the character name field in the Character Track header and type the new name. When the track is expanded to a larger height, the actor name field is also visible and can be edited inline in the same way.
 {width=60%}
 {width=60%}
To edit additional character settings, click the gearbox icon on the track header.
 {width=45%}
This opens the Edit Character Settings window with the following fields:
- Character - the character name
- Actor - the actor's name
- Prefix - the unique prefix code used for ADR Cue numbering
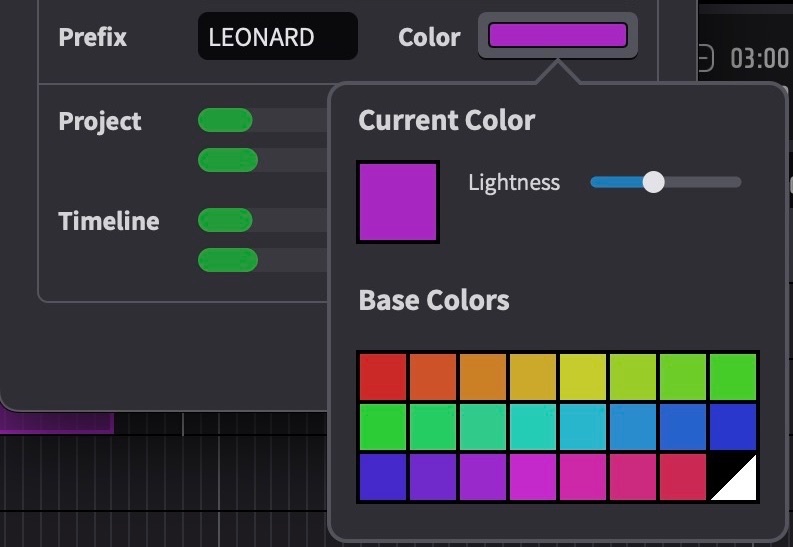
- Color - the Character Track colour
The Edit Character Settings window also displays line and cue counts for the character - per timeline and across all combined timelines. The distinction between lines and cues reflects the fact that nested ADR Cues (multiple lines sharing the same cue number) count as one cue but multiple lines.
Character Track Colour
The Color swatch in the Edit Character Settings window opens the colour picker. A colour is chosen from the Base Colors palette and adjusted using the Lightness slider. The Lightness slider extends the chosen Base Color across the full range between pure black (slider fully down) and pure white (slider fully up), with every darker and lighter variation of the colour in between. The chosen colour is applied to the Character Track header, to each ADR Cue event placed on that track, and to the character's strip on the Character Summary Track.
 {width=60%}
The same colour picker also opens from the Pre Roll Color field in the Event List, where it overrides the default Pre Roll Streamer colour for the selected event only. Overriding Pre Roll Color affects only the Streamer - the ADR Cue event itself continues to use the Character Track colour, both on the timeline and on the Character Summary Track.
Character Thumbnails
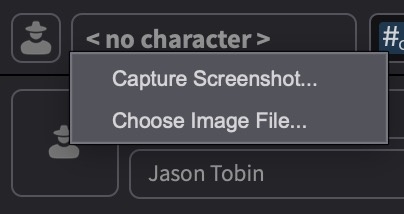
Each character can have a thumbnail image displayed on the Character Track header. To add or change a thumbnail, click the character icon on the track header. A menu appears with two options: Choose Image File... and Capture Screenshot....
 {width=30%}
Choose Image File
To use an existing image, click the character icon on the track header and select Choose Image File.... Select the image in the file browser and it is applied to the Character Track header.
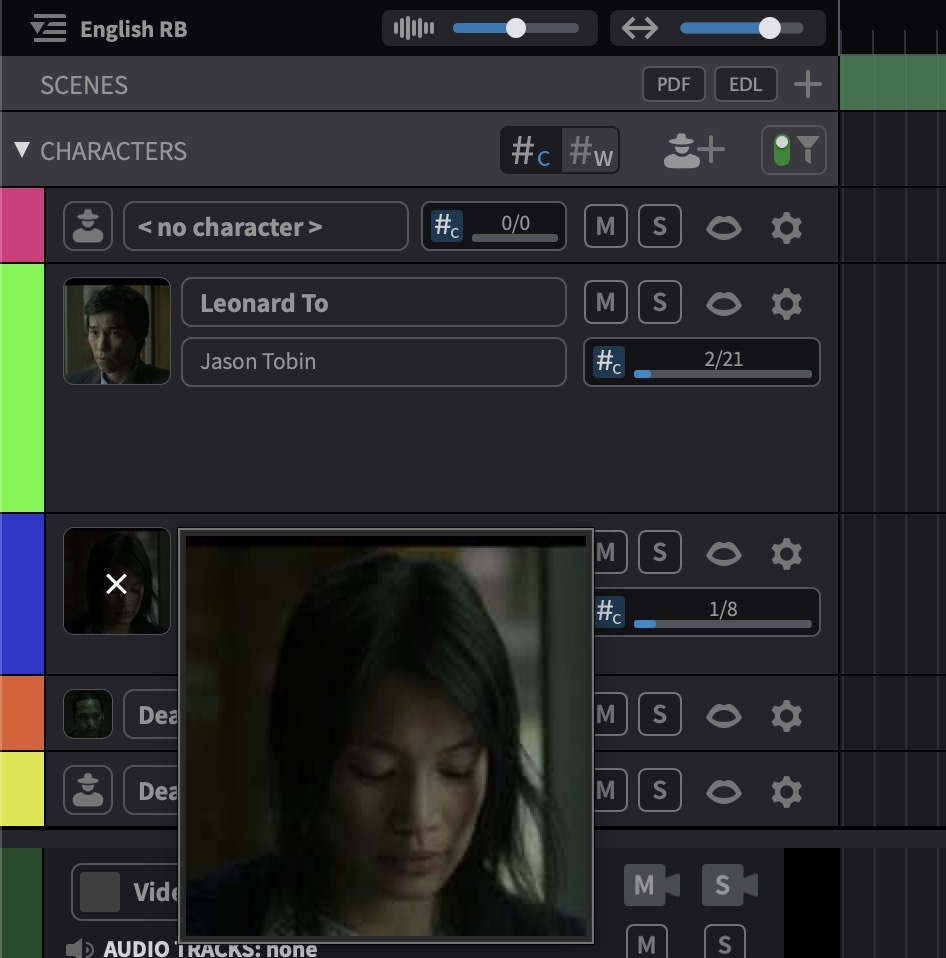
Capture Screenshot
To capture a thumbnail directly from the video, navigate to a frame showing the actor's face, then click the character icon on the track header and select Capture Screenshot.... Drag a marquee selection over the desired area. The selected region is cropped and applied to the Character Track header. This works on any display surface accessible to the mouse - the Internal Video Device, the Mini Player, or the Fullscreen Video Device - but not on external video hardware outputs where the mouse cannot be used.
Granting Screen Recording Permission (First Time Only)
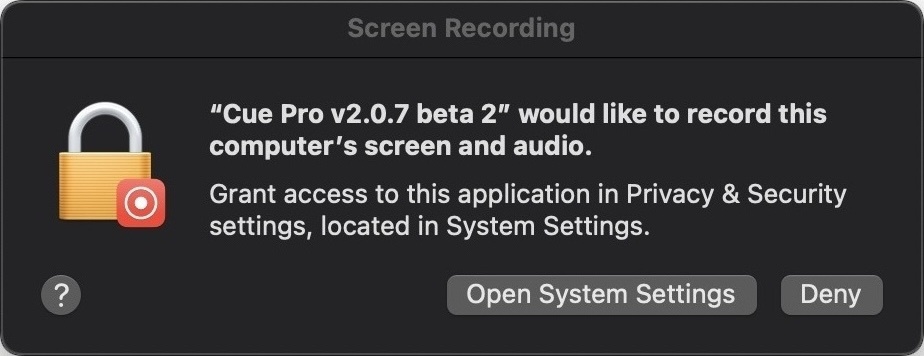
The Capture Screenshot... function requires macOS Screen Recording permission. The first time this function is used, macOS displays a Screen Recording dialog asking to grant Cue Pro access to record the screen.
 {width=50%}
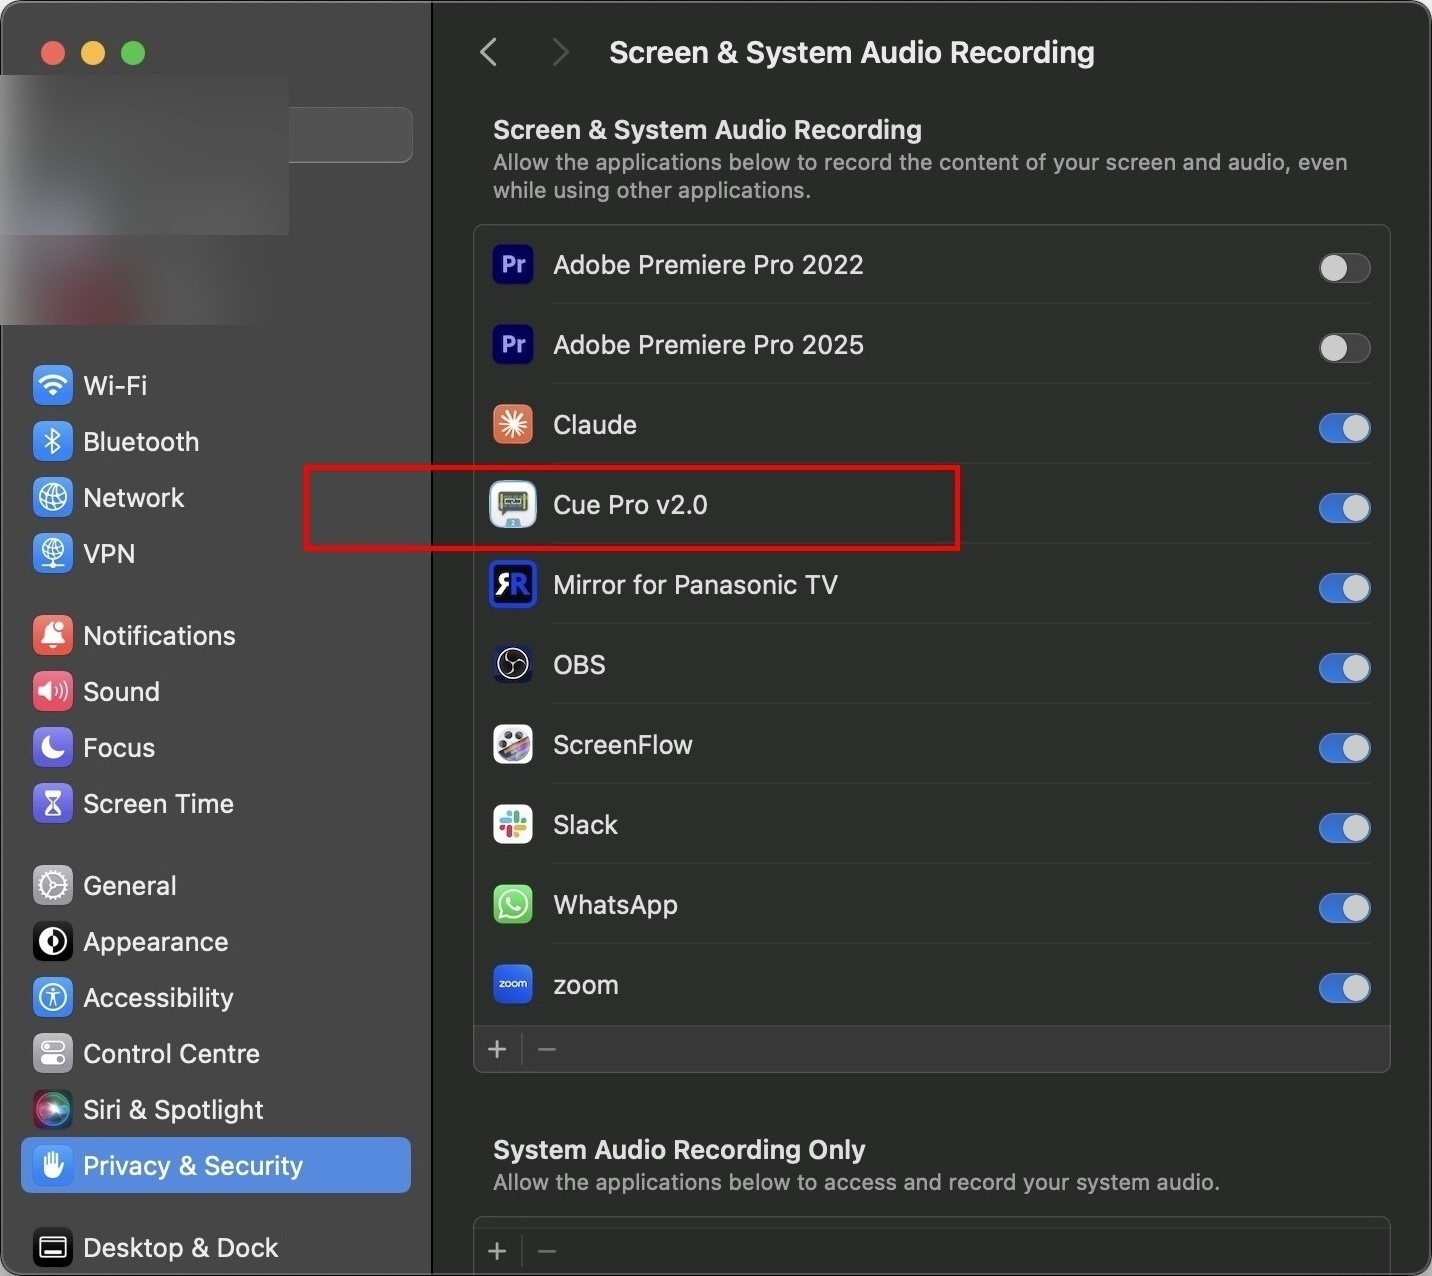
Click Open System Settings to open System Settings → Privacy & Security → Screen & System Audio Recording. Locate Cue Pro in the list and enable the toggle.
 {width=60%}
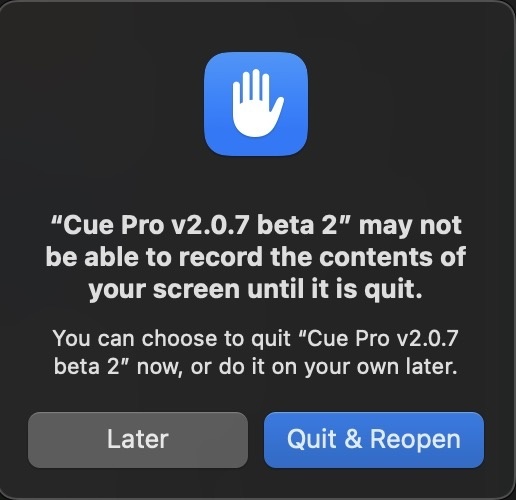
After enabling the permission, macOS displays a dialog stating that Cue Pro may not be able to record the screen until it is quit. Click Quit & Reopen to restart Cue Pro with the new permission active.
 {width=35%}
This permission only needs to be granted once. After restarting, the Capture Screenshot... function is available immediately for all future sessions.
Once a thumbnail is set, it appears on the Character Track header. The thumbnail scales with the track height - a narrow track shows a small preview, while a taller track shows a larger one. Hovering over the thumbnail displays a full-size preview.
 {width=50%}
Deleting a Character Track
To delete a Character Track, select it and choose Delete Selected Track(s) from the Track menu. Alternatively, right-click anywhere on the track header and select Delete Selected Tracks from the context menu. Multiple tracks can be selected and deleted at once.
Sorting Character Tracks Manually
Character Tracks can be manually sorted by dragging them into the desired order.
Note: The no character track cannot be moved and always remains at the top.
Sorting Character Tracks Automatically
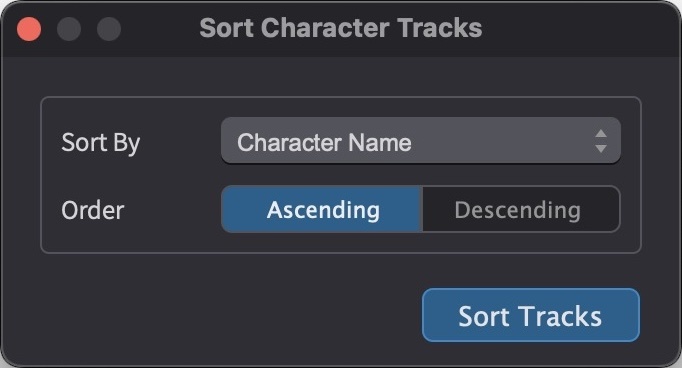
Character Tracks can also be sorted automatically using the Sort Character Tracks window, accessed from the Track menu.
 {width=40%}
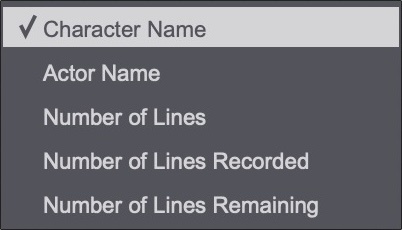
The Sort By pull-down offers Character Name, Actor Name, Number of Lines, Number of Lines Recorded, and Number of Lines Remaining. The Order toggle selects Ascending or Descending. Click Sort Tracks to apply.
 {width=30%}
Resizing Character Tracks
Tracks can be resized by dragging the bottom edge of the track header. The height of all selected tracks can be adjusted proportionally using Control & ↑ / ↓ - each track grows or shrinks relative to its current size.
Edit Mode: Timeline Range vs Target Event
Cue Pro offers two edit modes, which can be switched using the Edit Mode toggle in the Controller Bar, or by pressing G.
 {width=15%}
In Timeline Range Mode, the current timeline selection determines which ADR Cues are affected by edit operations. ADR Cues wholly within the selection are always fully affected. ADR Cues that are only partially within the selection behave differently depending on the operation - for example, a partial selection will trim an ADR Cue when deleting, but will simply ignore it when moving. The specific behaviour for each operation is noted throughout this chapter. In Timeline Range Mode, the current selection remains active until a new selection is made or the timeline is clicked elsewhere to deselect.
Target Event Mode keeps selected ADR Cues targeted even when scrubbing or nudging the playhead, which is useful for fine-tuning imported cue timings or working through cues one at a time. Discontiguous ADR Cues can be selected directly from the Event List. Target Event Mode is particularly useful for dialogue editors refining rough cue timings from an imported script - each cue can be individually selected, auditioned, and adjusted without losing the selection.
Edit Mode switches automatically when selecting discontiguous events from the Event List - Cue Pro enters Target Event Mode to accommodate non-contiguous selections.
Note: In Target Event Mode, clicking the timeline selects existing events rather than making a timeline range selection. To create new events from a timeline range selection, ensure Timeline Range Mode is active.
The Edit Mode setting is stored with the project and restored when the project is reopened.
Creating ADR Cues
ADR Cues can be created manually one at a time, automatically from audio transcription data (see Creating ADR Cues from Audio Transcription below), or in bulk from external sources such as Pro Tools clip groups, delimited text files, EdiCue files, subtitle files, or dialogue lists. For bulk import methods, see the Bulk ADR Cue Import from Pro Tools, Bulk ADR Cue Import from EdiCue, Bulk ADR Cue Import from a Subtitle file, Bulk ADR Cue Import from a Delimited Text File, and Manual ADR Cue Import from a Dialogue List chapters. For sending ADR Cues back to Pro Tools as clip groups, see the Working with Clip Groups in Pro Tools chapter.
To create an ADR Cue, ensure Timeline Range Mode is active, then make a selection in the timeline on the desired Character Track. Press the A hotkey to create an ADR Cue spanning the selection. The In Point and Out Point of the new ADR Cue will match the start and end of the selection. The Properties tab (Media Mode) or Edit Event window (Pro Tools Integrated Mode) appears with the Text field automatically selected.
To make a more precise selection, hold Control while clicking and dragging on the timeline to scrub the audio - release at the desired start position. Then hold Shift & Control and click and drag to scrub to the end position.
Note: Timeline and event selections are treated as exclusive at the end. The end timecode marks the first frame after the selection or event. In other words, the range includes the start timecode but does not include the frame at the end timecode.
If no selection is made prior to pressing A, an ADR Cue will be created at the current playhead position on the currently selected Character Track, using the default duration specified in Preferences / Settings → OVERLAYS → ADR Cue → General settings. The Properties tab (Media Mode) or Edit Event window (Pro Tools Integrated Mode) appears with the Text field automatically selected.
The same result can also be achieved by selecting New Event from the Event menu.
ADR Cues can also be created using the + button in the Event List.
Note: When adding several ADR Cues in succession, the + button will recognise this and continue adding ADR Cues when pressed.
 {width=80%}
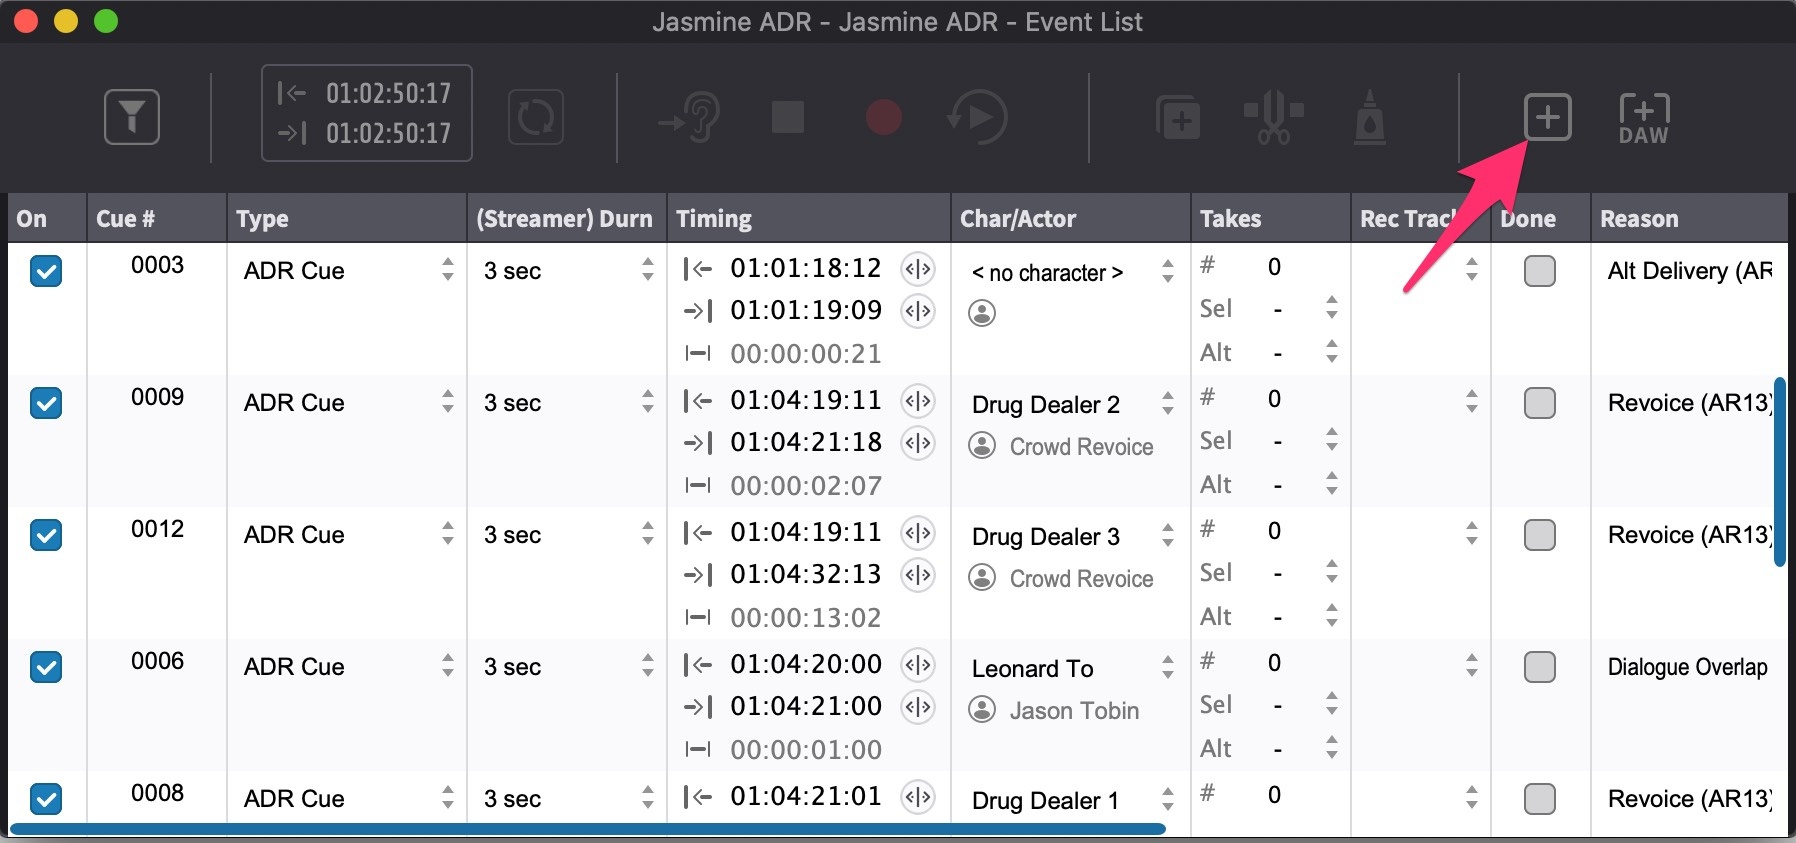
Capturing ADR Cues from Pro Tools Selection
When working with Pro Tools, ADR Cues can be created directly from the Pro Tools timeline selection. In Media Mode, this requires DAW sync to be configured (Avid Satellite Link, or MTC/MMC with Accessibility API). In Pro Tools Integrated Mode, the timeline selection is always mirrored automatically.
Prerequisite: In Pro Tools, enable Edit Insertion Follows Scrub/Shuttle in Preferences → Operation tab.
To capture an ADR Cue from the current Pro Tools selection, press Command & F7 (or Command & Shift & N). This is a system-wide hotkey that works even when Cue Pro is not in focus.
On Macs where F keys are not configured to act as standard function keys, Fn must also be held - for example, Command & Fn & F7. This setting can be found in System Settings → Keyboard → Function Keys.
 {width=80%}
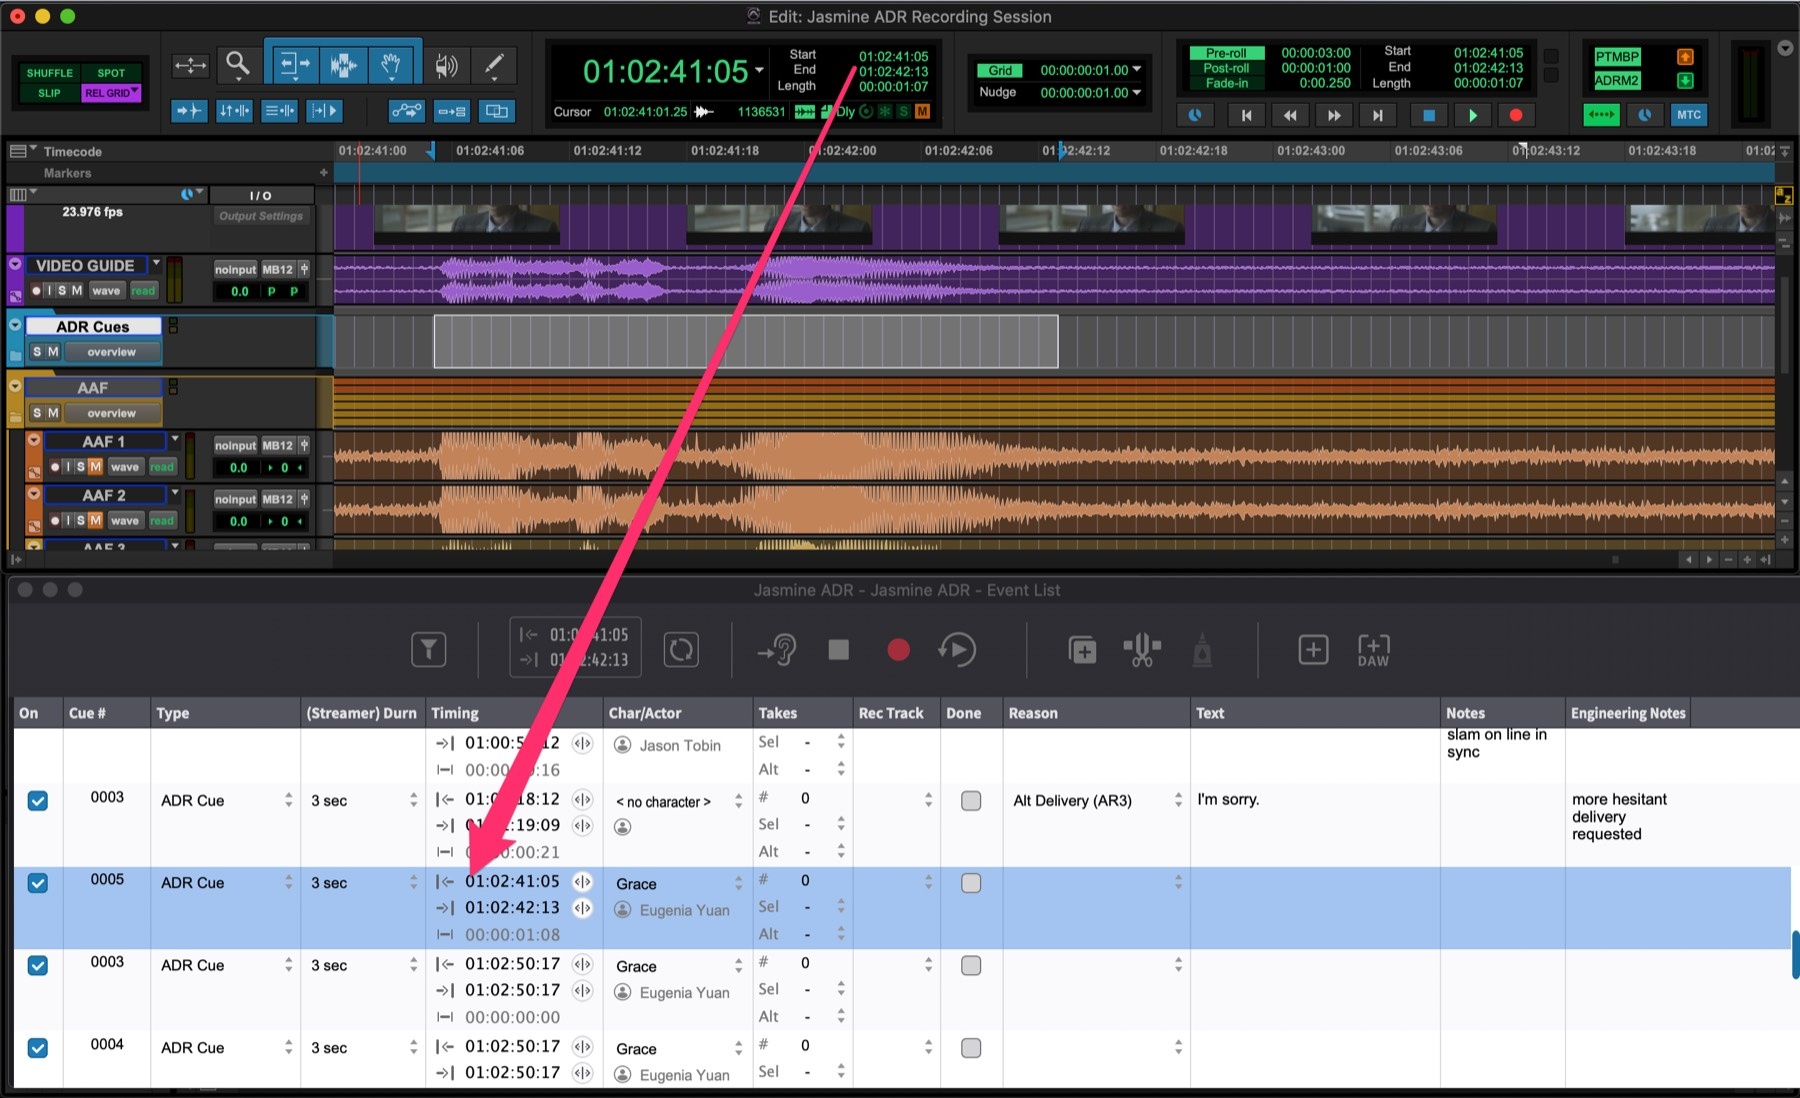
The same function is available from the Event menu as New Event from DAW Selection. Alternatively, use the +DAW button in the Event List to create a new event from the current DAW selection.
 {width=60%}
To update an existing ADR Cue's In and Out Points, make a new selection in Pro Tools and press Command & F8 (or Command & Shift & U). This is a system-wide hotkey that works even when Cue Pro is not in focus. The same function is available from the Event menu as Update Current Event from DAW Selection.
Auto Text Capture
When creating a single ADR Cue from a Pro Tools selection, Cue Pro can automatically populate the cue's text field with the transcribed dialogue from Pro Tools, if transcription data is available for the selected region - eliminating the need to manually type each line. To create multiple ADR Cues in bulk from an entire transcription, see Creating ADR Cues from Audio Transcription below.
Note: This feature requires Pro Tools 2025.10 or later.
Alternatively, text can be selected directly from the Pro Tools transcription lane instead of making an audio selection on a track. When a transcription lane text selection is used, the selected text is captured for the cue, and Cue Pro derives the In and Out Points from the text selection boundaries in Pro Tools.
When using transcription lane text selection, the In and Out Points derived from Pro Tools may not always be frame-accurate and may need light refinement after capture.
Creating ADR Cues from Audio Transcription
Where Auto Text Capture populates the text for a single cue at a time, this workflow creates ADR Cue Events in bulk - one event per detected sentence, with timecodes and text derived from the word-level timing data. This provides a fast alternative to manually spotting and typing each line.
In Pro Tools Integrated Mode, the transcription comes from Pro Tools' built-in transcription feature (requires Pro Tools 2025.6 or later). Pro Tools analyses the audio and produces word-level timing with speaker labels, which Cue Pro reads via DAW Control. Because Pro Tools identifies individual speakers, each speaker is mapped to a separate Character Track when the events are created. In Media Mode, Cue Pro runs its own transcription locally using OpenAI's Whisper model - no audio is sent to any third-party service. Media Mode does not include speaker detection, so all sentences are placed on the no-character track. Assign speakers manually after the events are created by moving each cue to the appropriate Character Track.
Installing a Transcription Model (Media Mode)
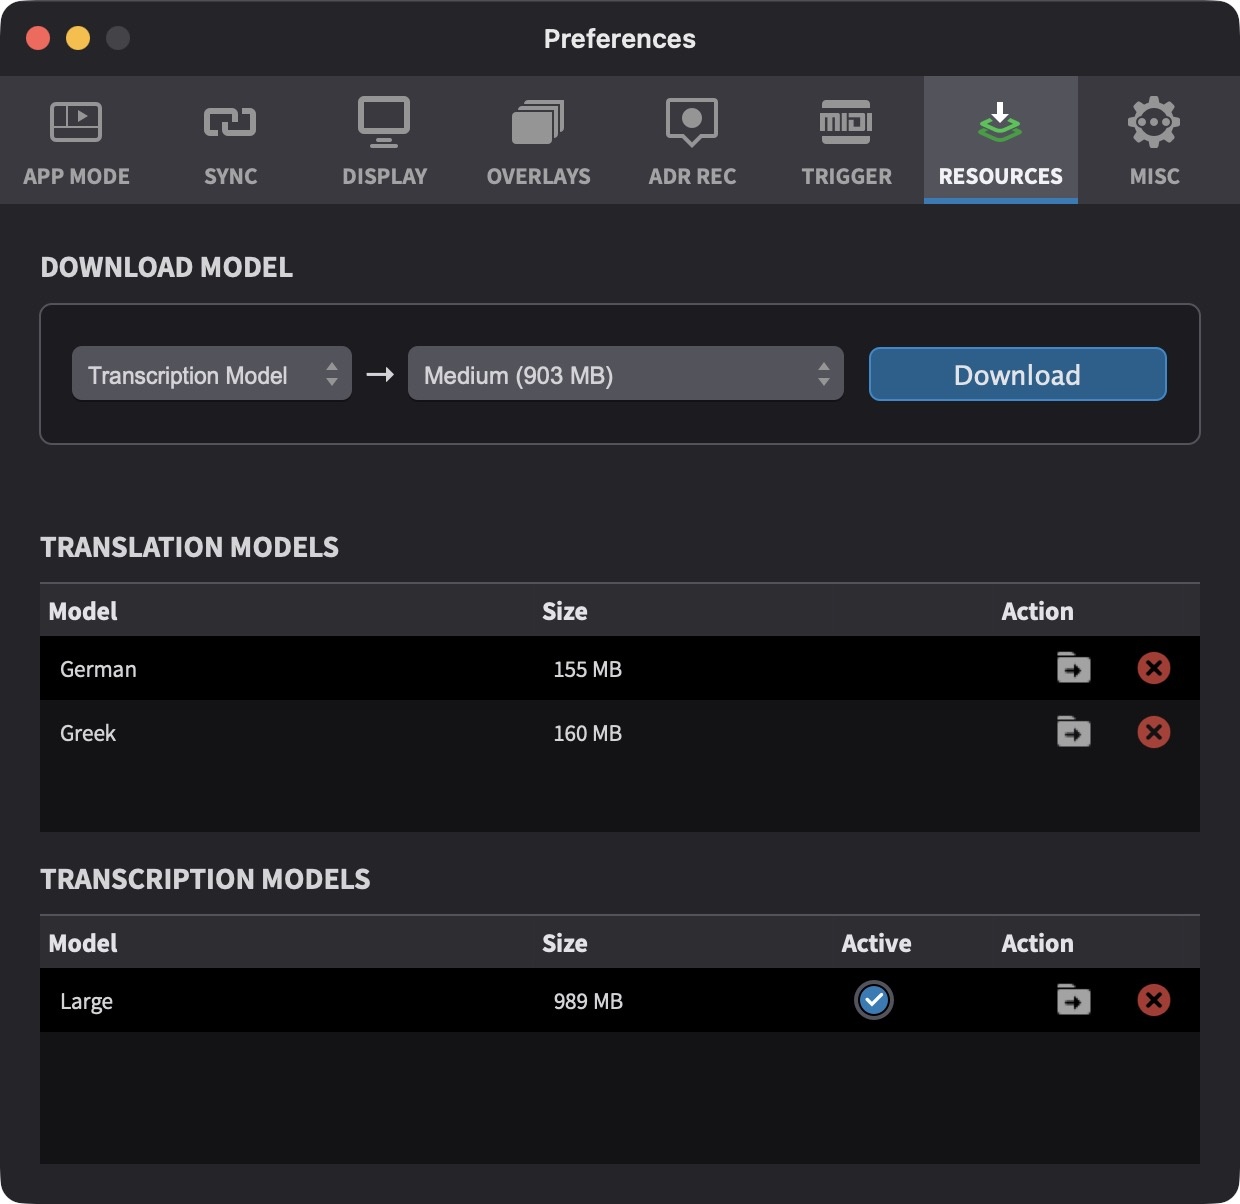
Before running a transcription in Media Mode, at least one Whisper model must be installed. Models are managed in the RESOURCES tab of the Preferences / Settings window. Set the model type pull-down to Transcription Model, choose a variant from the option pull-down, and click Download. The button shows a progress percentage while the download is in progress.
Two model variants are available:
- Medium - approximately 900 MB. A good balance between transcription quality and processing time, suitable for most material.
- Large - approximately 990 MB. Higher quality, particularly for noisy or accented speech, at the cost of slower processing.
Installed variants appear in the Transcription Models section lower in the same tab, where the active variant is indicated. To switch between installed variants, select the desired one. To remove an installed variant, select it and click Delete - if the deleted variant was active and another is installed, the remaining variant becomes active automatically.
Models are stored in the application's models folder, accessible via the Show Folder button in the RESOURCES tab.
 {width=70%}
Note: Transcription models are only required in Media Mode. In Pro Tools Integrated Mode, the transcription is generated by Pro Tools itself.
Running a Transcription on an Audio Track (Media Mode)
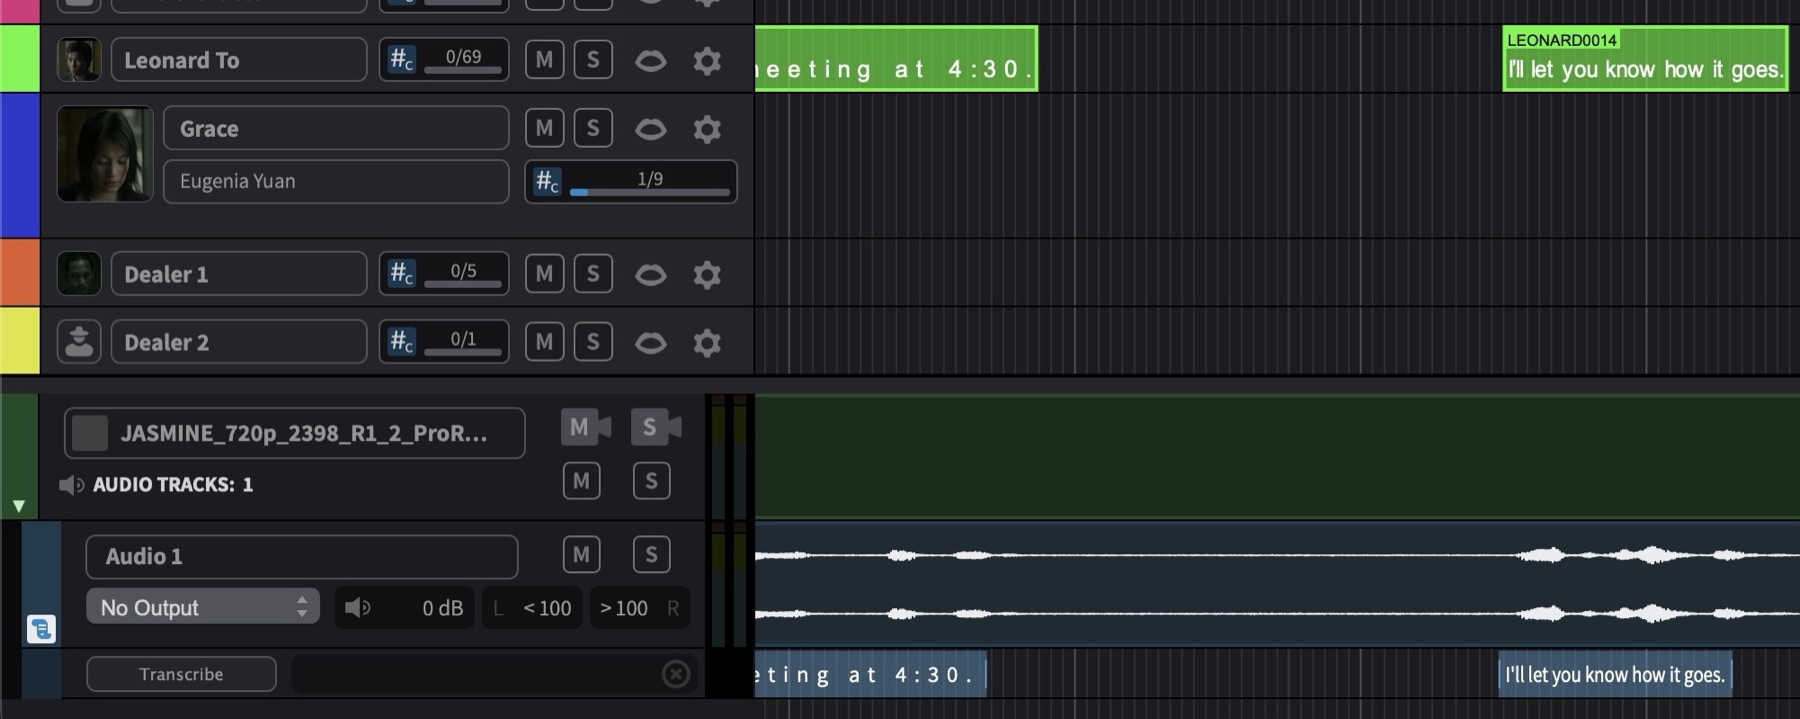
Each audio track header includes a Transcribe button. Click it to open the Transcription Settings dialog, which offers two settings:
Source Language - determines the language that the model expects to find in the audio. The default option, Detect from audio, lets the model detect the language automatically - this is typically reliable when the speech is in a single language and clearly audible. For mixed-language material, or when the model is mis-detecting the language, explicitly selecting the language from the list improves accuracy. Forty languages are supported, including English, German, French, Spanish, Italian, Portuguese, Dutch, Polish, Russian, Japanese, Chinese, Korean, and Arabic.
Range - defines the timecode range of the audio to transcribe. By default, the range matches the current timeline selection on the track, or - if there is no selection - the span from the first region's start to the last region's end on that track.
 {width=40%}
Click Start Transcription (or press Return) to begin. The dialog closes and a spinner appears on the track header showing the percentage complete, with a cancel button to abort the run.
Transcription proceeds in chunks. As each chunk completes, the results appear as sentence-level segments in a thin transcription lane drawn beneath the audio waveform. The lane updates live, so earlier results can be inspected while the rest of the track is still being processed. To cancel a transcription in progress, click the cancel button on the track header - any segments that have already been completed are kept.
 {width=80%}
Showing and Hiding the Transcription Lane
The transcription lane appears automatically the first time a track is transcribed and remains visible across save and load. To hide the lane on a specific track, right-click the track header and deselect Show Transcription Lane. To show it again, right-click the track header and re-enable the same option. Hiding the lane does not remove the transcription data.
Creating the Events in Pro Tools Integrated Mode
Make a timecode range selection in the Pro Tools session that covers the dialogue to convert. The selection must be on a single audio track - Pro Tools identifies speakers per audio file, so speaker IDs from different tracks are not comparable. If the selection contains clips from more than one source audio file, a confirmation dialog warns that speaker identification is limited to a per-file basis.
Choose Create Events from Transcription from the Event menu. Each detected sentence becomes one ADR Cue Event, with timecodes matching the sentence boundaries. Each speaker detected by Pro Tools is mapped to a Character Track named Character 1, Character 2, and so on, reusing existing characters of the same name where they already exist. Sentences with an unknown or absent speaker are placed on the no-character track.
Note: This requires Pro Tools 2025.6 or later with DAW Control enabled.
Creating the Events in Media Mode
Ensure a transcription exists on the audio track of interest. If the track has not yet been transcribed, run a transcription first using the Transcribe button on the track header.
Choose Create Events from Transcription from the Event menu. Each detected sentence becomes one ADR Cue Event, with timecodes matching the sentence boundaries. Assign speakers manually after the events are created by moving each cue to the appropriate Character Track.
Note: Media Mode does not include speaker detection - every sentence is placed on the no-character track.
Note: Transcription data is saved as part of the project file. Each audio track maintains its own transcription independently. When media is removed from a track, the corresponding transcription data is removed alongside it.
Editing ADR Cues
Adjusting In and Out Points
To trim an ADR Cue, move the pointer to the leading or trailing edge of the event until the trim icon appears, then click and drag to the new position. Hold Control while trimming to scrub the timeline audio, allowing precise placement by ear.
Alternatively, select the cue, scrub the playhead to the desired position, then press Shift & I to set the In Point or Shift & O to set the Out Point. These commands are also available from the Event menu as Set Playhead As Current Event's In Point and Set Playhead As Current Event's Out Point. These commands work in both Edit Modes.
To trim multiple selected ADR Cues at once, use Modify Selected Events from the Event menu to open the Batch Modify Events window. With the lock icon unlocked, a numeric offset can be applied to the In Point, Out Point, or both independently - so offsetting just the In Point changes the start without affecting the end, and vice versa.
Keyboard Trimming
ADR Cues can be trimmed frame-by-frame using keyboard shortcuts:
- Control & , (comma) - trim In Point earlier (make cue longer at the head)
- Control & . (period) - trim In Point later (make cue shorter at the head)
- Option & . (period) - trim Out Point later (make cue longer at the tail)
- Option & , (comma) - trim Out Point earlier (make cue shorter at the tail)
Editing Timecodes
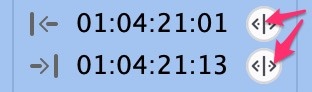
The In and Out timecode fields in the Event List, the Properties tab, and the Edit Event window can be edited in multiple ways. To scrub-adjust the timecode, click and hold the arrow button to the right of the timecode field and drag left or right. Dragging slowly produces finer changes, while dragging further produces larger changes.
 {width=30%}
To retype the timecode, click the field once so the entire timecode is selected, then type the full hours, minutes, seconds, and frames (excluding colons). The period and comma keys can be used as shortcuts to enter double zeroes into timecode fields, speeding up entry.
Press Enter or click elsewhere to confirm the new value.
To adjust only one specific timecode field (such as frames), double-click just that field so only it is selected, then retype the value.
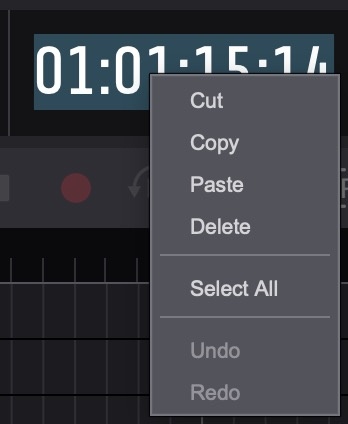
To copy and paste timecode values, double-click the timecode field to highlight it, then right-click to access a context menu with Cut, Copy, Paste, Delete, Select All, Undo, and Redo. This context menu is available on all timecode fields throughout the application - including the main counter, selection in/out counters, and timecode fields in the Properties tab, Edit Event window, and Event List. It allows timecodes to be copied from external sources - such as a DAW, spreadsheet, or email - and pasted directly into the field, or copied from Cue Pro and pasted elsewhere.
 {width=25%}
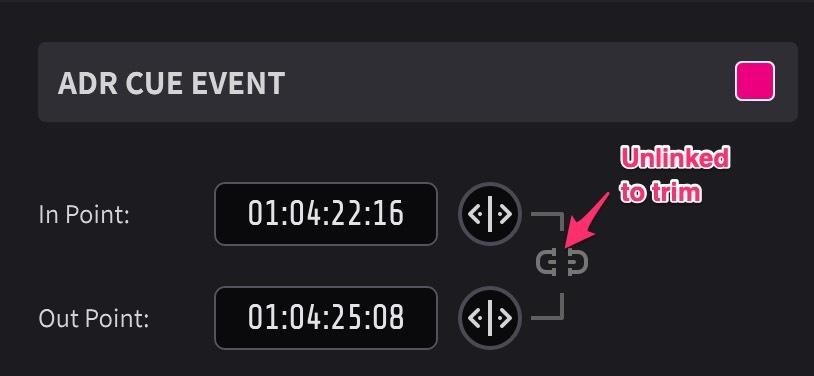
To trim an ADR Cue's start or end timecode independently, ensure the Link button between the In and Out Points is not enabled (un-linked). When unlinked, editing one timecode field adjusts only that boundary, keeping the other in place - useful for adjusting the start of a line without affecting the end.
 {width=50%}
The In Point of an ADR Cue marks the first frame of dialogue. The Pre Roll Streamer plays before this point, so the overlay will appear on screen earlier than the In Point itself.
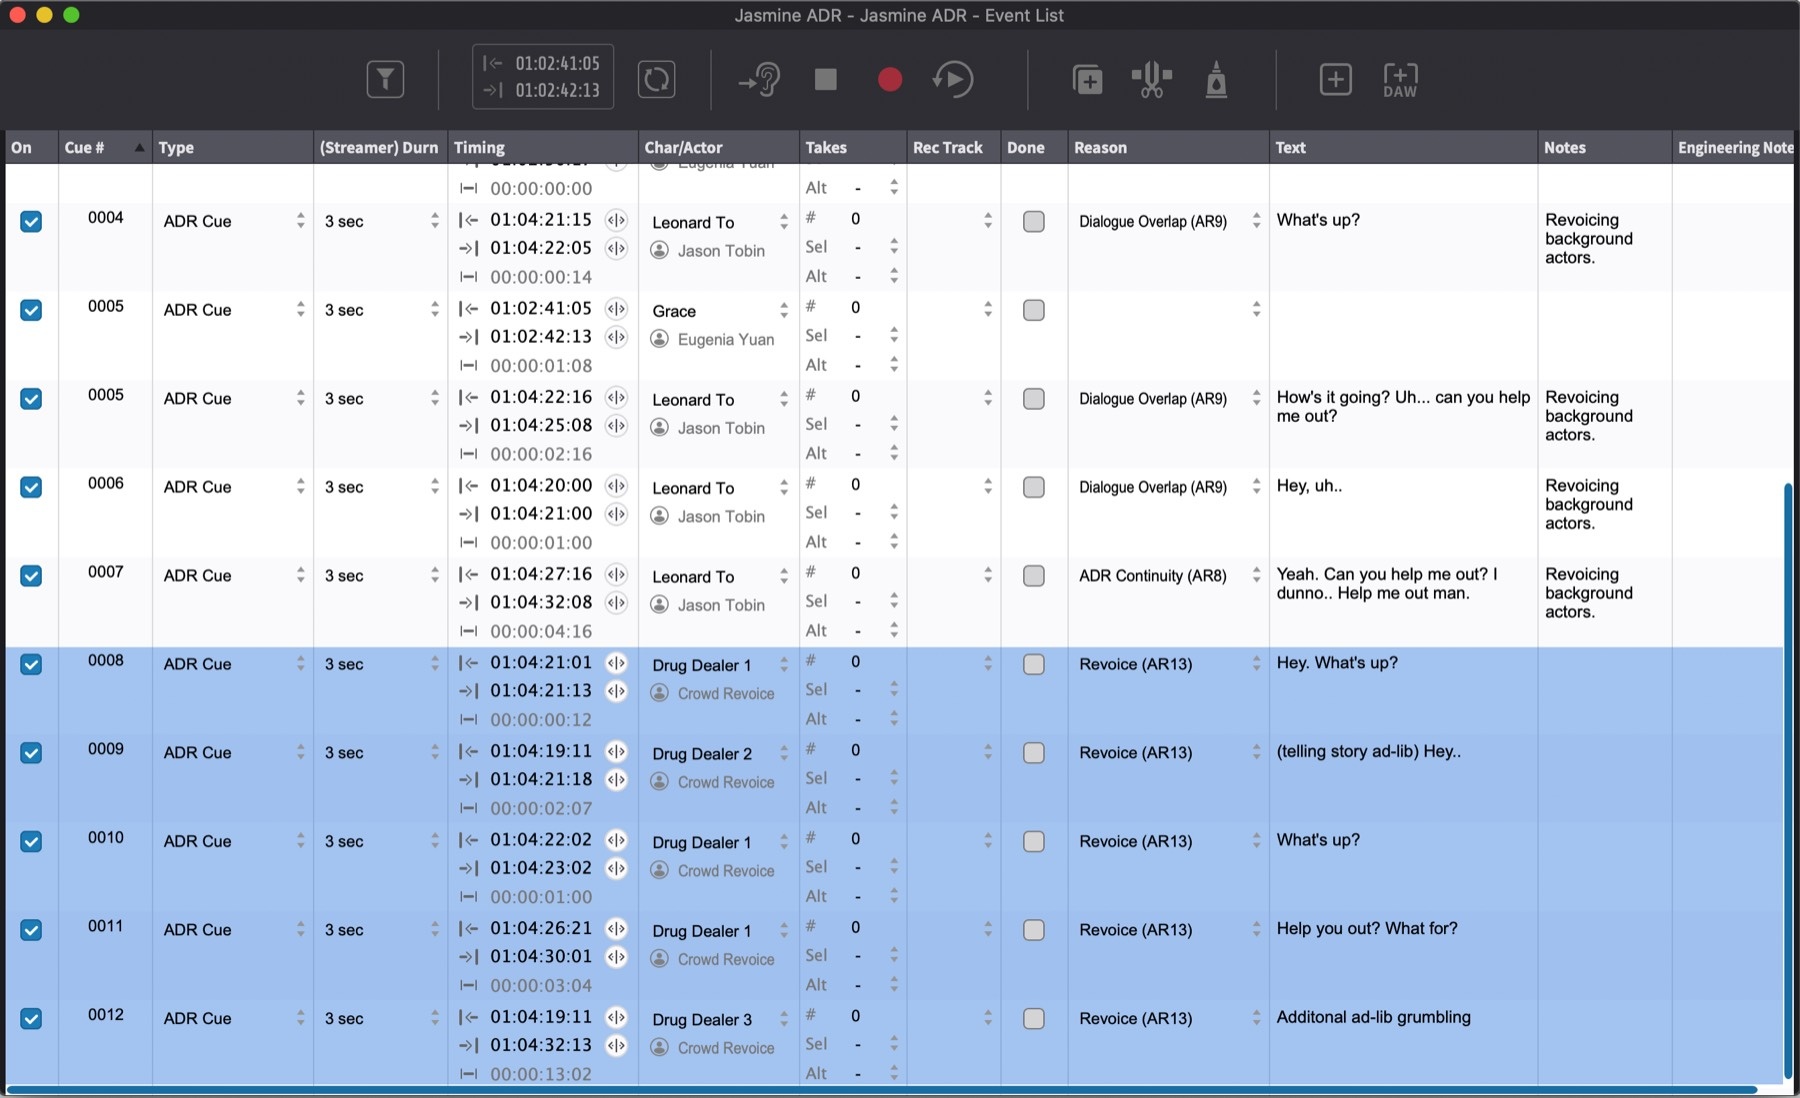
When multiple ADR Cues are selected, the Event List allows their common fields to be edited simultaneously - changes are applied to all selected events at once.
 {width=80%}
Moving ADR Cues
One or more ADR Cues can be moved on the timeline by clicking below the halfway point of the event (the hand symbol appears) and dragging to the new position.
Selected ADR Cues can be nudged frame-by-frame using the , (comma) key to move 1 frame earlier, or the . (period) key to move 1 frame later.
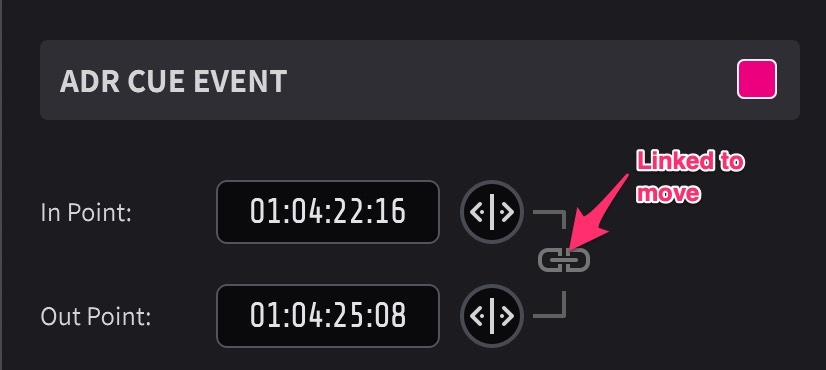
To move an ADR Cue while preserving its duration using timecodes, ensure the Lock icon is enabled (locked). When locked, editing the In Point automatically adjusts the Out Point by the same amount (and vice versa), preserving the overall duration of the cue.
 {width=50%}
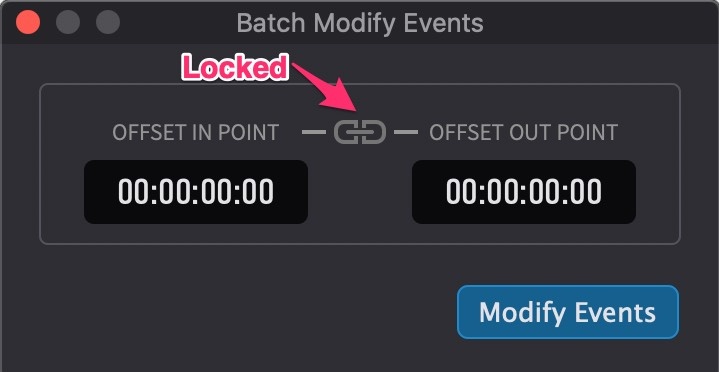
For precise numeric offset adjustments across multiple events, use Modify Selected Events from the Event menu to open the Batch Modify Events window. With the lock icon locked, a numeric offset moves both the In and Out Points by the same amount, preserving the duration.
 {width=50%}
Duplicating ADR Cues
To duplicate one or more selected ADR Cues while moving them to a new position, hold Option while dragging the events on the timeline.
Alternatively, with ADR Cues selected, press Command & D to duplicate them in place - the new ADR Cues are created at the exact same position as the originals, stacked on top. This command is also available from the Event menu as Duplicate Current Events.
Merging ADR Cues
To merge two or more ADR Cues into a single event, select the events and press Option & Command & M, or select Merge Selected Events from the Event menu.
Editing ADR Cue Text
To edit an ADR Cue's dialogue text, double-click the ADR Cue to open the Properties tab (Media Mode) or Edit Event window (Pro Tools Integrated Mode) and modify the Text field. Text can also be edited directly in the Text column in the Event List.
When an ADR Cue is selected in the Event List, the following keyboard shortcuts jump directly to specific fields for editing:
- T - Text
- Q - Cue Number
- N - Notes
- E - Engineering Notes
Splitting an ADR Cue
To split an ADR Cue at the current playhead position, select the event, scrub the playhead to the desired split point, and press B or select Split Current Event At Playhead from the Event menu.
If the ADR Cue contains text, the Split Text window appears, allowing the text to be divided between the two resulting events. Click at the desired split point in the text.
The split point can also be nudged using ← / → (by word) or Alt & ← / Alt & → (by character).
A Keep equal cue numbers toggle controls whether the resulting events retain the same cue number or receive suffixed numbers (e.g. "GRA01A" and "GRA01B").
Note: If the ADR Cue contains no text, the Split Text window is not displayed - the split occurs immediately at the playhead position.
 {width=60%}
Changing the Character of an ADR Cue
To reassign an ADR Cue to a different character, click and drag the event to the desired Character Track. Hold Control while dragging to lock the horizontal position, preventing accidental timecode changes.
Alternatively, click the Character selector field in the Properties tab, Edit Event window, or Event List and select the new character. When using the character field method, the cue is automatically moved to the corresponding Character Track and the cue number prefix is updated accordingly.
Deleting ADR Cues
One or more selected ADR Cues can be deleted by pressing the Delete key. This command is also available from the Event menu as Remove Selected Events.
Muting ADR Cues
One or more selected ADR Cues can be muted by pressing Command & M. Pressing the same shortcut again unmutes them. Muting an ADR Cue hides it from the overlay output without deleting it from the project. Muted events appear greyed out on the timeline. The mute state is also reflected in the On column in the Event List, where it can be toggled directly.
Anchors
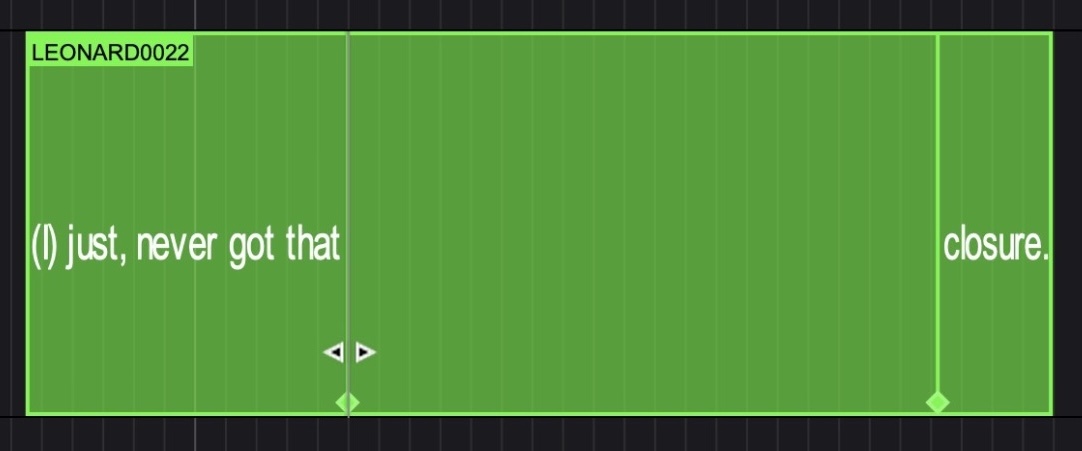
Anchors are the mechanism by which Rhythmo Bande text is synchronised to specific moments in the video. An anchor links a character position within the text to a precise timecode, ensuring that particular syllable or word crosses the Sync Marker at exactly the right moment.
A typical Rhythmo Bande cue contains multiple anchors distributed throughout the text. The start and end of each line are always anchored, and additional anchors may be placed at key sync points within the line - such as emphatic words, breath points, or moments where precise lip-sync is critical.
When cue data is imported from TTAL files, anchors are preserved automatically. TTAL files store anchor positions as part of their timing metadata, allowing Rhythmo Bande text to scroll with frame-accurate synchronisation from the moment of import.
Zooming into the timeline using the T key, Option & scroll, or trackpad pinch makes it easier to see and fine-tune anchor positions.
Adding an Anchor
To add an anchor, hold Shift and hover over the text in the Rhythmo Bande cue. A preview anchor appears which snaps to the start and end of words. Keep the cursor above the halfway point of the text so the I-beam cursor is visible. Click to place the anchor at the snap point.
 {width=80%}
Adding a Character-Level Anchor
To place an anchor at an individual character position and bypass word boundary snapping, hold Shift & Option and click at the desired character position in the text.
Scrubbing an Anchor
To hear audio at a specific anchor point and find the precise sync point, hold Control, click on the anchor point, and drag to scrub the audio.
Note: To hear Pro Tools® audio while scrubbing, ensure the Audio Guide Track is set correctly. The default Dynamic setting automatically follows the selected Pro Tools® track - confirm the correct track is selected in Pro Tools® before scrubbing.
 {width=80%}
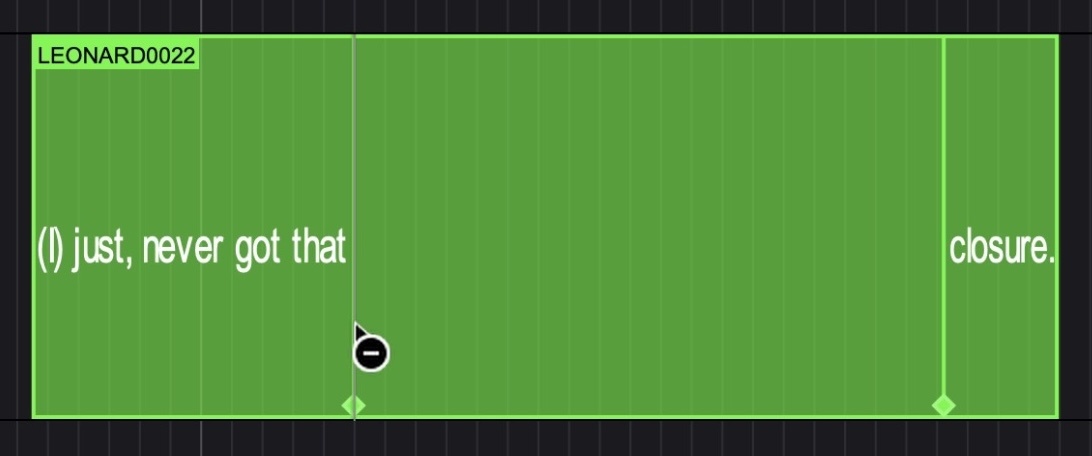
Deleting an Anchor
To delete an anchor, hold Option and click on the anchor.
 {width=80%}
Automatic Anchors When Merging
When separate cues are merged using Option & Command & M, anchor points are automatically added at the join points of the original cues. This preserves the timing relationships of the original events within the merged result.
Nested ADR Cues (Schachteltake)
A Schachteltake (nested ADR Cue) groups multiple dialogue lines into one combined recording pass - used when a single actor needs to record several short lines in rapid succession. In Rhythmo Bande mode, this is typically achieved by placing all text within a single cue and using anchors to control the timing of each phrase. The anchors ensure that each phrase crosses the Sync Marker at the correct moment, providing rapid-fire cueing within a single event. The traditional approach of assigning the same cue number to separate events is also supported.
Renumbering ADR Cues
To renumber ADR Cues, select the events to renumber and press Shift & Control & Option & Command & E, or select Assign Cue Numbers To Selected Events from the Event menu.
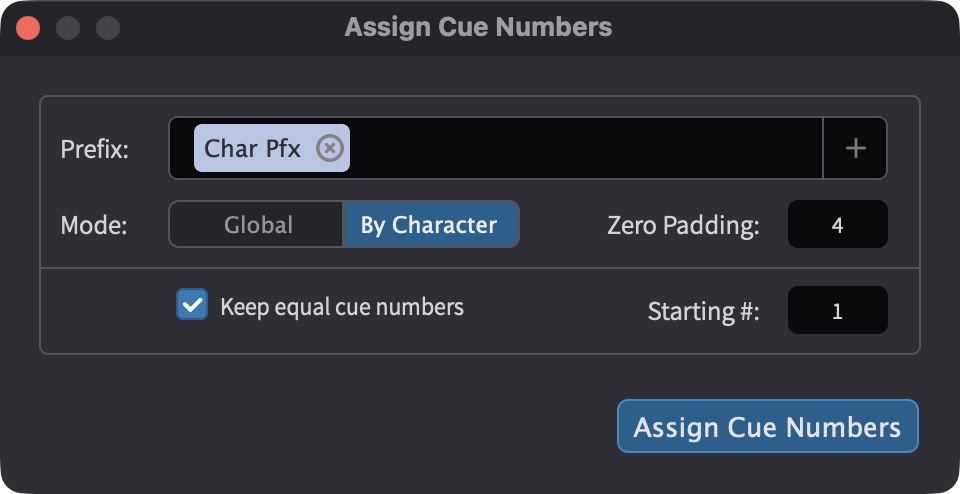
The Assign Cue Numbers window provides the following options:
 {width=60%}
Prefix - add one or more character prefixes to include in the renumbering operation. Click the + button to add a prefix tag.
Mode - select By Character (each character starts numbering from the starting number using its own prefix) or Global (a single counter across all selected characters).
Zero Padding - adds leading zeros to cue numbers (e.g. "GRA0001" instead of "GRA1").
Keep equal cue numbers - when enabled, existing nested ADR Cues retain their shared cue numbers during renumbering.
Starting # - the number from which cue numbering begins.
Multiple characters can be renumbered simultaneously while retaining their unique prefixes.
Reason Codes
Each ADR Cue can be assigned a reason code explaining why the line requires ADR. Reason codes are selected from the Reason field in the Properties tab, Edit Event window, or Event List.
Reason codes are organised into four main categories plus user-defined codes:
Actor Reasons - relating to the performance: New Line, Line Change, Alt Delivery, Clarity, Pronunciation, Projection, Accent, ADR Continuity, Dialogue Overlap, Breaths/Efforts, V.O., Temp ADR, Swearing, Revoice, Foreign Dubbing.
Sync Sound Reasons - relating to the production sound recording: Mic Off-Axis, Low Level, Distortion, Wind On Mic, Radio Mic Rustling, Boom Handling, Mic Drop-Out, Mic Interference, Missing Channel, Audible Sound Edit, Incorrect Sync, No Sync Sound.
Location Reasons - relating to the recording location: Noisy Background, Camera & Crew, Footsteps, Props, Modern Sounds.
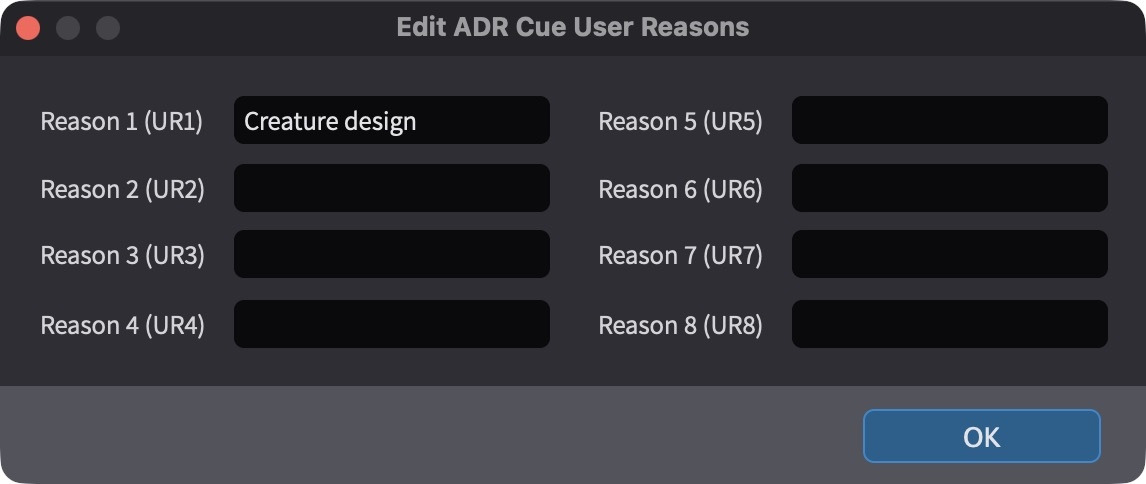
User Reasons - eight custom reason codes that can be defined per project. To add or edit user reasons, click the Edit Reason Codes button in the toolbar.
 {width=60%}
Shortcut categories - Most Used and Last Used provide quick access to frequently or recently selected reason codes.
Forced Narrative
For foreign language dubbing, Forced Narrative provides on-screen text to clarify story points that are not present in the dubbed audio - for example, an on-screen sign, text message, or location identifier that has been translated. These subtitles are "forced" because they are always displayed to the viewer regardless of subtitle settings.
To mark an ADR Cue as Forced Narrative, enable the Forced Narrative checkbox in the Event List. Select the FN Region to specify where the subtitle appears on screen: Bottom, Top, Left, or Right. The region should be chosen to avoid obscuring the on-screen text or graphic being translated - for example, if a translated sign appears at the bottom of the frame, place the Forced Narrative subtitle at the Top so both the original and the translation remain visible.
Open-Ended Cues
Each ADR Cue has an Open Ended checkbox, available in the Properties tab, Edit Event window, and Event List. When enabled, recording for that cue continues past the Out Point until manually stopped, rather than stopping at the Out Point. This is useful for lines where the exact end point is flexible or unknown.
The Open Ended checkbox overrides the global recording behaviour on a per-cue basis - even if the global Event Record Mode is not set to open-ended, individual cues marked as Open Ended will still record past their Out Point.
A global Event Record Mode setting is also available by right-clicking (or Control-clicking) the Record button. Setting the mode to Single w/ open end causes all cues to record open-ended regardless of their individual Open Ended checkbox value. For full details on Event Record Mode, see the Event Record Mode section in the ADR Recording with Cue Pro and Pro Tools chapter.
Adjusting Recording Status
Each ADR Cue carries a Done checkbox that tracks whether the line has been recorded. The checkbox is set automatically after the first recording pass and can be toggled manually to flag cues for re-recording. The Done state feeds into the progress counters on each Character Track and is preserved in exports and cue sheets. For full details on how Done interacts with the recording workflow, see the ADR Recording with Cue Pro and Pro Tools chapter.
Cue and Word Counts
The CHARACTERS header bar includes two toggle buttons - #c and #w - which switch between displaying the cue count and the word count on each Character Track header.
When #c is active, each Character Track header displays the total number of cues for that character. This is useful during the cueing process to monitor how many lines have been spotted per character and to balance workload across a session.
When #w is active, the counter switches to word count - showing the total word count across all cues for that character.
During recording, the same counters also show recording progress - the number of cues marked as Done out of the total (e.g. "2/33"), with a progress bar. For details on how these counters track recording progress, see the ADR Recording with Cue Pro and Pro Tools chapter.
Flagging Cues as To Be Written (TBW)
TBW cues typically arise when new dialogue is needed that was never in the original script - for example, an added line delivered over a cutaway, a background extra given dialogue to enhance a scene, or a new voiceover section.
To flag a cue as TBW, enable the TBW checkbox in the Properties tab, Edit Event window, or Event List.
The TBW column in the Event List can be used as a sort criterion to quickly group all TBW cues together.
TBW status is visible on Engineer and Director cue sheet layouts, and the ADR Overview sheet includes a per-character TBW line count.
When batch exporting, separate TBW sheets are also automatically generated alongside the main cue sheets if any cues are marked as TBW. These can be sent to the script writer, who writes the approved dialogue and returns the file.
The updated text can then be re-imported to populate the cue text, and the TBW flag can then be manually unchecked once each line is confirmed. The import and export steps of this round-trip workflow are covered in detail in the Word format export and import chapters later in this manual.
Marking a Cue as B&E (Breaths & Efforts)
B&E cues are non-dialogue vocal cues - breaths, efforts, grunts, screams, reactions, and other non-verbal vocal sounds. These cues are fundamentally different from dialogue: they require significantly less recording time per cue and are often recorded in batches. They are typically shorter and may not require text in the Text field.
To flag a cue as B&E, enable the B&E checkbox in the Properties tab, Edit Event window, or Event List.
If the Text field is empty when the B&E flag is first enabled on a cue, default text is automatically inserted: Breaths & Efforts.
The B&E column in the Event List can be used as a sort criterion to separate dialogue cues from presence cues during a session.
Setting On/Off Screen Status
To indicate whether the character's mouth is visible on screen during the line, set the On/Off Screen pull-down in the Properties tab, Edit Event window, or the On/Off Scr column in the Event List. This determines whether the performance requires precise lip-sync matching, and is also a factor in estimating recording time - off-screen cues are typically faster to record. The four states are:
- On - the character is on screen throughout the line and lip-sync matching is required
- Off - the character is off screen throughout the line and delivery timing is more flexible
- On → Off - the character starts on screen and moves off screen during the line
- Off → On - the character starts off screen and appears on screen during the line
The four values follow the Netflix TTAL specification and are preserved on TTAL import and export.
Adding Notes
To add notes to an ADR Cue, type in the Notes field in the Properties tab, Edit Event window, or Event List. The field supports rich text formatting (bold, italic, underline, strikethrough, and colour).
Notes are general-purpose and typically visible on cue sheets distributed to talent and the ADR supervisor - they might include performance direction, context about the scene, or pronunciation guidance.
Adding Engineering Notes
To add engineering notes to an ADR Cue, type in the Eng. Notes field in the Properties tab, Edit Event window, or Event List. The field supports the same rich text formatting as the Notes field (bold, italic, underline, strikethrough, and colour).
Eng. Notes are intended for the recording engineer and typically contain technical instructions - such as processing notes, track routing, or specific recording requirements for the line. During a recording session, the engineer can also use this field on the printed cue sheets to write notes back to the dialogue editor about a particular take.
Take Count
The Takes field tracks how many takes have been recorded for a cue. It is available in the Properties tab, Edit Event window, and the # column under Takes in the Event List. The count increments automatically during recording and can also be edited manually. The Sel and Alt pull-downs in the Event List allow the preferred and alternative takes to be marked. For details on how the take counter interacts with Pro Tools take numbering, see the ADR Recording with Cue Pro and Pro Tools chapter.
Assigning a Recording Track
Each ADR Cue has a Rec Track field - available in the Properties tab (Media Mode), the Edit Event window (Pro Tools Integrated Mode), and the Event List - that determines which Pro Tools track the cue records to. The available track numbers correspond to tracks configured in the recording matrix. For full details on setting up the recording matrix and how track assignment works, see the ADR Recording with Cue Pro and Pro Tools chapter.
Overriding Pre Roll Colour
To override the default Pre Roll Streamer colour for a specific cue, set the Pre Roll Color column in the Event List. This is useful for visually distinguishing certain cues during a session - for example, using a different colour to indicate priority lines, retakes, or cues that require special attention.
Reconformation State
To check whether a cue has been affected by a reconform operation, view the Reconf State column in the Event List. When a project is reconformed to a new picture edit via Matchbox2, cues may be shifted, split, or flagged as requiring review. The Reconf State field tracks this status, allowing editors to identify and address cues that need attention after a reconform. This workflow is covered in detail in the reconform chapter.
Viewing TTAL Detection Symbols
Each Character Track header includes a detection symbols toggle (the lip icon). This shows or hides lip-motion detection symbols for that character. Detection symbols indicate the beginnings and ends of sentences, labials, semi-labials, and other mouth positions - they assist the adaptation writer in choosing words that correspond to the on-screen character's lip movements.
Detection symbol data is imported from TTAL files (the Netflix foreign versioning format). When a TTAL file is imported, the detection symbols are extracted and displayed per character on the corresponding Character Track. The toggle allows individual characters' symbols to be shown or hidden independently.
Hovering over a detection symbol displays a tooltip identifying the symbol type - for example, labial, semi-labial, or sentence boundary. This makes it possible to inspect individual symbols without needing to refer back to the TTAL specification.
In Timeline Range Mode, detection symbols can be navigated on the timeline using the Tab key. Press Tab to move the playhead forward to the next detection symbol, and Option & Tab to move backward. The playhead stops at each detection symbol position, making it straightforward to navigate through the lip-motion data alongside the dialogue. Hold Shift while pressing Tab to make a timeline selection as the playhead advances.
For full details on TTAL import and detection symbol data, refer to the How to use TTAL with Cue Pro chapter.
Muting and Soloing Character Tracks
Each Character Track header includes M (Mute) and S (Solo) buttons, which behave like their audio track equivalents in a DAW. Mute hides that character's ADR Cue overlays from the video output without removing the cues from the project. Solo isolates a single character - only that character's ADR Cue overlays are rendered, and all other characters are temporarily muted. Events belonging to a muted or non-soloed Character Track appear greyed out in the Event List but are not hidden from the list.
Filtering ADR Cues
ADR Cues can be filtered to show only the cues that match specific criteria. Filtering affects the overlay output (only matching cues are rendered on the video), the Character Tracks (only matching cues are displayed), and the Event List (only matching cues appear in the list). Filtering also determines which cues are included when exporting ADR Cues (see the Exporting ADR Cues chapter).
The filter controls are accessible from two locations: the filter icon on the CHARACTERS header bar, and the filter icon in the Event List header. Click either filter icon to open the filter panel. When a filter is active, the filter icon is highlighted.
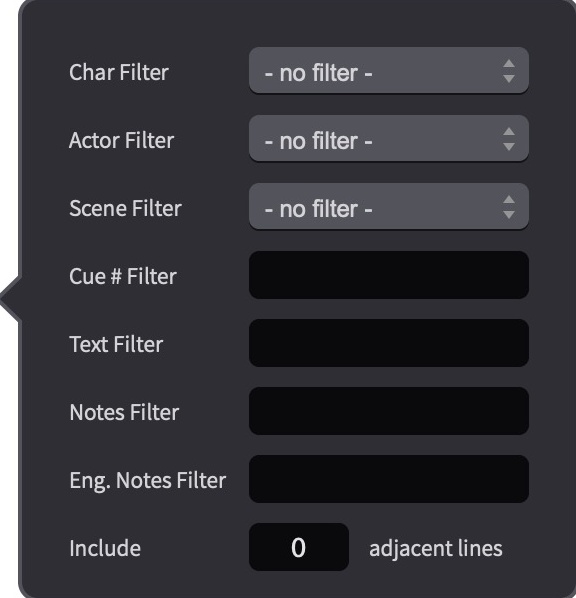
The filter panel provides pull-down filters for Character, Actor, and Scene, and text fields for Cue #, Text, Notes, and Eng. Notes. The pull-down filters restrict the list to the selected value. The text fields use contains matching - entering text in the Cue # filter, for example, shows all cues whose number contains the entered string.
Include [n] adjacent lines - when set to a value greater than zero, the filter results include the specified number of cues from other characters immediately before and after each matching cue, even though those lines would otherwise be filtered out. This provides surrounding dialogue context - for example, when filtering for a specific character and setting this to 1, the talent will also see the adjacent lines of other characters so they know what they are reacting to.
Multiple filter fields can be combined - for example, filtering by Char Filter and Text Filter simultaneously will show only cues for that character where the dialogue text contains the specified text.
 {width=35%}
A filter enable/disable toggle is located to the left of the filter controls on the CHARACTERS header bar. This allows the current filter settings to be temporarily disabled - showing all ADR Cues - without losing the filter configuration. Clicking the toggle again re-enables the filter with its previous settings intact.
Sorting Events
The Event List can be sorted by clicking a field heading to sort by that column. Clicking again switches between ascending and descending order.
Fields that are not available as filter criteria - such as Done, TBW, Reason, and B&E - can still be located by sorting the Event List. Sorting is useful both for organising filtered results and for working through the full unfiltered list.
Customising the Event List
Column order can be rearranged by clicking a column header and dragging it to a new position.
Column width can be adjusted by clicking the right edge of a column header and dragging.
Columns can be shown or hidden by right-clicking (or Control-clicking) any column header.
 {width=90%}
Scene Information
Each ADR Cue inherits its scene number and description from the SCENES track, based on the cue's timecode position. The cue is assigned to the scene whose start point falls immediately before the cue's In Point on the timeline. When a cue is moved or a scene entry is repositioned, the scene assignments update automatically.
The inherited scene data is displayed in the Scene column in the Event List, showing the scene number and scene description together (for example, "18 - INT. LIVING ROOM - NIGHT").
Scene information on ADR Cues is read-only - it cannot be edited directly on the cue. To change a cue's scene assignment, either move the cue to a different position on the timeline or adjust the scene entries on the SCENES track. For full details, see the Scenes Track chapter.
Translation
Cue Pro includes built-in translation for ADR Cue dialogue, intended to support foreign-language adaptation workflows. A source script can be translated into a target language as a starting point for the adapter. The translated text is written into each event's Alt Text field, leaving the original source text untouched in the main Text field. Both versions live side-by-side on the same event and can be swapped at any time.
Translation runs locally using downloadable language models - no text is sent to any third-party service, and no internet connection is required once the models are installed.
When translating between two non-English languages, the translation is performed in two passes - first from the source language into English, then from English into the target language. This means both language models must be installed (for example, German and French models to translate from German to French). When one of the two languages is English, only a single model is needed.
Downloading Translation Models
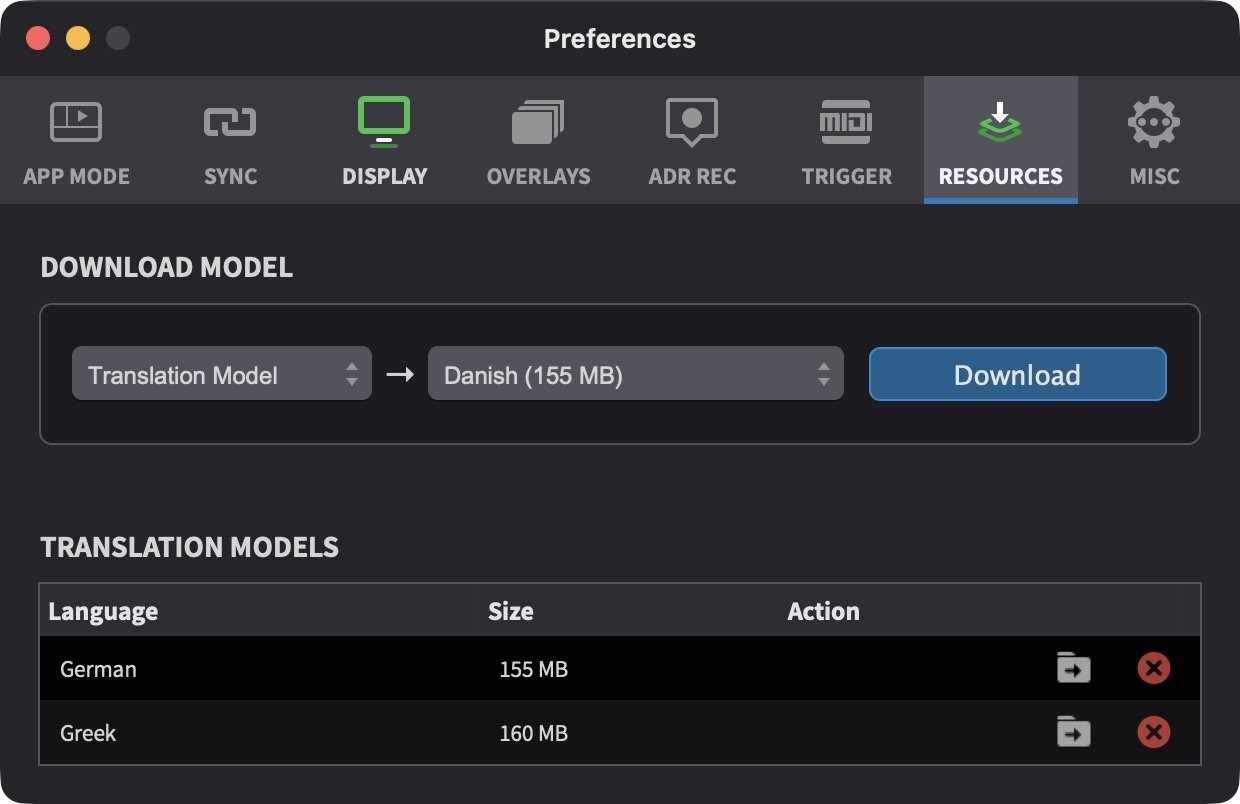
Translation models are managed in the RESOURCES tab of the Preferences / Settings window. Set the model type pull-down to Translation Model, choose a language from the option pull-down, and click Download. Each language download includes both directions (language-to-English and English-to-language), totalling approximately 155-160 MB per language.
Installed languages appear in the Translation Models section lower in the same tab. Languages can be removed individually from this list when no longer needed.
The supported languages are: Bulgarian, Catalan, Croatian, Czech, Danish, Dutch, Estonian, Finnish, French, German, Greek, Hebrew, Hungarian, Icelandic, Indonesian, Italian, Lithuanian, Malay, Norwegian, Polish, Portuguese, Romanian, Russian, Slovak, Spanish, Swedish, and Ukrainian. Translation between any two of these languages, or between any of them and English, is supported. For language requests, contact support@nonlethalapps.com.
 {width=70%}
Setting Source and Destination Languages
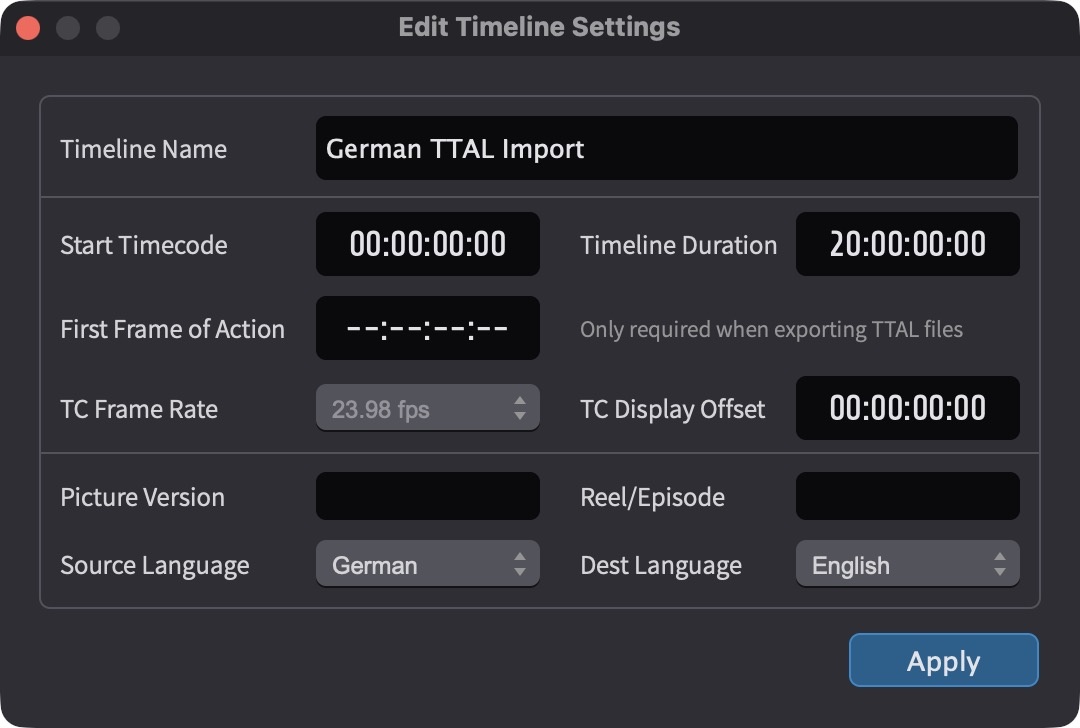
The source and destination languages for translation are configured per timeline. Open Edit Timeline Settings (accessible by double-clicking the timeline tab, or by right-clicking the tab and choosing Edit Timeline Settings) and set the Source Language and Dest Language pull-downs to the appropriate languages. Both must be set before translation can run.
The source language should match the language of the script as currently written in the events' main Text field. The destination language is the language to translate into.
 {width=60%}
Translating ADR Cues
To translate one or more ADR Cues, select the cues in the Event List or on the timeline, then choose Translate Text of Selected Events from the Event menu.
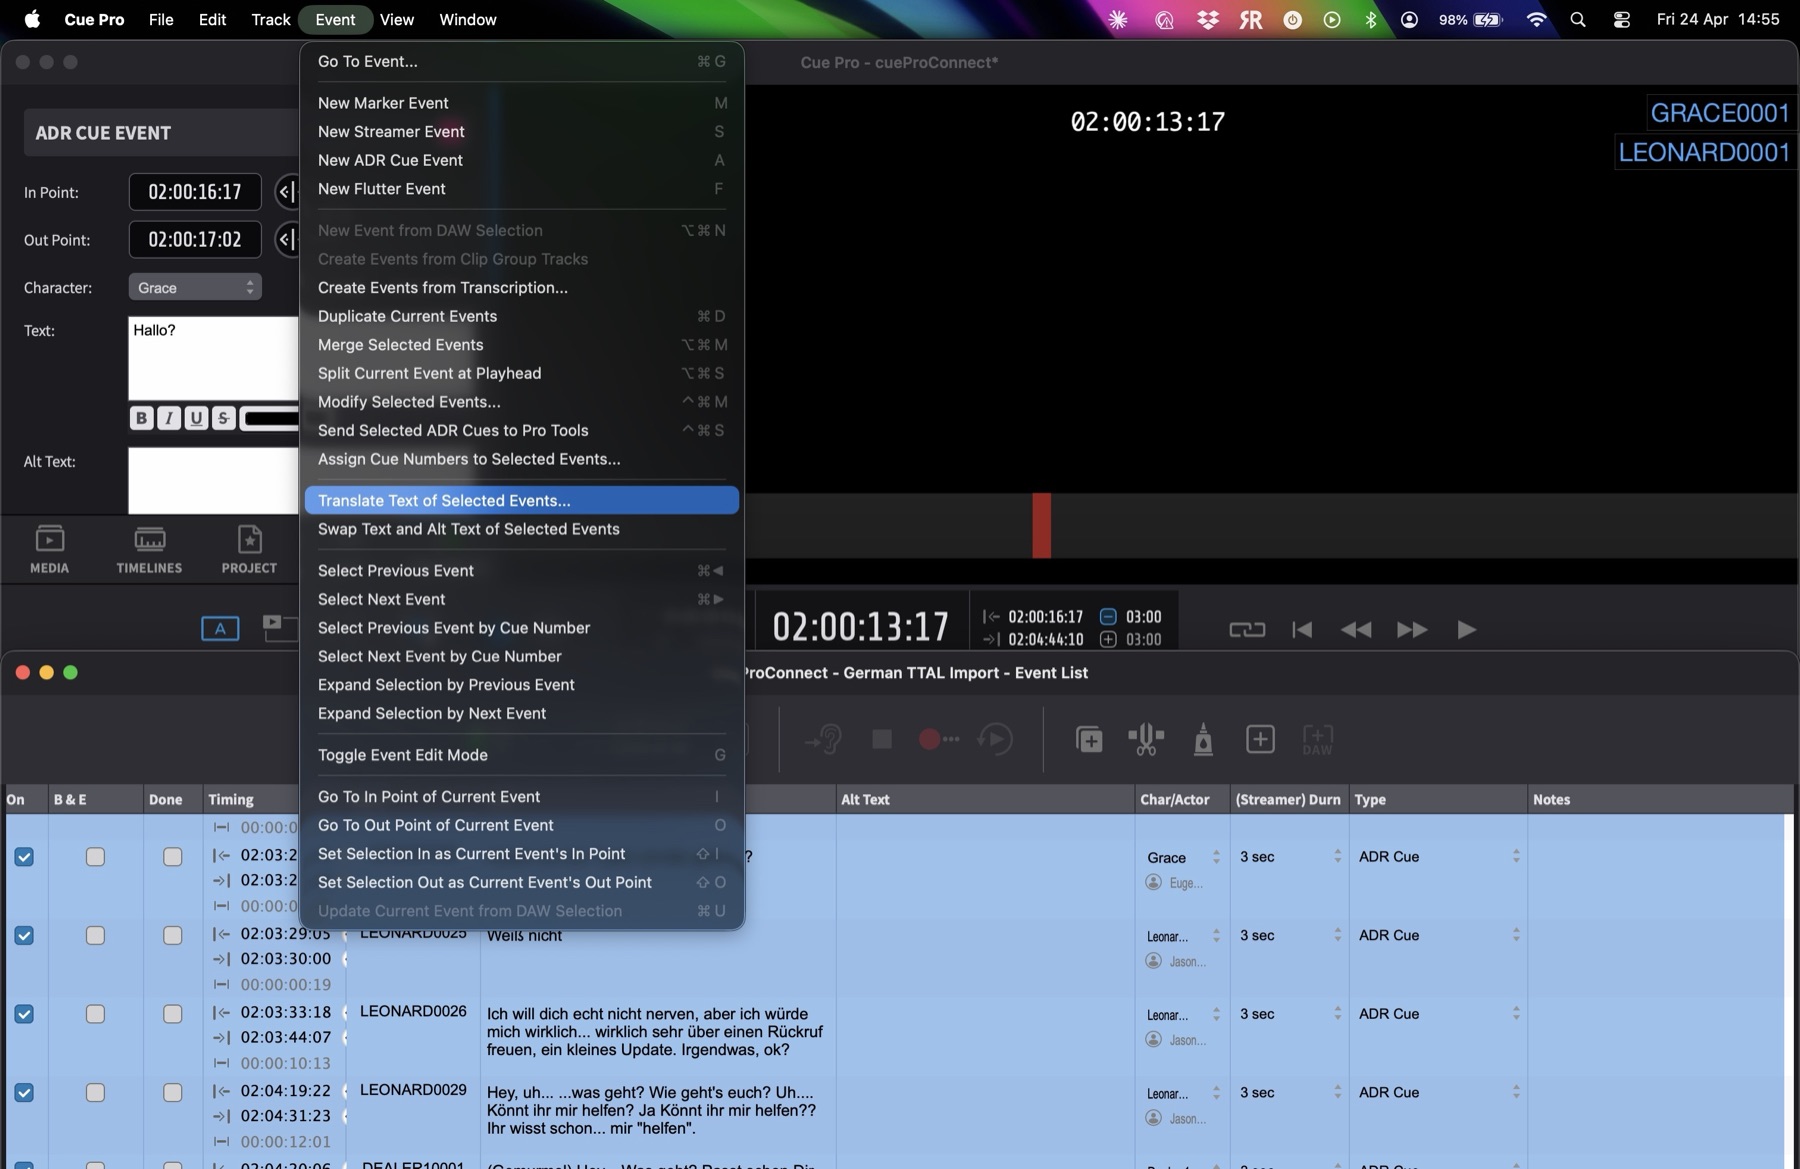 {width=80%}
Cue Pro reads the source and destination languages from the active timeline and translates the Text field of each selected cue, writing the result into the Alt Text field.
If either of the required language models is not installed, a dialog reports which models are missing and offers to install them. Choosing Install starts the downloads in the background and opens the RESOURCES tab so download progress can be tracked. Once the downloads complete, the translation can be re-run from the Event menu.
If any of the selected events already have content in the Alt Text field, a confirmation dialog warns that translating will overwrite the existing alt text. Continue proceeds with the translation; Cancel leaves all events untouched.
A progress window appears while the translation runs, showing the number of events processed and a percentage indicator. The translation can be cancelled at any time - events translated before cancellation keep their result, while remaining events are left untouched.
The operation is recorded as a single undo step, so the entire translation can be reverted with Edit → Undo if the results are not satisfactory.
After translation, both the Text and Alt Text columns are populated in the Event List - the original dialogue in Text and the translated version in Alt Text. The Alt Text field is also visible in the Properties tab, where it can be reviewed and edited manually.
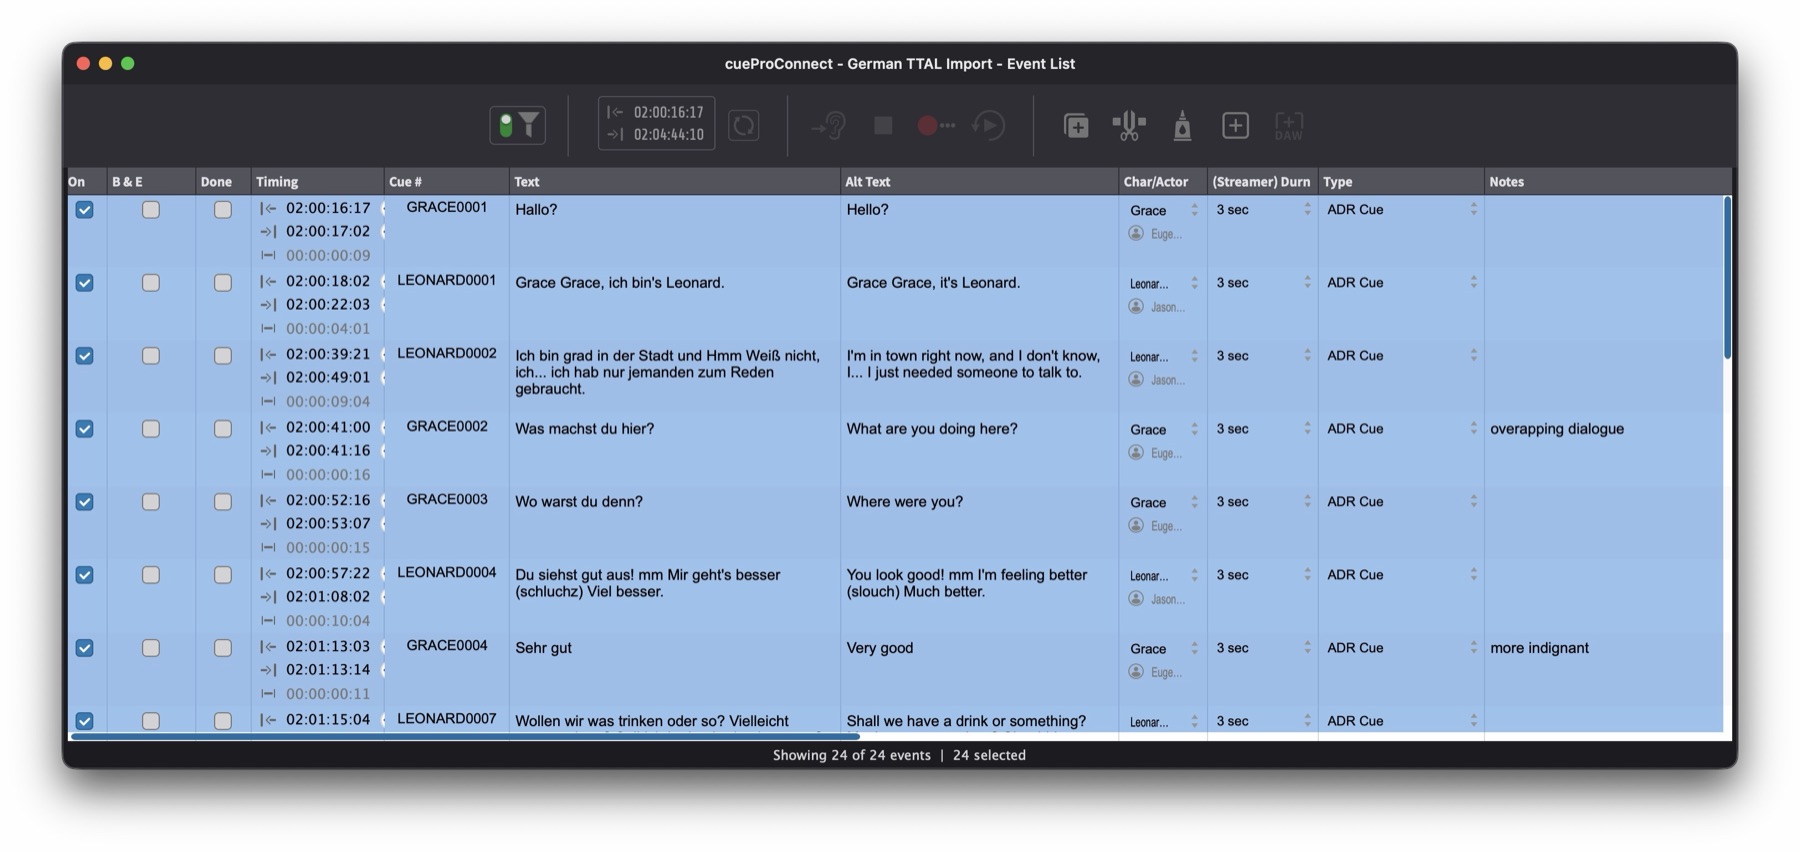 {width=80%}
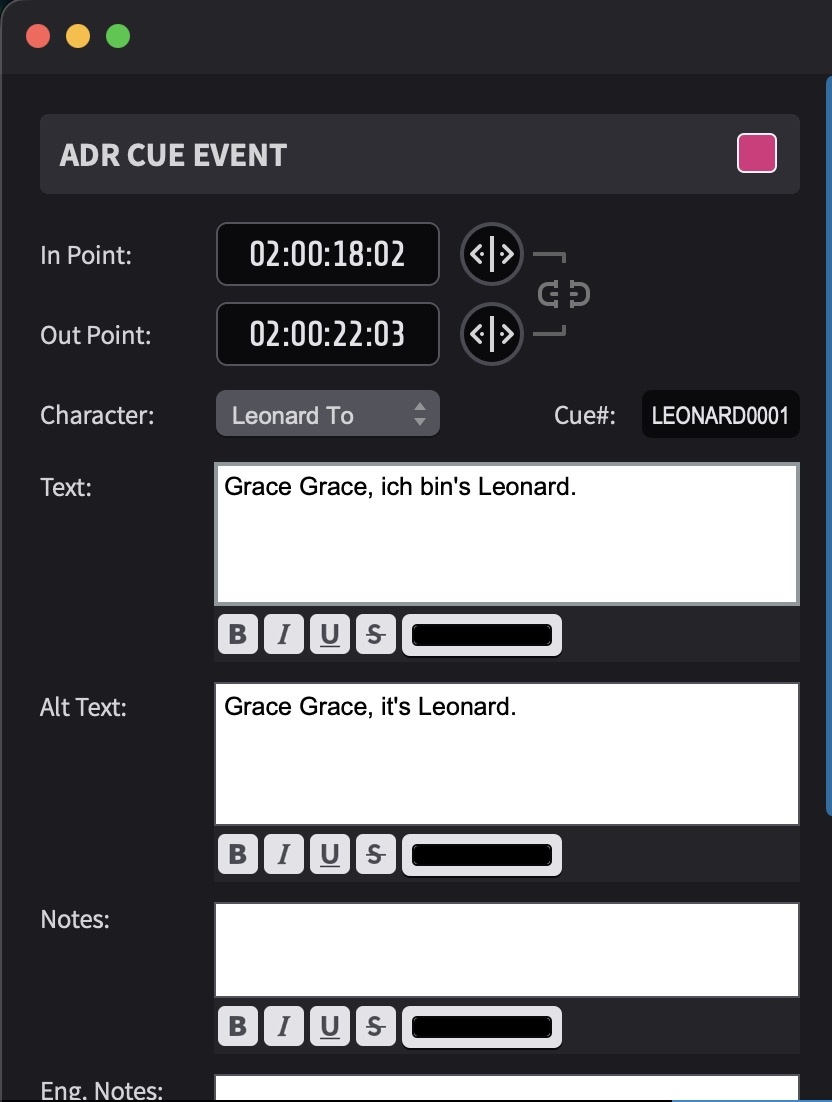 {width=50%}
Swapping Text and Alt Text
To swap the contents of the Text and Alt Text fields - for example, to move the translated dialogue into the primary Text field for overlay display - select the cues in the Event List and choose Swap Text and Alt Text of Selected Events from the Event menu. This exchanges the two fields on all selected cues. The source version is then kept as a reference in Alt Text.
Adapters typically work by reviewing both columns in the Event List and editing the Alt Text column directly until the translation reads naturally and fits the timing. Once the adaptation is final and ready to drive recording, the swap command moves the translated version into the main Text field, where the overlays display from.
Note: Translation runs entirely on the local machine. No event text is transmitted to any third-party service, and no internet connection is required after the models have been installed. Model files are stored in the application's models folder, accessible via the Show Folder button in the RESOURCES tab.
Navigating Events
The Event List provides several methods for navigating between events:
- ↑ or Command & ← to select the previous event
- ↓ or Command & → to select the next event
These commands navigate through all visual events in the Event List, not just ADR Cues. Navigation follows the current sort order. If navigation behaves unexpectedly, check which column the list is sorted by and whether it is set to ascending or descending order.
When Cue Pro is not in focus, system-wide hotkeys can be used to navigate between events where they have been configured in Preferences / Settings. Command & F5 selects the previous event and Command & F6 selects the next event.
For ADR Cues specifically, cue-number-based navigation is also available:
- Option & F1 - select previous event by cue number
- Option & F2 - select next event by cue number
These commands select all events that share the same cue number.
On Macs where F keys are not configured to act as standard function keys, Fn must also be held - for example, Command & Fn & F5. This setting can be found in System Settings → Keyboard → Function Keys.
The Go To command (Command & G) allows quick navigation directly to a specific event. Pressing the shortcut opens a text input box. Begin typing and a list of matching candidates from all event types appears immediately below. Clicking an event from the list selects it and moves the playhead to its position.
Typing # followed by a cue number searches specifically by cue number — for example, entering #12 will find all cues containing 12 in their cue number.
 {width=60%}
Selection expansion commands allow multiple events to be selected quickly. These commands apply to all visual event types, not just ADR Cues:
- Command & Option & A includes all events before the current selection
- Command & Shift & A includes all events after the current selection
- Command & A selects all events in the list
Navigating ADR Cues on the Timeline
In Timeline Range Mode, ADR Cues can be navigated directly on the timeline using the Tab key. Press Tab to move the playhead forward to the next event boundary, and Option & Tab to move backward. The playhead stops at the In Point and Out Point of each ADR Cue, making it straightforward to navigate through cues on the timeline. When an ADR Cue contains anchors, the playhead also stops at each anchor position within the cue.
To navigate through ADR Cues on multiple Character Tracks, click and drag across the desired tracks in the timeline to include them in the selection - the playhead will then stop at the boundaries of every ADR Cue across all selected tracks.
Hold Shift while pressing Tab to make a timeline selection as the playhead advances, extending the selection from the current position to the next event boundary. Shift & Option & Tab extends the selection in the opposite direction.
When navigating the timeline - whether by clicking a position, tabbing between events, or using any other navigation method - the Event List automatically updates to show the events at the current timeline position. The selected event appears at the top of the Event List window, ensuring the list always reflects the current working area without needing to scroll manually.
Event Selection Playhead Behaviour
Settings under Preferences / Settings → OVERLAYS → General tab control what happens when an event is selected:
When an event is selected - choose between Go to Start (playhead moves to the start of the Pre-Roll), Go to In Point (playhead moves to the In Point of the cue), or Don't move Playhead (playhead stays in place).
If Events are Selected - choose between Show Only Selected (only the selected event's overlays are rendered) or Show All (all events' overlays are rendered during playback).
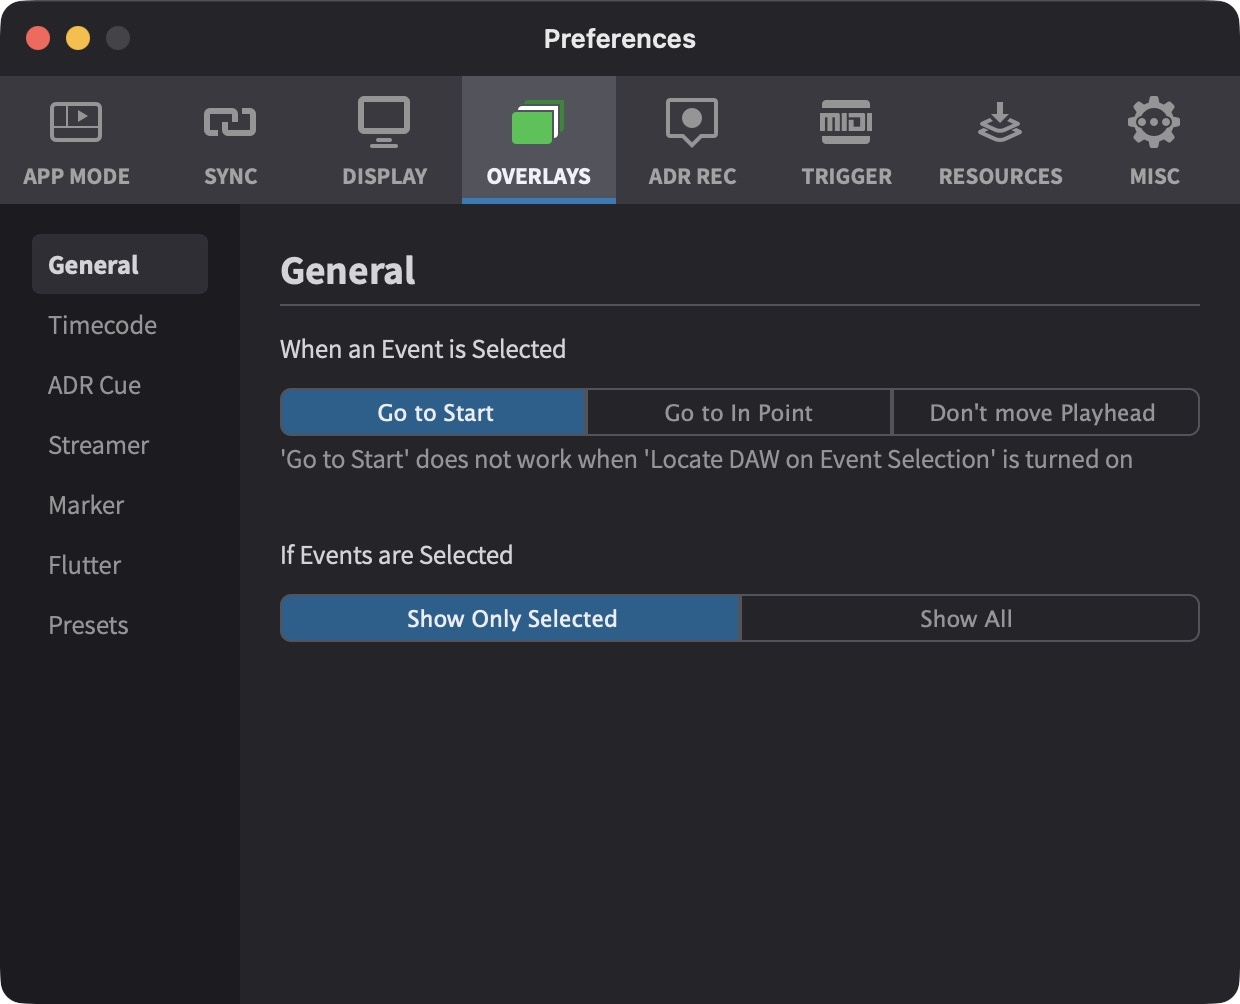 {width=70%}
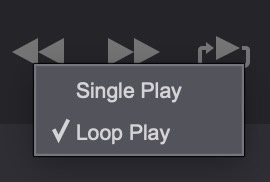
Playback Modes
Hold down the Control key while clicking the play button to choose between Single Play and Loop Play modes.
 {width=25%}
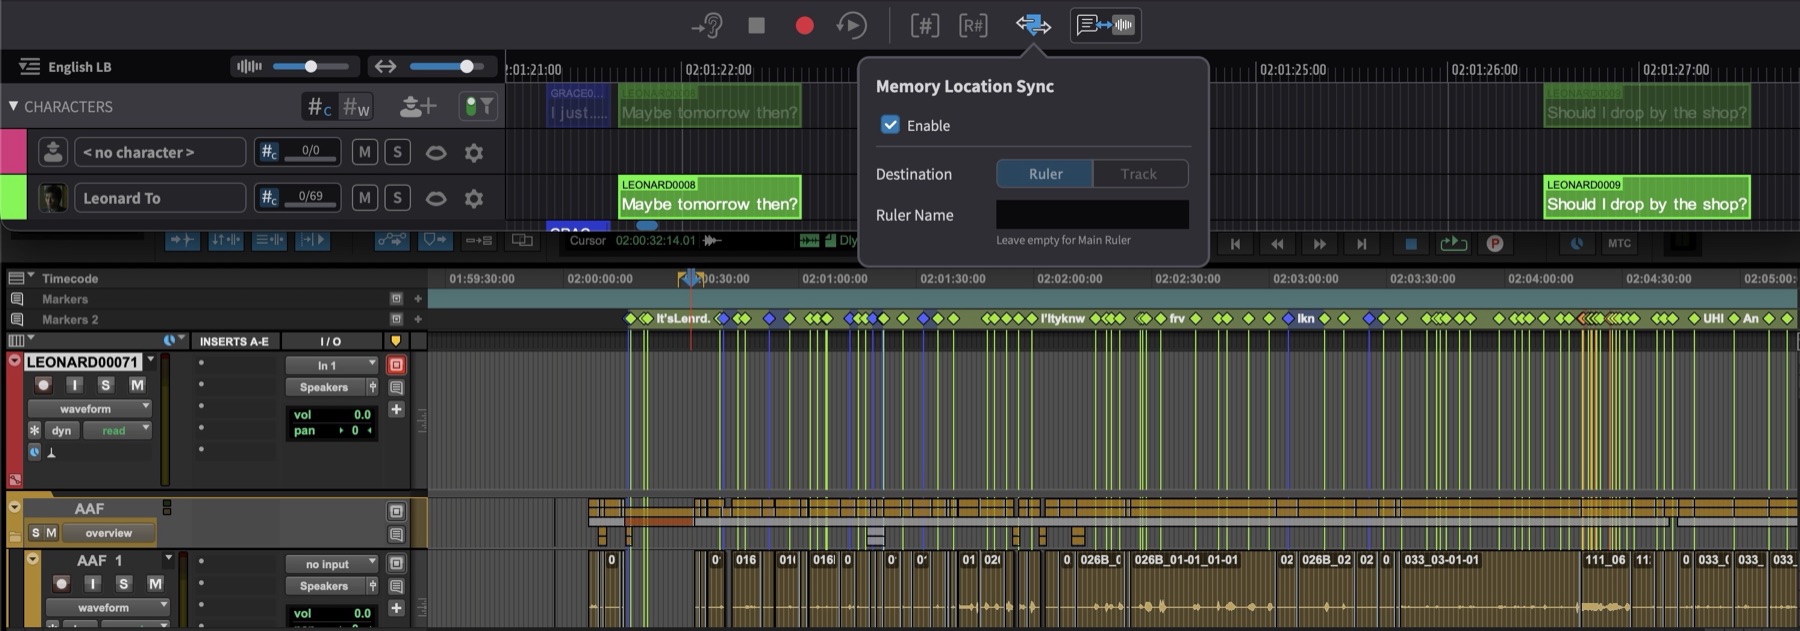
Pro Tools Memory Location Sync
Cue Pro can synchronise ADR Cue positions with Pro Tools® Memory Locations, providing a visual reference in the Pro Tools® timeline that shows where each cue falls. This is useful during both the cueing process and during recording sessions - engineers can use Pro Tools® Memory Locations to navigate between cues directly within Pro Tools®.
Click the Memory Location Sync button in the toolbar to open the settings popover.
 {width=80%}
Enable the Enable checkbox to activate synchronisation. Cue Pro creates a Memory Location at the In Point of each currently visible ADR Cue. The marker name is taken from the cue's dialogue text, and the marker colour follows the Character Track colour assigned in Cue Pro.
Destination
Memory Locations can be placed on a Pro Tools® Ruler or a specific Track:
Ruler - Enter a name in the Ruler Name field to target a specific ruler, or leave the field empty to use the Main Ruler.
Note: Take care to enter the ruler name exactly as it appears in Pro Tools®. The matching is not strict - partial or approximate names may still match a ruler, which could result in Memory Locations being placed on the wrong ruler if multiple rulers have similar names.
Track - Select the target track from the Track Name dropdown, which lists all tracks in the current Pro Tools® session.
To switch between destinations, disable the Enable checkbox first, change the destination, then re-enable.
Existing Memory Locations already present in Pro Tools® are not affected by Memory Location Sync - any markers previously created in Pro Tools® remain in place, even if they are on the same ruler or track that Cue Pro is syncing to.
Filter Interaction
Memory Location Sync reflects the currently filtered view in Cue Pro. Applying a Character filter updates the Memory Locations to show only that character's cues. Advanced filter options such as Include adjacent lines are also respected. Toggling the filter switch off restores Memory Locations for all cues.
Note: The Mute and Solo buttons on Character Tracks do not affect Memory Location Sync. Only the filter system controls which cues are synced.
Sync Behaviour
Adding or deleting an ADR Cue updates the Memory Locations in Pro Tools® immediately. Editing the dialogue text of an existing cue does not update the marker name automatically - toggle the Enable checkbox off and on to refresh. Memory Locations created by Cue Pro are managed by Cue Pro; manually renaming a Memory Location in Pro Tools® will be reverted on the next sync refresh.
Enabling ADR Cue Overlays
Cue Pro operates in one of two modes - Pro Tools Integrated Mode and Media Mode - which determines how video devices and their overlay controls are presented in the Device List. The current mode affects how overlays are enabled and which devices are available.
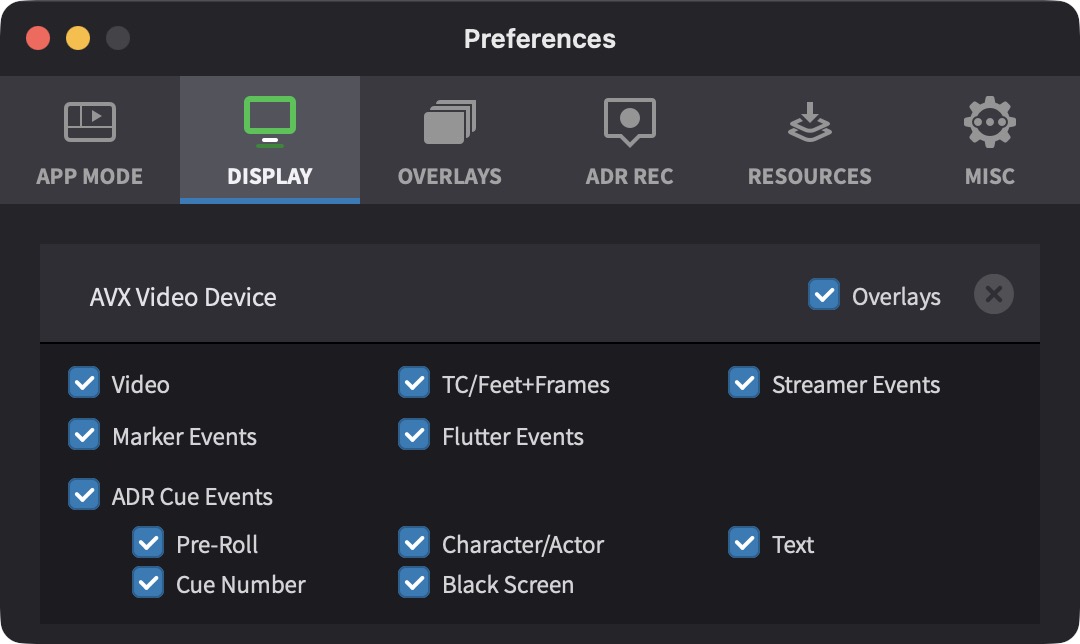
Pro Tools Integrated Mode
In Pro Tools Integrated Mode, a single Pro Tools AVX Video Device is shown in the Device List in Preferences / Settings → DISPLAY tab. The Overlays checkbox toggles all overlays on or off for this device. When Overlays is enabled, the ADR Cue Events checkbox controls whether ADR Cue overlays are visible. Beneath ADR Cue Events, individual sub-checkboxes allow specific overlay layers - such as the Pre Roll Streamer, Text, Character/Actor, and Cue Number - to be toggled independently (see Individual ADR Cue Overlay Layers below).
 {width=70%}
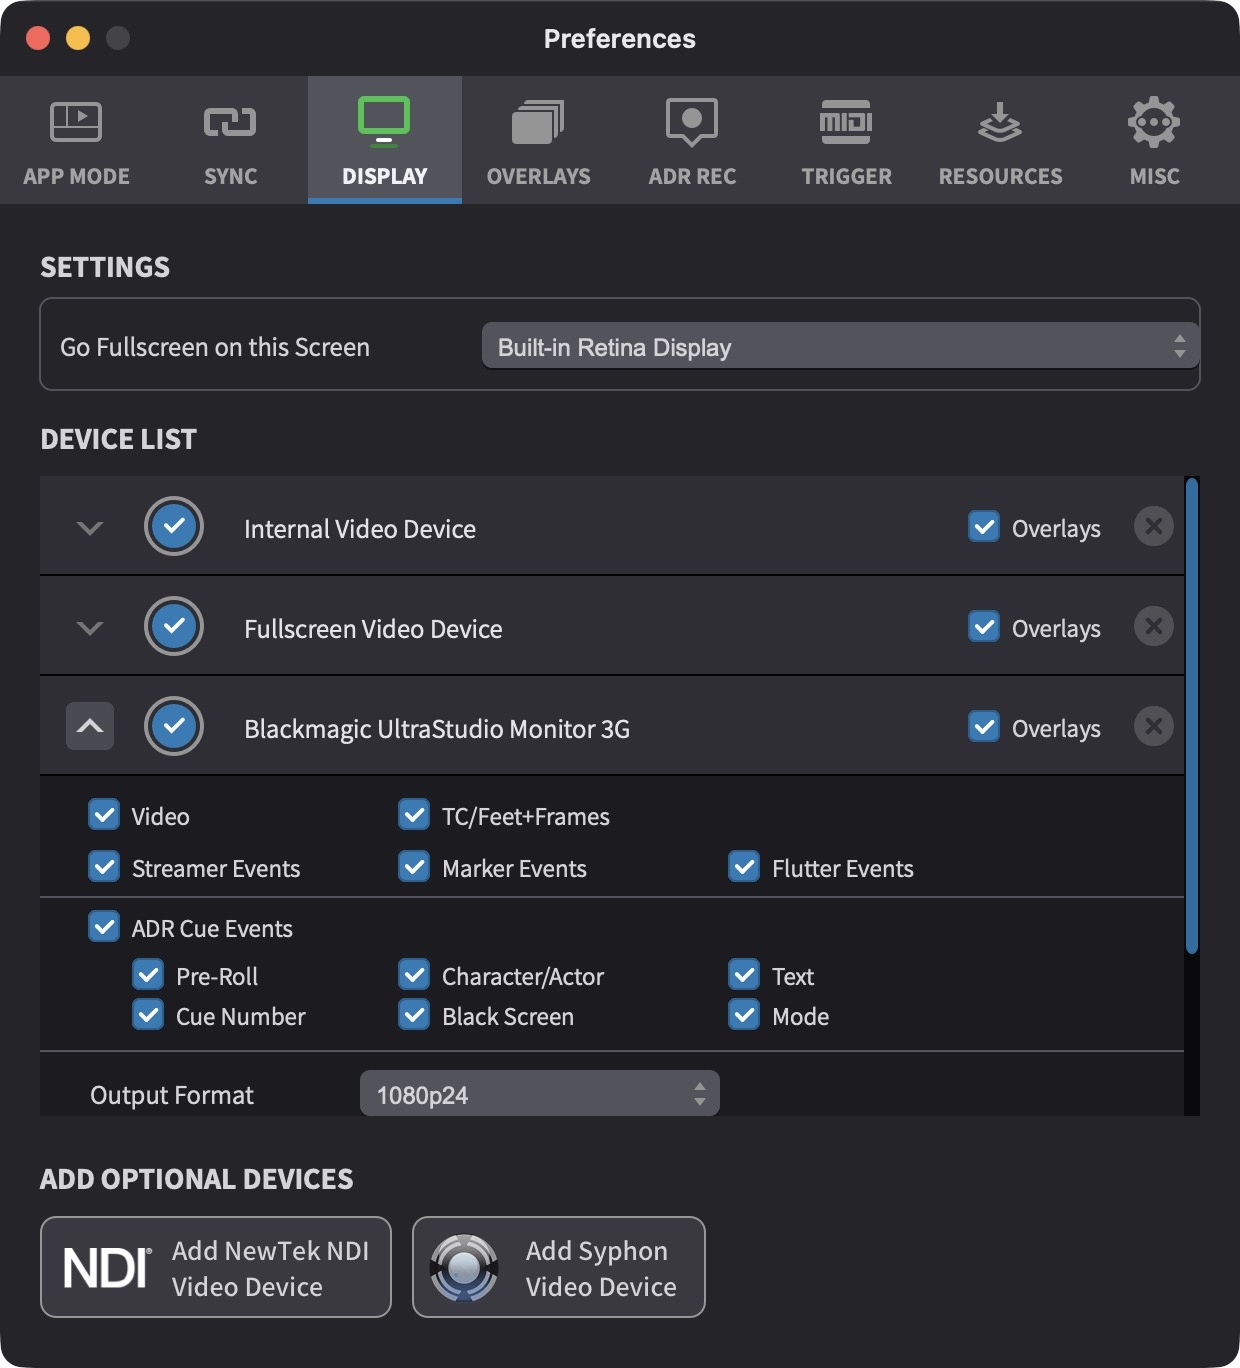
Media Mode
In Media Mode, the Device List shows all available video output devices - including video hardware, the Fullscreen Video Device, and the Internal Video Device - each with independent overlay controls. Click on the left-most grey arrow of the relevant video device to show the expanded settings, so that the arrow is pointing up.
Each device can independently show or hide ADR Cue overlays using the ADR Cue Events checkbox, and the individual overlay layer sub-checkboxes beneath it allow each device to display a different combination of ADR Cue elements. The Overlays checkbox on each device toggles all overlay types on or off for that device. This allows flexibility when setting up multiple outputs - for example, a performer's monitor might show only Text and Character/Actor, while an engineer's display shows Cue Number and Mode.
 {width=70%}
Individual ADR Cue Overlay Layers
When ADR Cue Events is enabled, the individual components of the ADR Cue overlay can be toggled independently using the sub-checkboxes beneath it: Pre-Roll, Character/Actor, Text, Cue Number, Black Screen, and Mode.
Black Screen toggles whether the screen goes black just before and after the In and Out Points of the ADR Cue, providing a clear visual boundary around the cue.
Mode toggles the Rehearse, Record, or Review recording mode indicator overlay (Cue Pro Studio only).
The combination of enabled sub-checkboxes is maintained when toggling the device's Overlays state or when using Toggle Overlays Globally.
Global Toggle Shortcuts
To toggle all overlays across all devices globally, press Shift & Command & B, or select Toggle Overlays Globally from the View menu.
ADR Cue Settings - Rhythmo Bande Mode
Rhythmo Bande overlay appearance and behaviour is controlled through the Preferences / Settings → OVERLAYS → ADR Cue window. Use the Settings Section pull-down to navigate between the different setting groups.
When a setting is adjusted, a temporary preview of the overlay is automatically displayed on all available video devices for a few seconds, allowing settings to be fine-tuned visually. Overlays do not need to be enabled in the Device List, and events do not need to be added to the timeline, in order to preview settings changes.
If overlays are visible when adjusting settings but not during playback, ensure that the overlay type is enabled for the relevant device in the Device List (Preferences / Settings → DISPLAY tab), and that overlays have not been disabled globally via Toggle Overlays Globally in the View menu.
Overlay appearance settings apply globally - they are shared across all video devices, projects, and timelines.
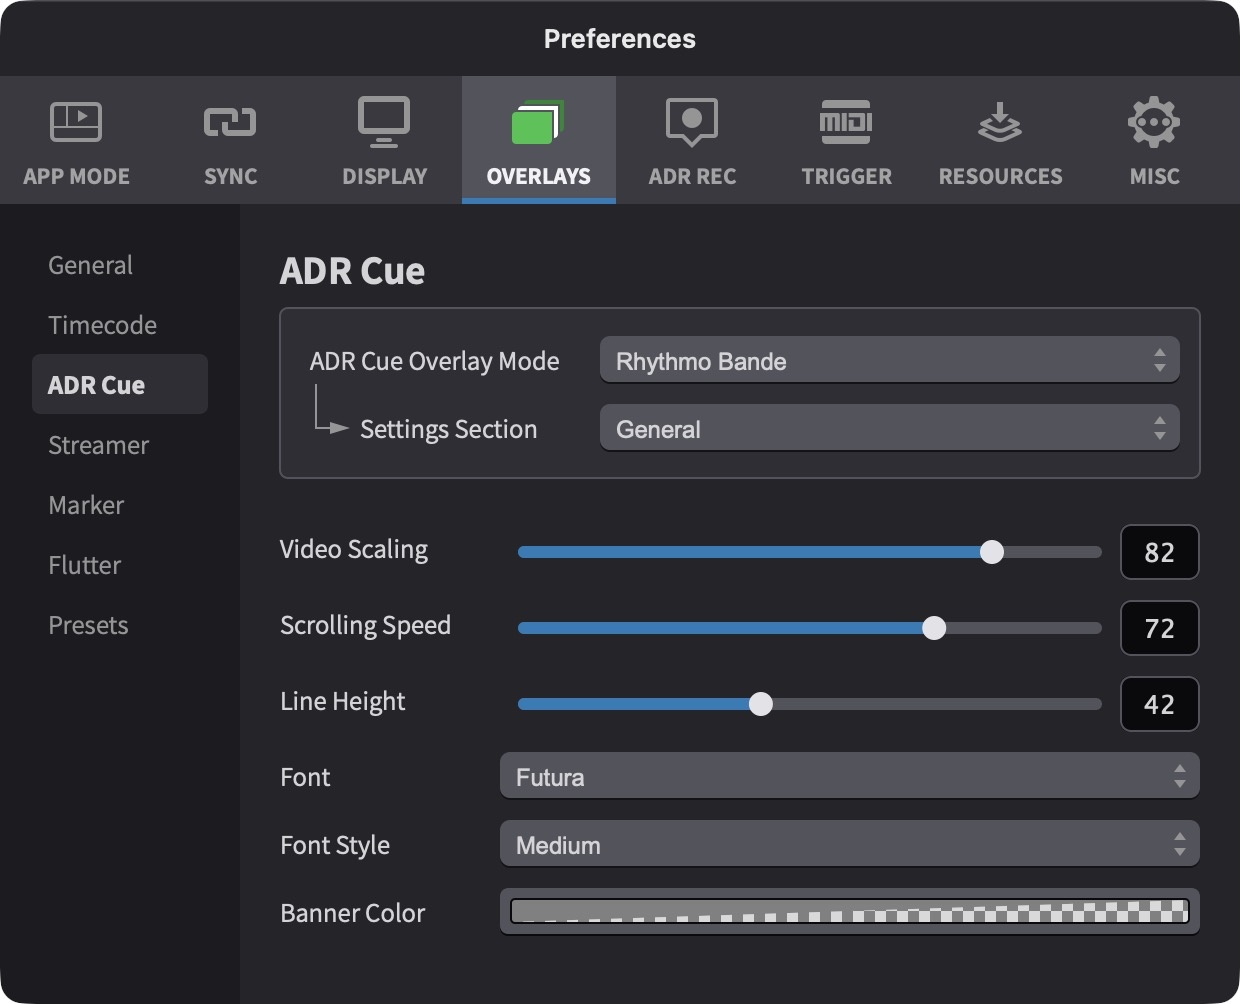
General Settings
The General settings section controls the overall appearance and behaviour of the Rhythmo Bande scrolling text.
Video Scaling - Adjusts the scaling of the video image to make room for the Rhythmo Bande text banner. Move the slider to the left to shrink the video, creating more space for the scrolling text area below it. At the maximum value the video occupies the full display area.
Scrolling Speed - Controls how far ahead and behind the Sync Marker text is visible. A lower value shows a wider time window of text, making the scrolling appear slower. A higher value compresses the visible text to a narrower window around the Sync Marker, making the scrolling appear faster. This setting also affects letter spacing in the scrolling text.
Line Height - Adjusts the vertical height of each line of scrolling text. Increase this value for larger, more legible text, or decrease it for a more compact display.
Font - Selects the preferred font for the scrolling Rhythmo Bande text.
Font Style - Selects the style variant of the chosen font (e.g. Regular, Bold, Thin, Light). The available options depend on the variants offered by the selected font. Choosing a thinner font style can improve readability for fast-paced dialogue where text is densely spaced.
Banner Color - Sets the background colour of the banner area where the scrolling text is displayed. To adjust the transparency, open the colour picker and use the Opacity slider. The border colour behind each character's text is determined by the Character Track colour, which can be set in the character's track settings.
 {width=70%}
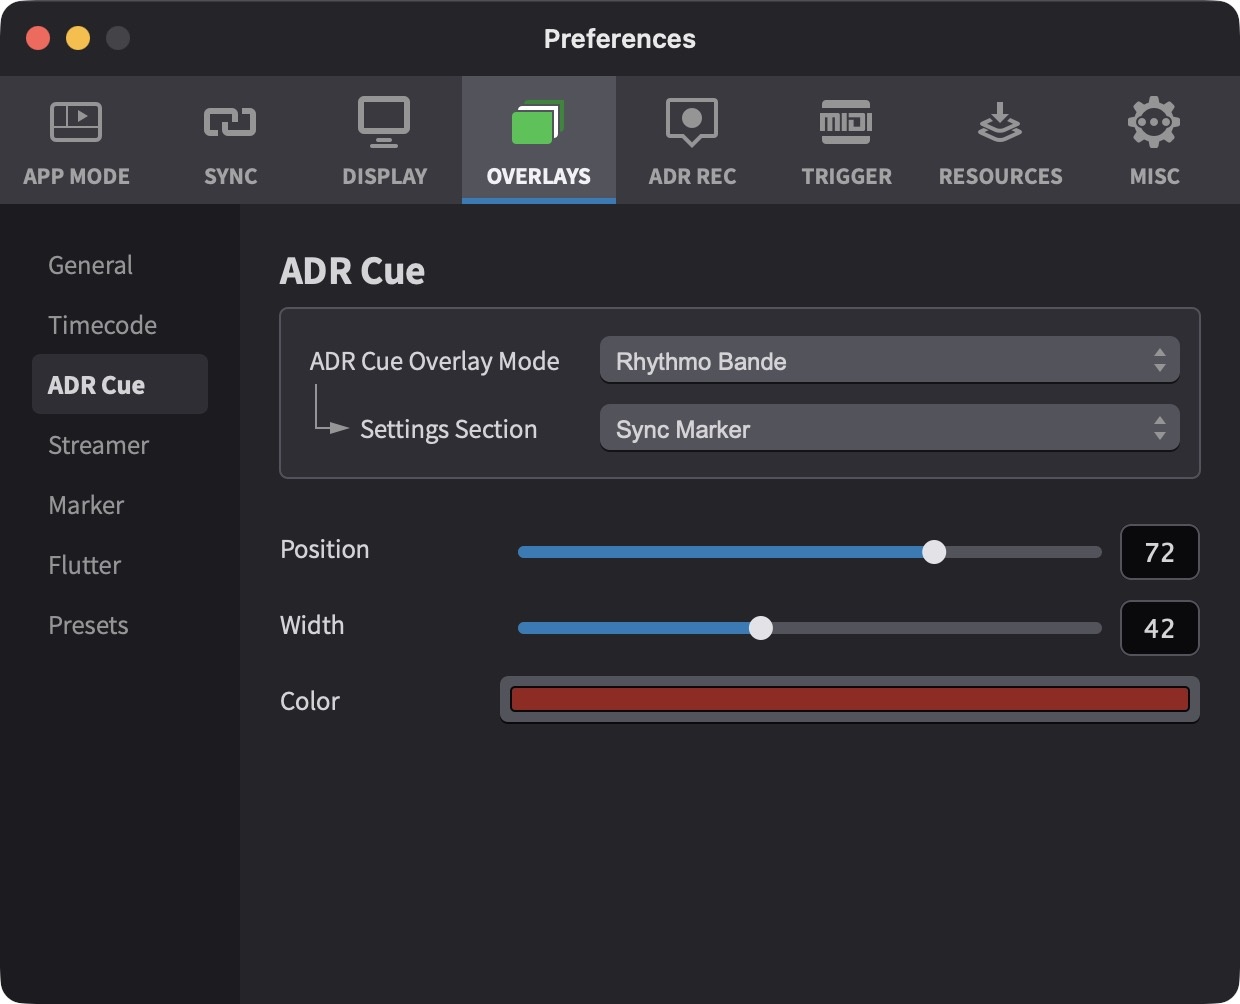
Sync Marker Settings
The Sync Marker is the vertical reference line that marks where each word or syllable should be spoken as the text scrolls past it. These settings control its appearance and position.
Position - Adjusts the horizontal position of the Sync Marker on the screen. Move the slider left to position the marker closer to the left edge, or right to position it closer to the right edge.
Width - Adjusts the thickness of the Sync Marker line. Slider left is thinner. Slider right is thicker.
Color - Sets the colour of the Sync Marker line.
 {width=70%}
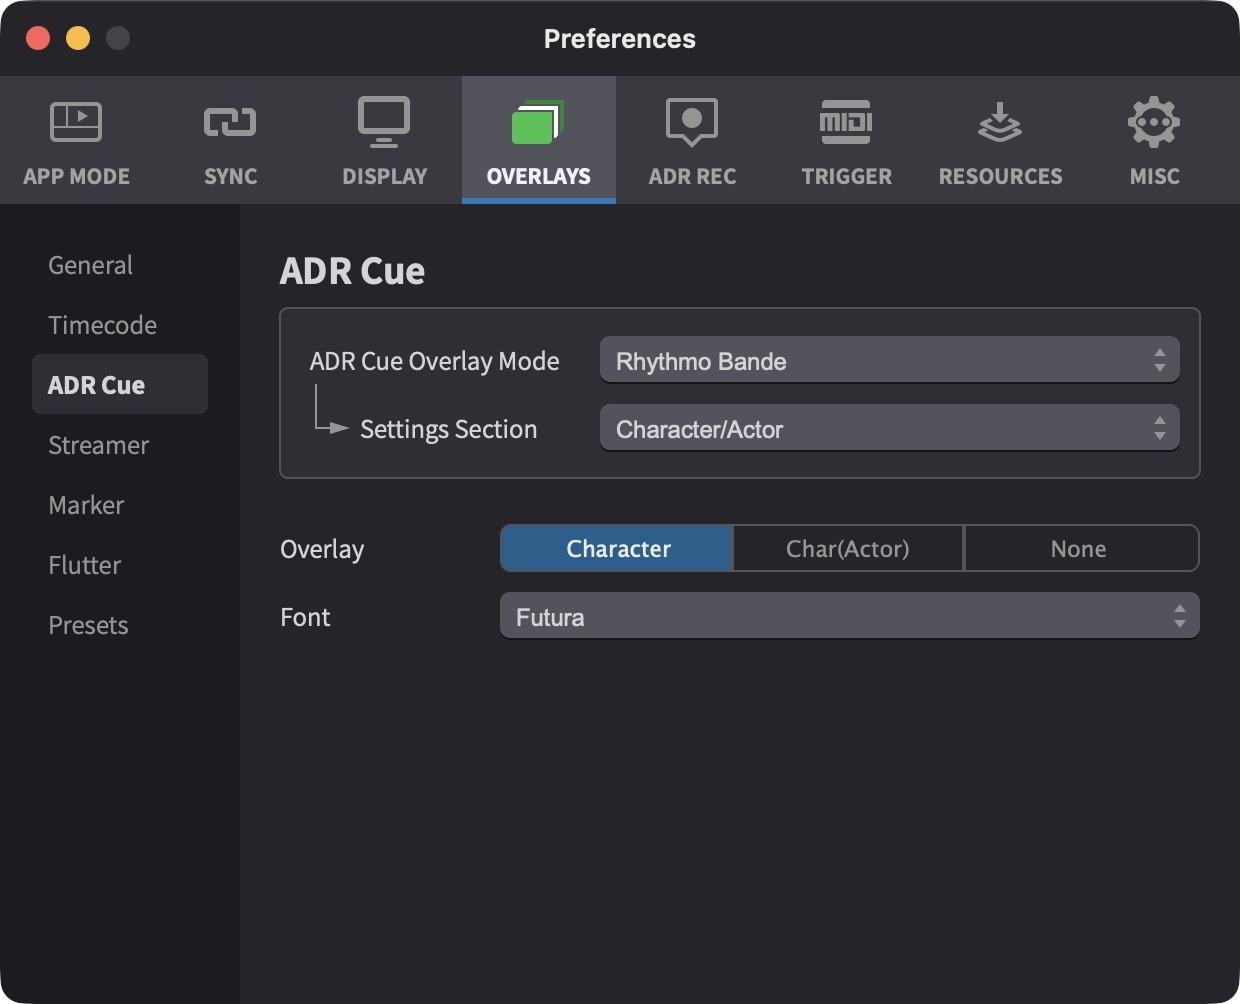
Character/Actor Settings
These settings control the display of character and actor names during Rhythmo Bande playback.
Overlay: Character / Char(Actor) / None - Selects whether just the Character name, or both Character and Actor names, or None are shown during Rhythmo Bande cue playback. If Char(Actor) is chosen, the actor name will be displayed in brackets after the character name.
Font - Selects the preferred font for the Character/Actor overlay.
 {width=70%}
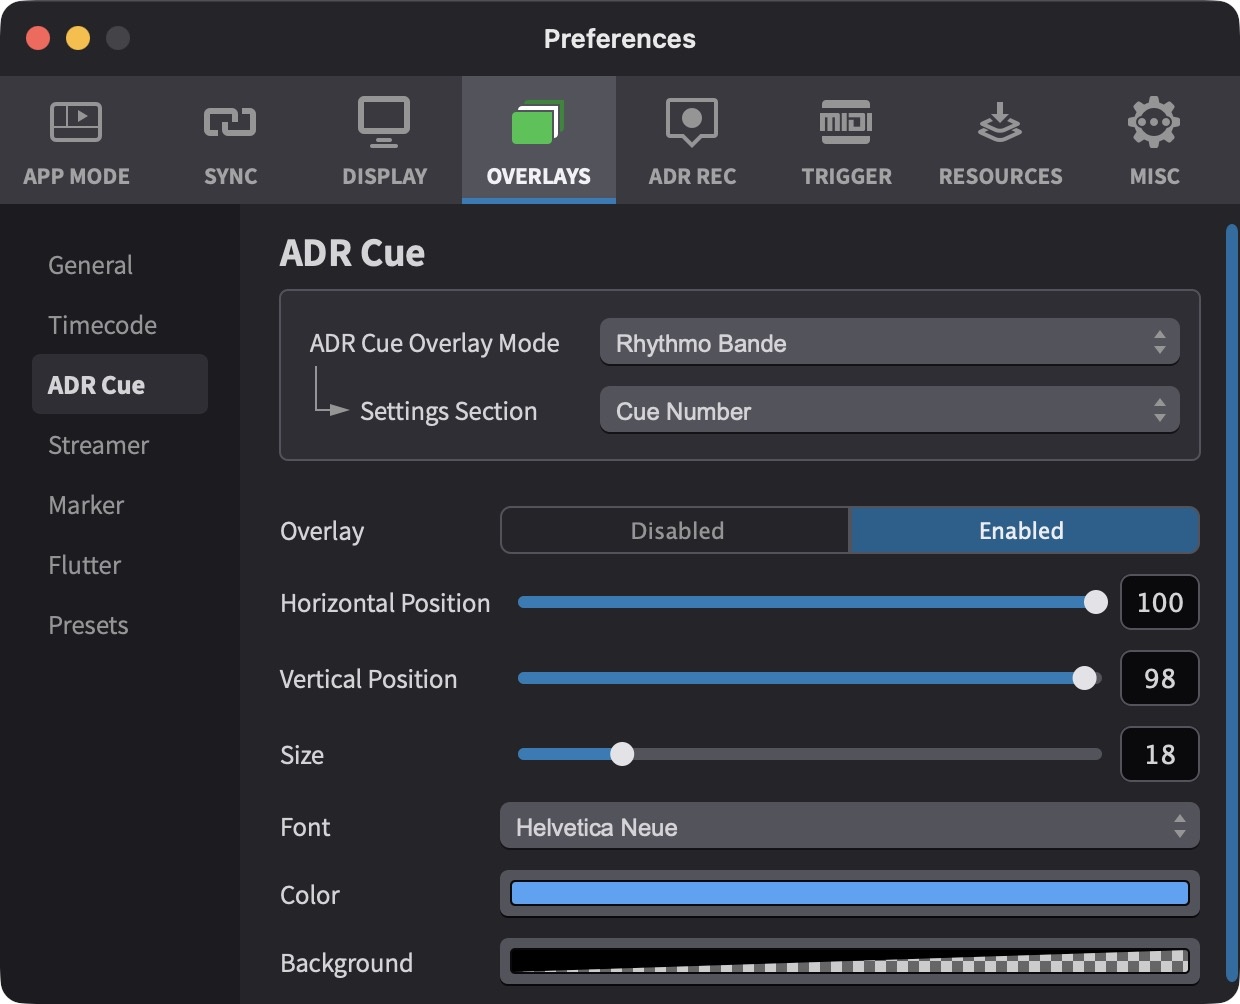
Cue Number Settings
The Cue Number settings in Rhythmo Bande mode control the appearance and position of cue number overlays.
Overlay - If a cue number is set for an ADR Cue visual event, this toggles the Cue Number overlay. If no cue number is set or the switch is set to "Disabled", no cue number overlay will be drawn.
Font - Selects the preferred font for the overlay.
Position: Horizontal - Adjusts the horizontal position. Move the slider left or right.
Position: Vertical - Adjusts the vertical position. Slider left is down. Slider right is up.
Size - Adjusts the overall size. Slider left is smaller. Slider right is bigger.
Color - Sets the foreground colour of the Cue Number.
Background - Sets the colour of the background underneath the Cue Number. To remove the background completely, open the colour picker and drag the Opacity slider to 0%.
 {width=70%}
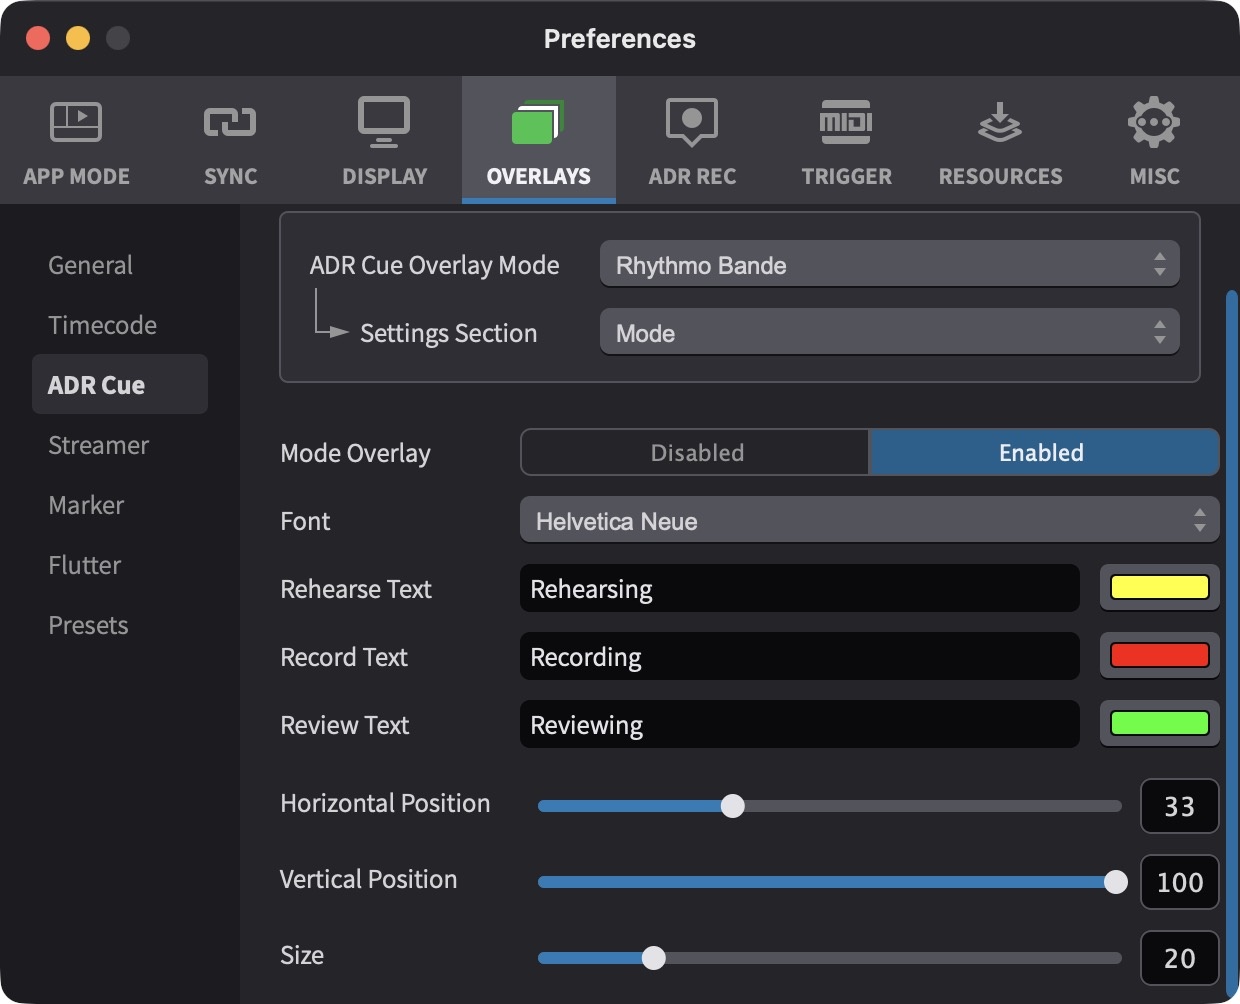
Mode Settings
Cue Pro Studio only
The Mode settings in Rhythmo Bande mode control the appearance of the Rehearse, Record, and Review recording mode overlays.
Mode Overlay: Enabled / Disabled - When using Cue Pro Studio's ADR recording features with Pro Tools®, this selects whether the Rehearse, Record or Review recording mode overlay is displayed or not.
Font - Selects the preferred font for the overlay.
Rehearse Text - Defines the text that is shown when rehearsing an ADR Cue. By default this is set to "Rehearsing".
Rehearse Text Color - Sets the colour of the Rehearse Text overlay.
Record Text - Defines the text that is shown when recording an ADR Cue. By default this is set to "Recording".
Record Text Color - Sets the colour of the Record Text overlay.
Review Text - Defines the text that is shown when reviewing back an ADR Cue. By default this is set to "Reviewing".
Review Text Color - Sets the colour of the Review Text overlay.
Horizontal Position - Adjusts the horizontal position. Move the slider left or right.
Vertical Position - Adjusts the vertical position. Slider left is down. Slider right is up.
Size - Adjusts the overall size. Slider left is smaller. Slider right is bigger.
Modifying the Rehearse, Record and Review Text can be especially useful for adapting to the appropriate language. For example in German, Vorhören, Aufnahme and Überprüfung could be used instead.
 {width=70%}
Overlay Presets
Overlay settings can be saved and managed through the Presets item in the OVERLAYS sidebar in Preferences / Settings. A Default preset is always present and cannot be deleted or renamed. The currently active preset is highlighted, and a modified indicator shows when unsaved changes exist.
Loading a preset: Double-click the preset name to load it.
Saving changes to a preset: Click the Save button (↓) on the preset row. The Default preset cannot be overwritten. When the current settings have been modified since the preset was last loaded or saved, an asterisk (*) appears after the preset name to indicate unsaved changes.
Reverting a preset: Click the Revert button (↑) on the preset row to discard unsaved changes and restore the preset's last saved state.
Creating a new preset: Click the + button below the preset list.
Renaming a preset: Click the preset name in the list. The Default preset cannot be renamed.
Deleting a preset: Click the Delete button on the preset row. The Default preset cannot be deleted.
Importing and exporting presets: Use the
Import (↓) and Export (↑)
buttons at the bottom left of the Presets page to share
.dispPref preset files between studios, editors, or
machines.
 {width=70%}
Smooth Rendering
For smoother Rhythmo Bande scrolling text and Streamer motion during playback, enable Smooth Overlay Rendering in the DISPLAY tab. This decouples overlay rendering from the video frame rate, allowing overlays to render at the display's native refresh rate instead. For full details on enabling and configuring smooth rendering — including Pro Tools Integrated Mode and Media Mode setup, hardware device configuration, and performance considerations — see the Display Setup chapter.