Timelines
Introduction
Timeline management in Cue Pro differs depending on the operational mode.
Pro Tools Integrated Mode
In Pro Tools Integrated Mode, each Cue Pro project can contain several timelines. Each timeline contains the following unique elements:
- Start Timecode
- Timecode Range
- Frame Rate
- Visual Event Track with Visual Event Data
- Picture Version Info
- Reel/Episode Info
- Language
The main properties of a newly created Timeline are derived from the currently active Pro Tools® session. This includes the frame rate, session start and timeline duration.
Note: The cues can also be saved or exported / shared by saving the Cue Pro Connect plug-in setting in Pro Tools®.
Media Mode
In Media Mode, timelines additionally contain:
- Multiple Video Tracks with Video Regions
- Multiple Audio Tracks with Audio Regions
The remainder of this chapter covers features common to both modes, with mode-specific differences noted where applicable.
Working with Timelines
Depending on personal preference and the kind of project being worked on, one or several timelines per project may be the best choice.
One example for the use of several timelines would be if working on a feature film consisting of several reels. One timeline can have all movie reels starting at their individual respective hours, and another one where they are all joined together for review. Another use would be if different timelines are needed for different picture cut versions. There are many other scenarios where using more than one timeline can make sense as well, such as foreign dubbing workflows where each Timeline could hold another language.
Using several timelines is however not required in many scenarios.
If working on feature films with multiple reels (but only one picture cut version), documentaries or similar with only one movie asset, one timeline will probably be the best choice.
If working on a feature film with reels starting at the respective hours, make the timeline long enough (switch to the timeline tab in the top left of the main window and click the Edit button on the timeline) and then place the cues or video files at their respective hours.
In Media Mode, if inserts are received with e.g. a rendered scene for a reel, create a new video track and drop the insert on there, and cut that section out of the main video.
The same applies if a new picture cut is received. Either:
- remove the old region from the main active video track
- create a new video track and move the new cut onto that and then disable the old video track
- make a new Timeline for the new picture cuts
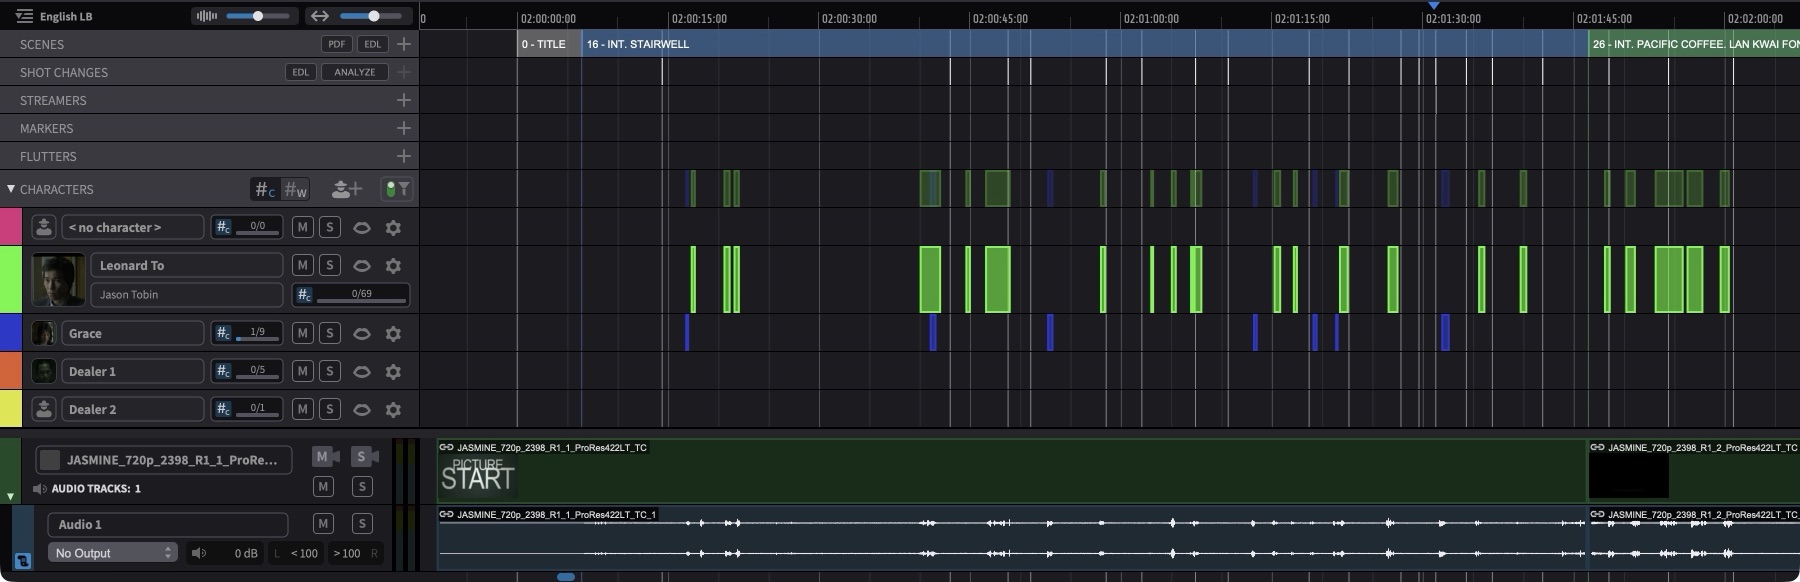
Timelines and Visual Event Track Events
 {width=100%}
When any visual events are created, they all appear on the Visual Events track of the currently active Timeline. If the timeline is switched, the events will switch as well. Hence, timelines allow for a clear separation of visual events. Again, depending on the type of project being worked on, this may be just what is needed or not ideal. If cues should not be separate for e.g. each reel of a multi-reel feature film, simply stick to one timeline with all reels on one video track at the respective hours (Media Mode) or one timeline with cues placed at their respective hours (Pro Tools Integrated Mode).
TIMELINES Tab (Media Mode)
To change the current Timeline start timecode and duration, as well as add new, delete, or duplicate existing timelines, click on the TIMELINES tab of the tab section in the top left corner of the main window.
 {width=60%}
In a new or empty Project, a timeline will already be present called <unnamed timeline>.
To rename it, double-click the name, type a new name and hit enter.
To add a new Timeline, click the + button at the bottom right of the Timelines pane, or press Command & Shift & N. A new inactive Timeline will appear.
To delete the currently selected Timeline, click the - button at the bottom right of the Timelines pane.
To duplicate the currently selected Timeline, click the + within a square at the bottom right of the window.
 {width=60%}
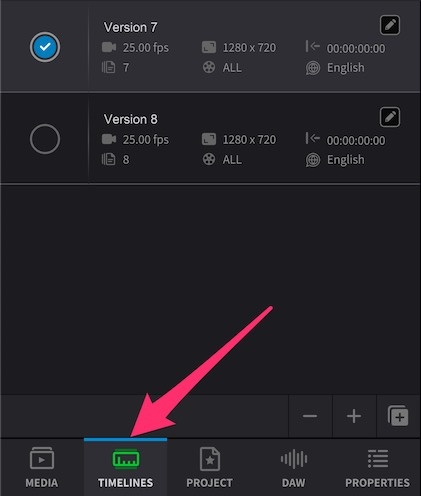
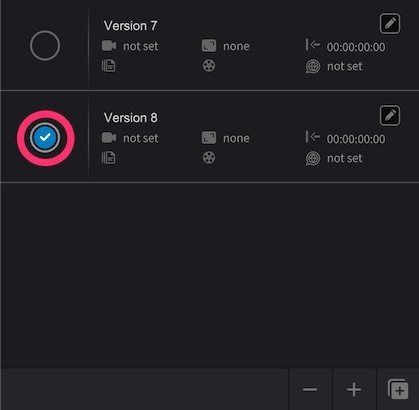
To switch to another timeline, click the circle to the left of the corresponding desired Timeline, such that the blue tick appears.
Note: Event selections are remembered when switching between timelines and restored when returning to a previously active timeline.
Timeline Tools (Pro Tools Integrated Mode)
To change the current Timeline start timecode and duration, as well as add new, delete, or duplicate existing timelines, use the Timelines tools at the top right of the Cue Pro interface.
In a new or empty Project, a timeline will already be present called <unnamed timeline>.
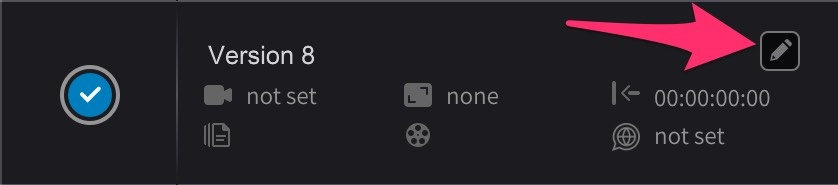
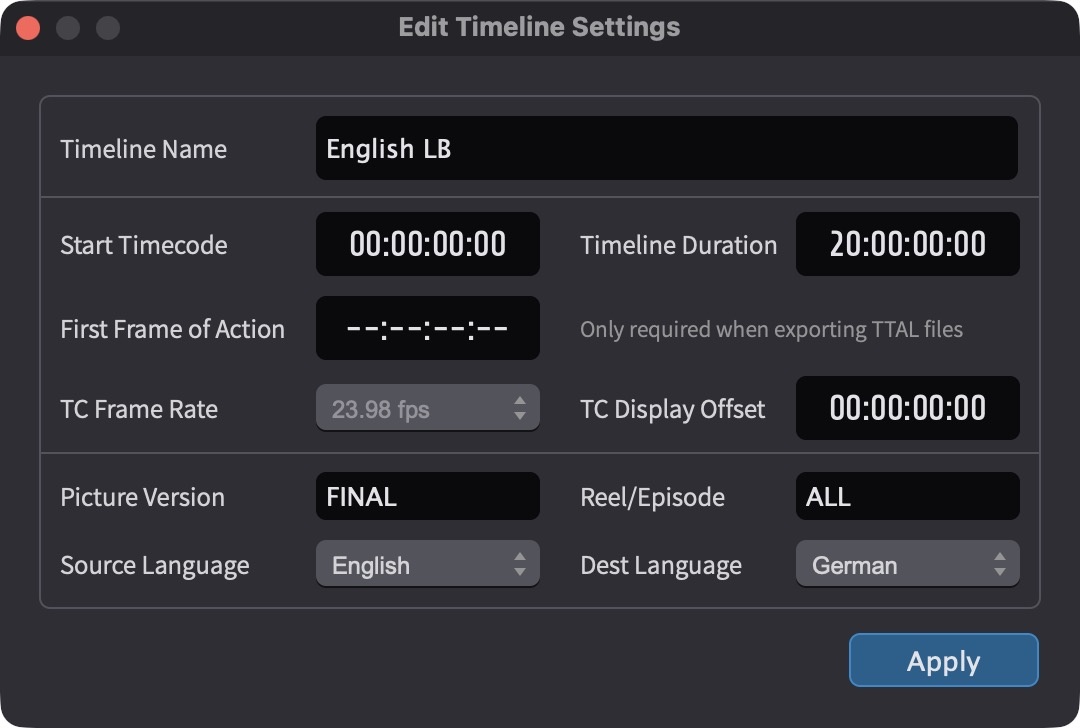
To rename it, click the pencil button. In the Edit Timeline Settings window that appears, type a new name in the Timeline Name field and then press the Apply button.
To add a new Timeline, click the + button at the bottom right of the Timelines section, or press Command & Shift & N. A new inactive Timeline will appear and be shown.
To delete the currently shown Timeline, click the - button at the bottom right of the Timelines settings section.
To duplicate the currently selected Timeline, click the + within a square at the bottom right of the Timelines settings section.
To switch to another timeline, click on the Timeline name and from the pulldown menu, select the desired Timeline.
Editing Timeline Settings
In Media Mode, it is vital to set up the Timeline settings correctly first before importing video - to allow the correct placement and playback of video files in the Timeline.
In Pro Tools Integrated Mode, the main properties of a newly created Timeline are derived from the currently active Pro Tools® session. This includes the frame rate, session start and timeline duration.
To edit the properties of any Timeline, click the 'Edit' pencil icon to open the Timeline settings window.
 {width=50%}
Start Timecode - Sets the desired Timeline start timecode. Click on the Start Timecode field and enter the timecode numerically without any separators (e.g. 00:59:52:00 would be entered as 00595200) and then hit the return key. If working on a project around a 10:00:00:00 timecode start, the timeline start timecode may need to be set a bit earlier to allow for leader or Pre-Roll - to something like 09:59:00:00 or 09:59:52:00. If in doubt, this can be set to zero to allow any timecode start.
 {width=80%}
Note (Pro Tools Integrated Mode): Cue Pro will always ensure that the active Timeline Start Timecode is the same as the Pro Tools® Session Start. If the Pro Tools® Session Start is changed at any time to an earlier timecode, Cue Pro will detect this and automatically adjust the current active Timeline Start Timecode to match.
Note (Media Mode): If the embedded timecode start of video files is before the value set here, then these files will be unable to be manually or auto-spotted to their original timecode within the timeline. Adjust this value to accommodate the video before populating the Timeline.
It is important to note that if visual events (or video/audio regions in Media Mode) already exist on a Timeline, and the Timeline Start Timecode field is adjusted thereafter - that the events will all be relatively moved according to the difference before and after in the Start Timecode value. For example, if a cue was placed at 04:00:00:00 with a Timeline Start Timecode of 01:00:00:00, and then the Start Timecode was changed to 00:00:00:00, the cue would then be relatively moved to start at 03:00:00:00. This can be a very useful way of quickly offsetting the start point of all the visual events in a Timeline to another hour. There is currently no way to adjust this behaviour.
Timeline Duration - Sets the desired Timeline duration. In Pro Tools Integrated Mode, Cue Pro will auto-match the current Session Length Limit set in the Pro Tools® Session Setup window. If preferred, the Timeline Duration can be manually edited to a larger value. In Media Mode, adjust the timeline duration to a value matching the job's timecode range. If in doubt, this can be set to 24 hours to allow any timeline length.
Note (Pro Tools Integrated Mode): Another way of achieving the same result is by changing the Pro Tools® Session Length Limit to 24:00:00:00. Cue Pro will then automatically adjust the Timeline Duration value to match.
Note (Media Mode): If the embedded timecode end of video files is after the value set here, then these files will be unable to be manually or auto-spotted to their original timecode within the timeline.
TC Frame Rate - In Pro Tools Integrated Mode, the frame rate of the current timeline is automatically derived from the Pro Tools® Session Setup Timecode Rate value. In Media Mode, the frame rate is automatically set by the frame rate of the first video file placed on that timeline. In either mode, the drop-down is greyed out unless the video files are 29.97fps - in which case it is important to set this correctly depending on whether the video files are drop-frame (DF) or non-drop-frame (NDF), as it is not possible to detect this automatically.
In the case of ADR Cues being imported from a Cue Pro session with a different frame rate, the user will be prompted what should happen to the cues to accommodate the TC Frame Rate difference.
TC Display Offset - Sets the amount to offset the Timecode Overlay by, while leaving the Timeline timecode without this offset. (Media Mode only)
Picture Version - Enter the Picture cut version here.
Reel/Episode - Enter the Film Reel or Episode number here.
Language - Sets the language of this timeline. This setting will be imported from Netflix TTAL files. When a TTAL file is later exported after cueing or recording, the language tag will be picked up again, removing the need for the reliance on file naming schemes to recognise each language.
Press the Apply button once done.
Setting new Timeline Timecode Start & Duration Defaults (Media Mode)
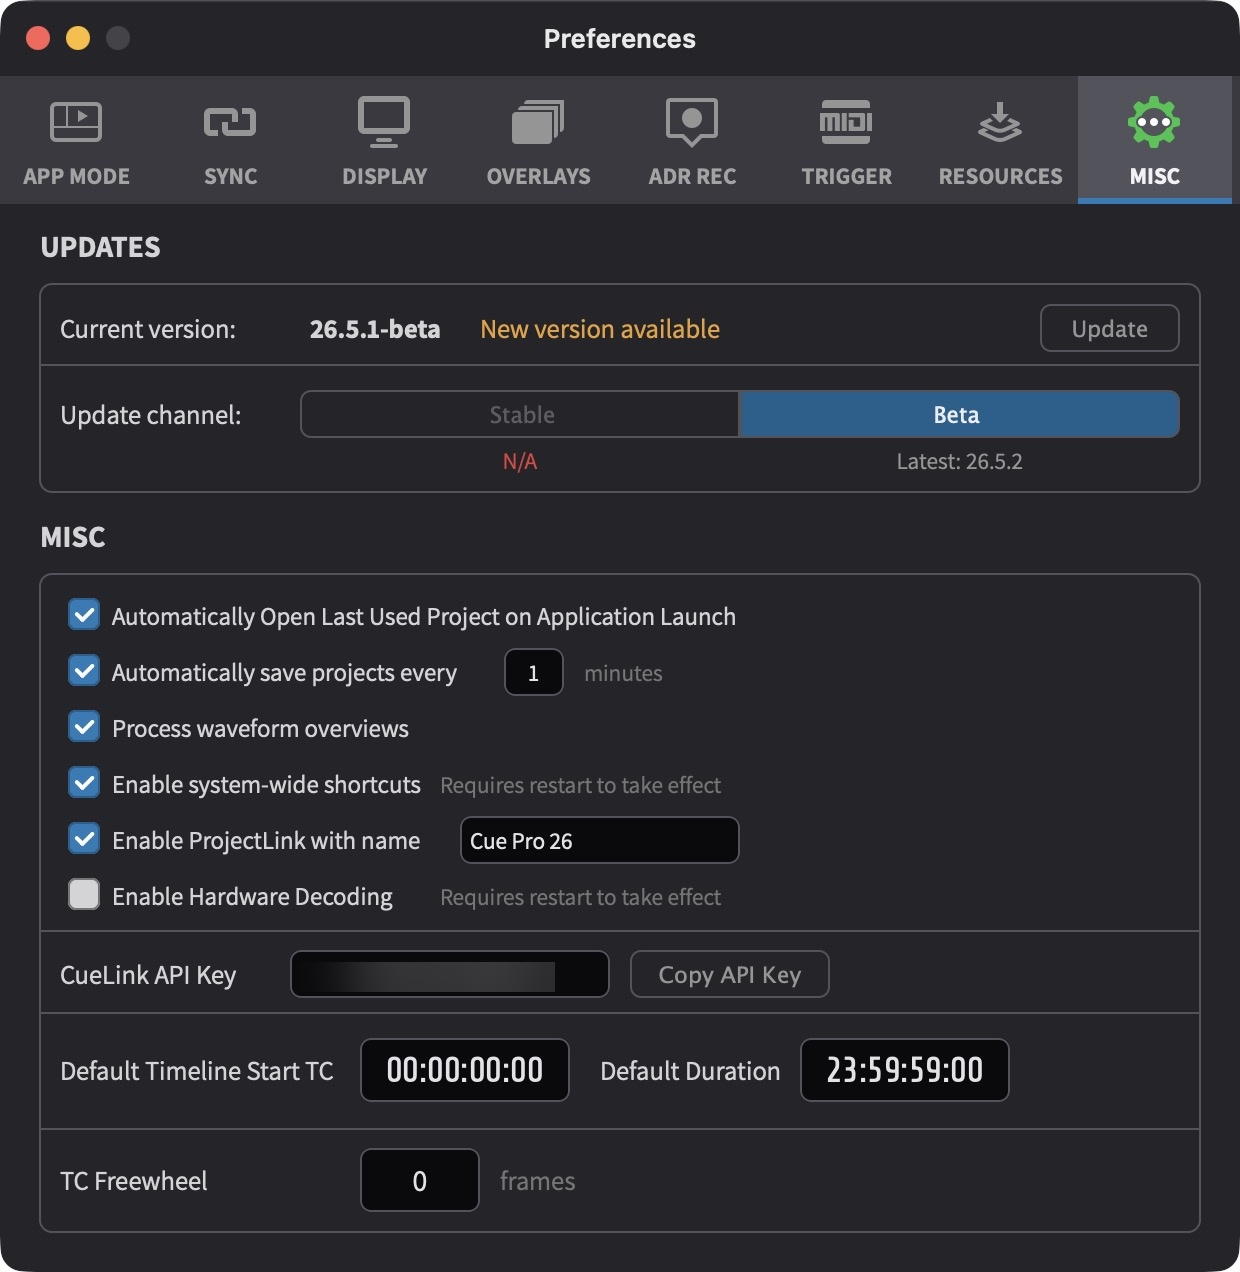
By default, new timelines have a start TC of 01:00:00:00. This default can be adjusted in the user preferences.
The default new Timeline timecode preferences can be found under the general settings in the MISC tab.
 {width=70%}
Default Timeline Start TC - When creating a new timeline in the timeline tab of the main window, this is the default timecode Cue Pro will assign.
Default Timeline Duration - When creating a new timeline in the timeline tab of the main window, this is the default timeline duration Cue Pro will assign. These values are also used for the first timeline created automatically when creating a new project.
Note: Be sure to choose a default start timecode value that is valid with all common frame rates. For example, 00:59:58:29 won't work at 24 fps.
Toggling all Timelines between Timecode or Feet+Frames
The time display format of the Timelines, counters and Timecode overlay can be toggled between displaying Timecode or Feet+Frames by right-clicking the main counter and selecting either Set Time Format to Timecode or Set Time Format to Feet+Frames. To prevent the edit menu from appearing instead, ensure that the counter is not highlighted before right-clicking.
Feet+Frames values are always shown relative to the Timeline Start value.