Streamer Overlays
Introduction to Overlays
Overlays are graphical elements rendered into the video output that provide visual information during sound post-production sessions. Cue Pro offers several overlay types, each serving a different purpose:
- Timecode - displays the current timeline position
- Markers - annotate and identify sections of a project
- Streamers - provide visual countdowns to sync points
- Flutters - mark Hit Points and tempo with flashing visual cues
- ADR Cues - dialogue cueing and recording workflows
In addition to overlays, Cue Pro provides the SCENES track and SHOT CHANGES track for timeline-based navigation and edit structure reference - see the Scenes Track and Shot Change Track chapters.
This chapter covers all aspects of Streamers - how to create, configure, edit, and trigger them via MIDI.
Streamers are primarily used by composers and music editors to visually identify the start of a new cue, the start of a recording take, or other critical sync points. They provide a visual countdown and the corresponding tempo, where relevant, that helps performers and conductors anticipate upcoming sync moments.
Streamer Overlays
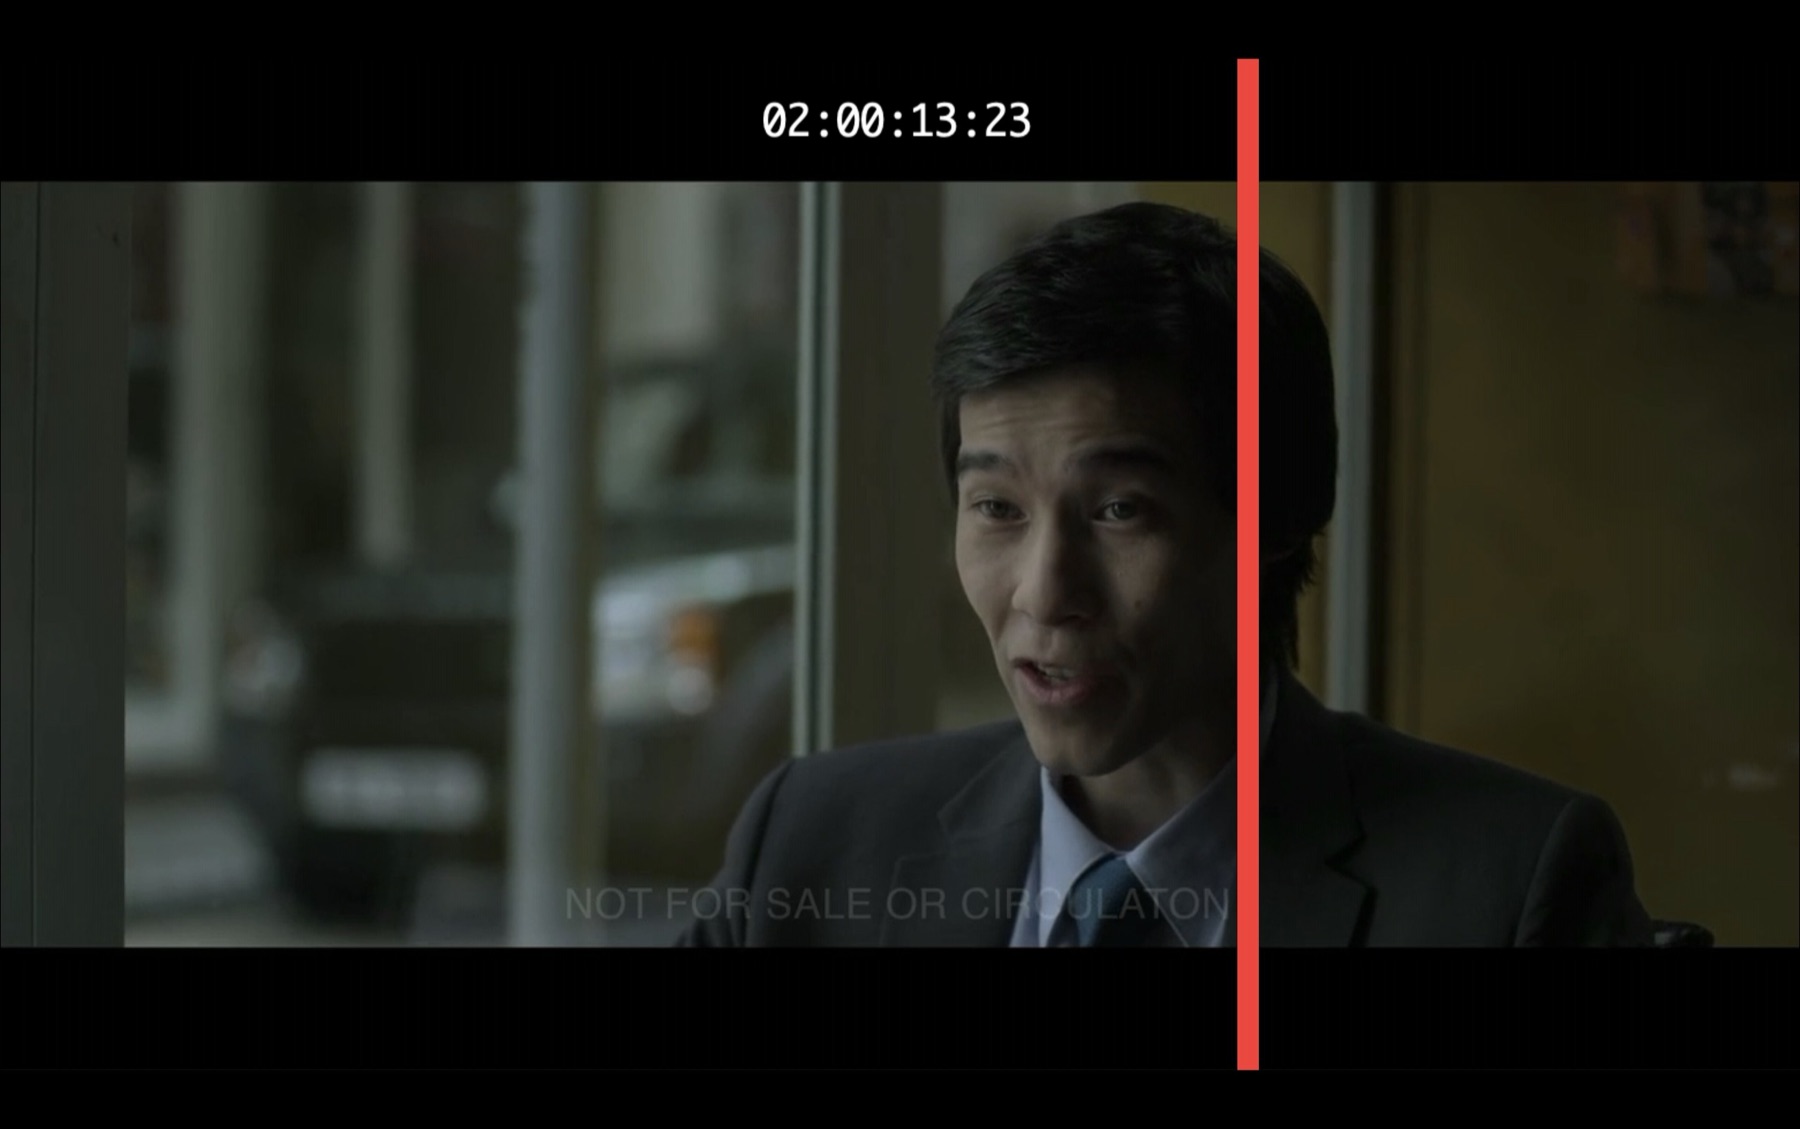
Streamers are animated visual countdown overlays that provide a visual lead-in to a Hit Point. A Streamer can display as a single coloured bar moving from left to right across the screen, or as a bar from each edge of the screen, both moving simultaneously towards the centre. Optionally, the Streamer can finish on a vertical bar, and a Punch (a flashing circle) can appear as the Streamer reaches the Hit Point. Each Streamer consists of a Hit Point timecode, a duration (selected from preset values), a colour, and optional audio beeps. Streamers can operate in either a time-based or tempo-based reference unit. Traditionally, streamers are also referred to as "wipes."
Streamers appear as Visual Events on a dedicated STREAMERS track in the Visual Events section.
 {width=80%}
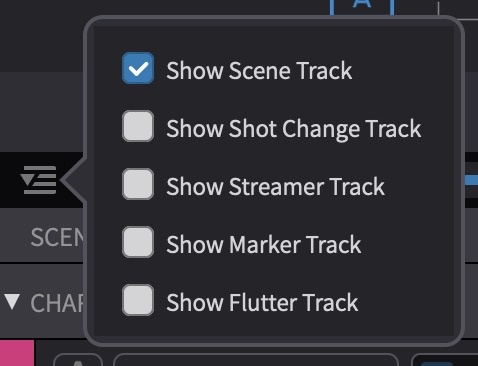
The Streamer track can be shown or hidden using the show/hide pull-down tab located at the top left of the Visual Events section.
 {width=40%}
During playback, the Streamer animates on the video output, moving towards the Hit Point.
 {width=80%}
Note: Overlays are enabled by default. If Streamer overlays are not visible during playback, see Enabling Streamer Overlays later in this chapter.
Viewing and Editing Streamer Properties
Streamer properties can be viewed and edited in three places:
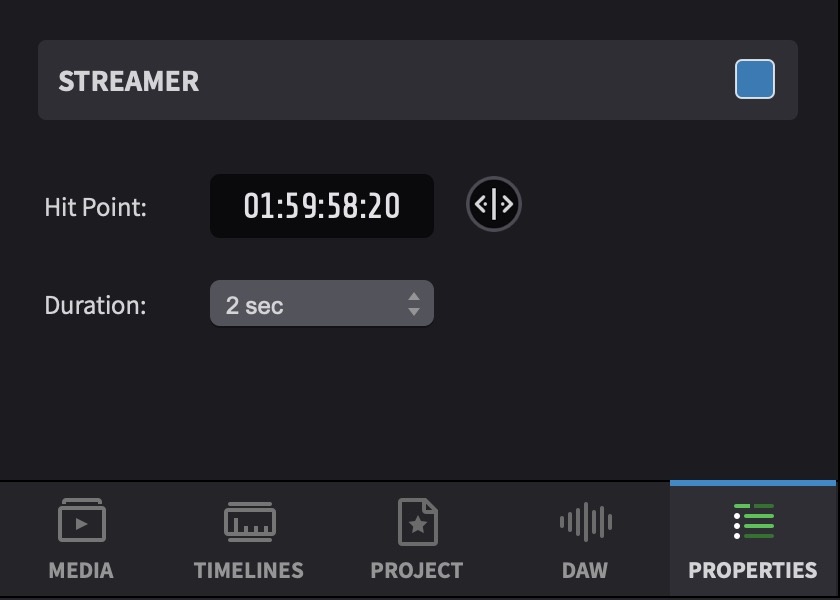
- The Properties tab (Media Mode) shows the selected Streamer's Hit Point and Duration. Double-click a Streamer to open it, or click the PROPERTIES tab at the top left of the Visual Events section.
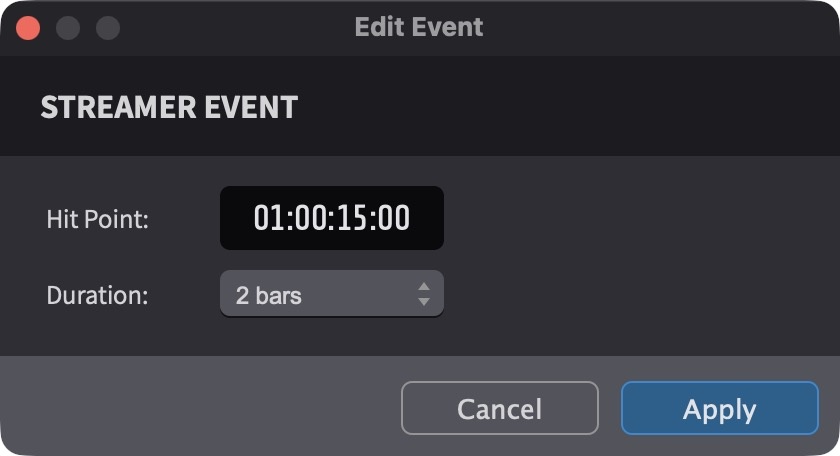
- The Edit Event window (Pro Tools Integrated Mode) opens a separate window for editing the Hit Point and Duration. Double-click a Streamer to open it. Colour is not available in the Edit Event window - use the Event List to change a Streamer's colour.
- The Event List shows all events in a table format, allowing multiple Streamers to be viewed and edited at once. Press Shift & L, or select Event List from the Window menu, to show or hide it.
All three are used throughout this chapter for creating, editing, and managing Streamers.
Streamer Properties
Streamers can be either time-based or tempo-based, determined by the Reference Unit setting active at the moment the Streamer is created. Once created, a Streamer's type cannot be changed - a time-based Streamer cannot be given a tempo, and a tempo-based Streamer cannot be converted to a time-based duration. A project can contain a mix of both types. Both appear identically on the timeline - the difference is only visible in the Properties tab, Edit Event window, or Event List.
A time-based Streamer has the following properties:
- Hit Point - the timecode where the Streamer reaches its target (the sync point)
- Duration - how long the countdown animation plays, in seconds
- Colour - the colour of the Streamer bar
- Cue # - an optional identifier for the Streamer, visible and editable in the Event List only (not shown in the Properties tab or Edit Event window). Cue numbers are not auto-assigned - they are entered manually.
A tempo-based Streamer has the same properties plus an additional field:
- Tempo - the BPM (beats per minute) of the countdown
Switching Between Timecode and Feet+Frames
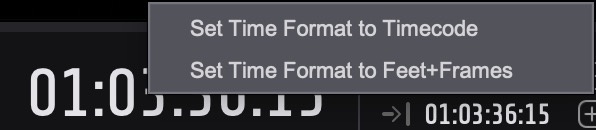
To switch between Timecode and Feet+Frames display, right-click the main counter when it is not highlighted. Select either Set Time Format to Timecode or Set Time Format to Feet+Frames. This changes the display format of the Timelines, counters, and the Timecode overlay simultaneously.
 {width=60%}
Edit Mode: Timeline Range vs Target Event
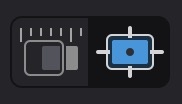
Cue Pro offers two edit modes, as they determine how Streamers behave when selected and modified in the timeline. The Edit Mode can be switched using the Edit Mode toggle in the Controller Bar, or by pressing G.
 {width=15%}
In Timeline Range Mode, the current timeline selection determines which Streamers are affected by edit operations. The selection remains active until a new selection is made or the timeline is clicked elsewhere to deselect.
Target Event Mode keeps selected Streamers targeted even when scrubbing or nudging the playhead, which is useful for maintaining a selection while navigating the timeline. Discontiguous Streamers can be selected directly from the Event List.
Edit Mode switches automatically when selecting discontiguous events from the Event List - Cue Pro enters Target Event Mode to accommodate non-contiguous selections.
Note: In Target Event Mode, clicking the timeline selects existing events rather than making a timeline range selection.
The Edit Mode setting is stored with the project and restored when the project is reopened.
Creating Streamers
To create a Streamer, press the S hotkey. A new Streamer event will be created at the current playhead position using the defaults specified in Preferences / Settings → OVERLAYS → Streamers tab.
The same result can also be achieved by selecting New Streamer Event from the Event menu.
Streamers can also be created from the Event List using the Add New Event button (+). This button adds a new event based on the most recently or most frequently used visual event type.
Note: When adding several Streamers in succession, the button will recognise this and continue adding Streamers when pressed.
Editing Streamers
Editing the Hit Point
The Hit Point timecode can be edited numerically in the Properties tab (Media Mode) or the Edit Event window (Pro Tools Integrated Mode). Double-clicking a Streamer in the STREAMERS track or the Event List opens the relevant view, where the Streamer's properties can be edited.
Pro Tools Integrated Mode - Edit Event Window:
 {width=50%}
Media Mode - Properties Tab:
 {width=50%}
The Hit Point timecode field can be edited in multiple ways. To scrub-adjust the timecode, click and hold the arrow button to the right of the timecode field and drag left or right. Dragging slowly produces finer changes, while dragging further produces larger changes.
To retype the timecode, click the field once so the entire timecode is selected, then type the full hours, minutes, seconds, and frames (excluding colons). The period and comma keys can be used as shortcuts to enter double zeroes into timecode fields, speeding up entry.
Press Enter or click elsewhere to confirm the new value.
To adjust only one specific timecode field (such as frames), double-click just that field so only it is selected, then retype the value.
To copy and paste timecode values, double-click the timecode field to highlight it, then right-click to access a context menu with Cut, Copy, Paste, Delete, Select All, Undo, and Redo. This context menu is available on all timecode fields throughout the application - including the main counter, selection in/out counters, and timecode fields in the Properties tab, Edit Event window, and Event List. It allows timecodes to be copied from external sources - such as a DAW, spreadsheet, or email - and pasted directly into the field, or copied from Cue Pro and pasted elsewhere.
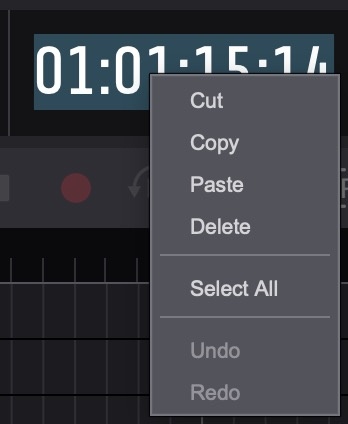 {width=25%}
Moving Streamers
One or more Streamers can be moved on the timeline by selecting them and dragging to the new position.
Selected Streamers can be nudged frame-by-frame using the , (comma) key to move 1 frame earlier, or the . (period) key to move 1 frame later.
Duplicating Streamers
To duplicate one or more highlighted Streamers while moving them to a new position, hold Option while dragging the Streamers on the timeline.
Alternatively, with Streamers highlighted, press Command & D to duplicate them in place - the new Streamers are created at the exact same position as the originals, stacked on top. This command is also available from the Event menu as Duplicate Current Events.
Deleting Streamers
One or more selected Streamers can be deleted by pressing the Delete key. This command is also available from the Event menu as Remove Selected Events.
Muting Streamers
One or more selected Streamers can be muted by pressing Command & M. Pressing the same shortcut again unmutes them. Muting a Streamer hides it from the overlay output without deleting it from the project. Muted Streamers appear greyed out on the timeline. The mute state is also reflected in the On column in the Event List, where it can be toggled directly.
Sorting Events
The Event List can be sorted by clicking a field heading to sort by that column. Clicking again switches between ascending and descending order.
Sorting is useful for organising events in different ways - for example, sorting by colour to group similarly styled Streamers together, or sorting by Hit Point to find the last event in the timeline.
Customising the Event List
Column order can be rearranged by clicking a column header and dragging it to a new position.
Column width can be adjusted by clicking the right edge of a column header and dragging.
Columns can be shown or hidden by right-clicking (or Control-clicking) any column header.
Navigating Events
The Event List provides several methods for navigating between events:
- ↑ or Command & ← to select the previous event
- ↓ or Command & → to select the next event
These commands navigate through all visual events in the Event List, not just Streamers. Navigation follows the current sort order. If navigation behaves unexpectedly, check which column the list is sorted by and whether it is set to ascending or descending order.
When Cue Pro is not in focus, system-wide hotkeys can be used to navigate between events where they have been configured in Preferences / Settings. Command & F5 selects the previous event and Command & F6 selects the next event.
On Macs where F keys are not configured to act as standard function keys, Fn must also be held - for example, Command & Fn & F5. This setting can be found in System Settings → Keyboard → Function Keys.
The Go To command (Command & G) allows quick navigation directly to a specific event. Pressing the shortcut opens a text input box. Begin typing and a list of matching candidates from all event types appears immediately below. Clicking an event from the list selects it and moves the playhead to its position.
Typing # followed by a cue number searches specifically by cue number — for example, entering #12 will find all cues containing 12 in their cue number.
 {width=60%}
Selection expansion commands allow multiple events to be selected quickly. These commands apply to all visual event types, not just Streamers:
- Command & Option & A includes all events before the current selection
- Command & Shift & A includes all events after the current selection
- Command & A selects all events in the list
Navigating Streamers on the Timeline
In Timeline Range Mode, Streamers can be navigated directly on the timeline using the Tab key. Press Tab to move the playhead forward to the next event boundary, and Option & Tab to move backward. The playhead stops at the start and end of each Streamer, making it straightforward to navigate through Streamers on the timeline.
Hold Shift while pressing Tab to make a timeline selection as the playhead advances, extending the selection from the current position to the next event boundary. Shift & Option & Tab extends the selection in the opposite direction.
Event Selection Playhead Behaviour
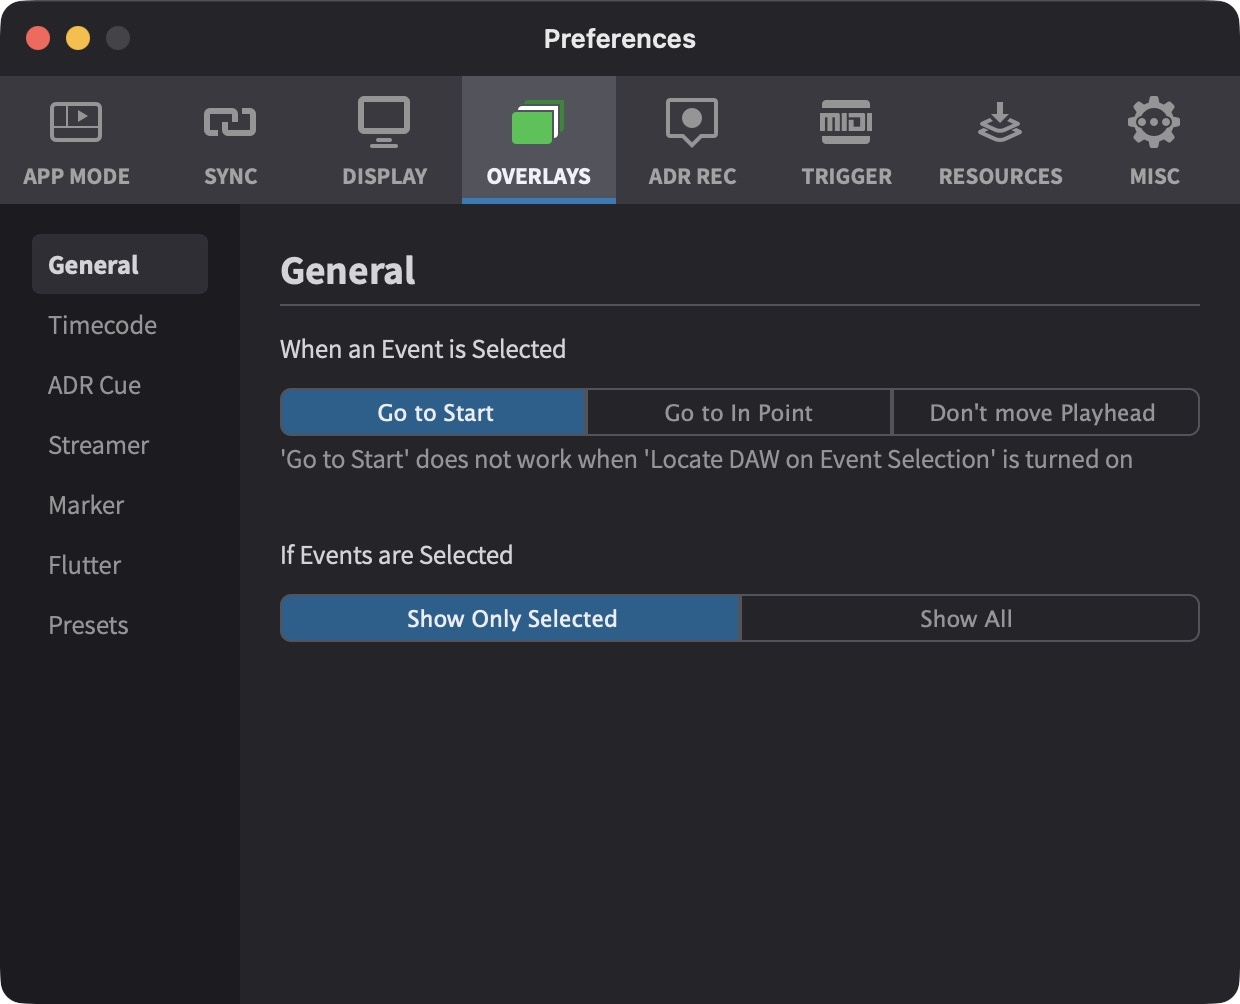
Settings under Preferences / Settings → OVERLAYS → General tab control what happens when an event is selected:
When an event is selected - choose between Go to Start (playhead moves to the start of the Streamer countdown), Go to In Point (playhead moves to the Hit Point), or Don't move Playhead (playhead stays in place).
If Events are Selected - choose between Show Only Selected (only the selected event's overlays are rendered) or Show All (all events' overlays are rendered during playback).
 {width=70%}
Playback Modes
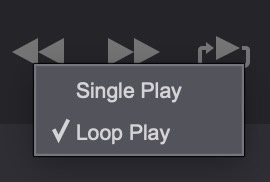
Hold down the Control key while clicking the play button to choose between Single Play and Loop Play modes.
 {width=25%}
MIDI Triggers
Streamers can be triggered via external MIDI events from the DAW. This allows Streamers to fire in real time during playback by sending MIDI notes from Pro Tools to Cue Pro. Multiple trigger configurations can be defined, each mapped to a different MIDI note - for example, C1 could trigger a green 2-bar Streamer at 72 BPM for a strings cue, D1 a red 2-bar Streamer at 96 BPM for a brass cue, and E1 a blue 3-second Streamer for a scene change.
Note: MIDI triggers are only available in Media Mode. They are not available in Pro Tools Integrated Mode.
In Cue Pro
First, select the desired Streamer type by setting the Reference Unit to Time or Tempo in Preferences / Settings → OVERLAYS → Streamers. This determines the fields available for each trigger row - tempo-based triggers include an additional BPM field.
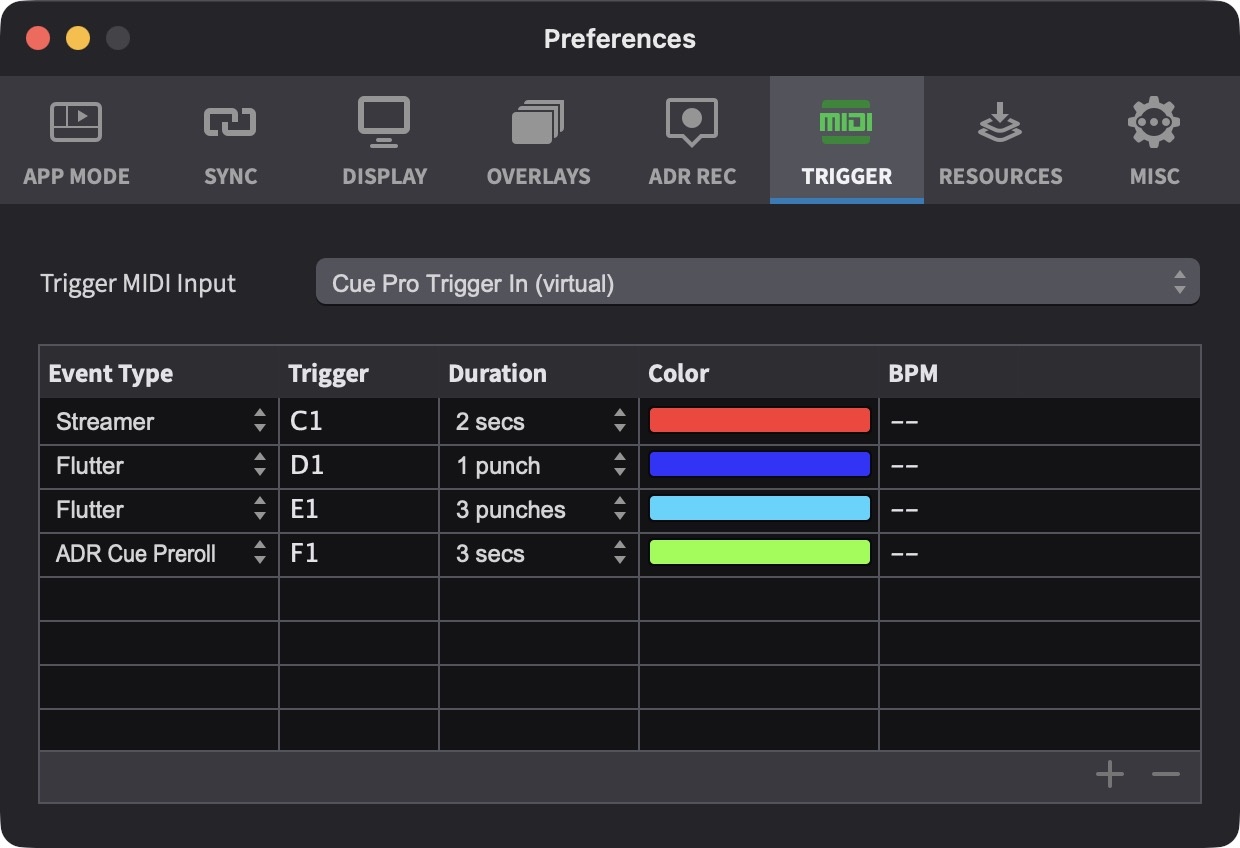
Then, open the TRIGGER tab in Preferences / Settings. Verify that the Trigger MIDI Input is set to Cue Pro Trigger In (virtual).
Press the + button to add a new trigger row. Each row defines the following:
- Event Type - set to Streamer
- Trigger - the MIDI note that will trigger this Streamer (e.g. C1, D1, E1)
- Duration - how long the Streamer animation plays
- Color - the colour of the Streamer
Note: When entering the MIDI note value in the Trigger field, a capital letter must be used (e.g. C1, not c1). The value will not change if a lowercase letter is entered.
Multiple rows can be added, each with a different MIDI note, duration, and colour. To add a mixture of time-based and tempo-based trigger rows, add the rows for one type first, then switch the Reference Unit in Preferences / Settings → OVERLAYS → Streamers before adding rows for the other type. This allows a single Pro Tools session to trigger several distinct Streamer types.
 {width=80%}
In Pro Tools
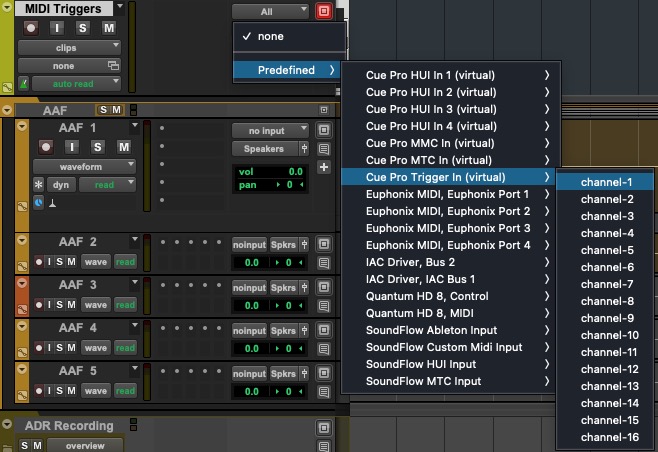
To send MIDI triggers from Pro Tools to Cue Pro, create a new MIDI track in the Pro Tools session. Set the track's output to Cue Pro Trigger In (virtual) → Channel-1.
As with MTC and MMC virtual ports, it is advised to always launch Cue Pro before launching Pro Tools so that the virtual ports are available.
Place MIDI notes on this track at the timecode positions where Streamers should fire. The note values must match the notes defined in the Cue Pro MIDI Triggers tab. During playback, Pro Tools sends the MIDI notes to Cue Pro, which triggers the corresponding Streamer at each note position.
 {width=50%}
Note: MIDI triggers may not be frame-accurate when using supported video devices from Avid, Blackmagic Design, or AJA.
Enabling Streamer Overlays
Cue Pro operates in one of two modes - Pro Tools Integrated Mode and Media Mode - which determines how video devices and their overlay controls are presented in the Device List. The current mode affects how overlays are enabled and which devices are available.
Pro Tools Integrated Mode
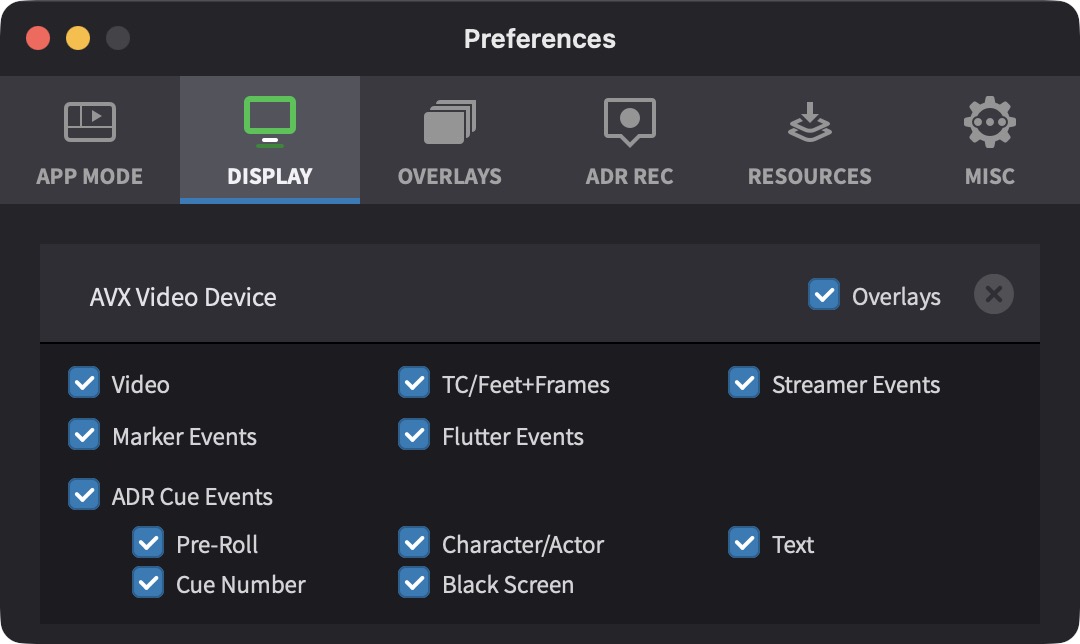
In Pro Tools Integrated Mode, a single Pro Tools AVX Video Device is shown in the Device List in Preferences / Settings → DISPLAY tab. The Overlays checkbox toggles all overlays on or off for this device. When Overlays is enabled, the Streamer Events checkbox controls whether Streamers are visible.
 {width=70%}
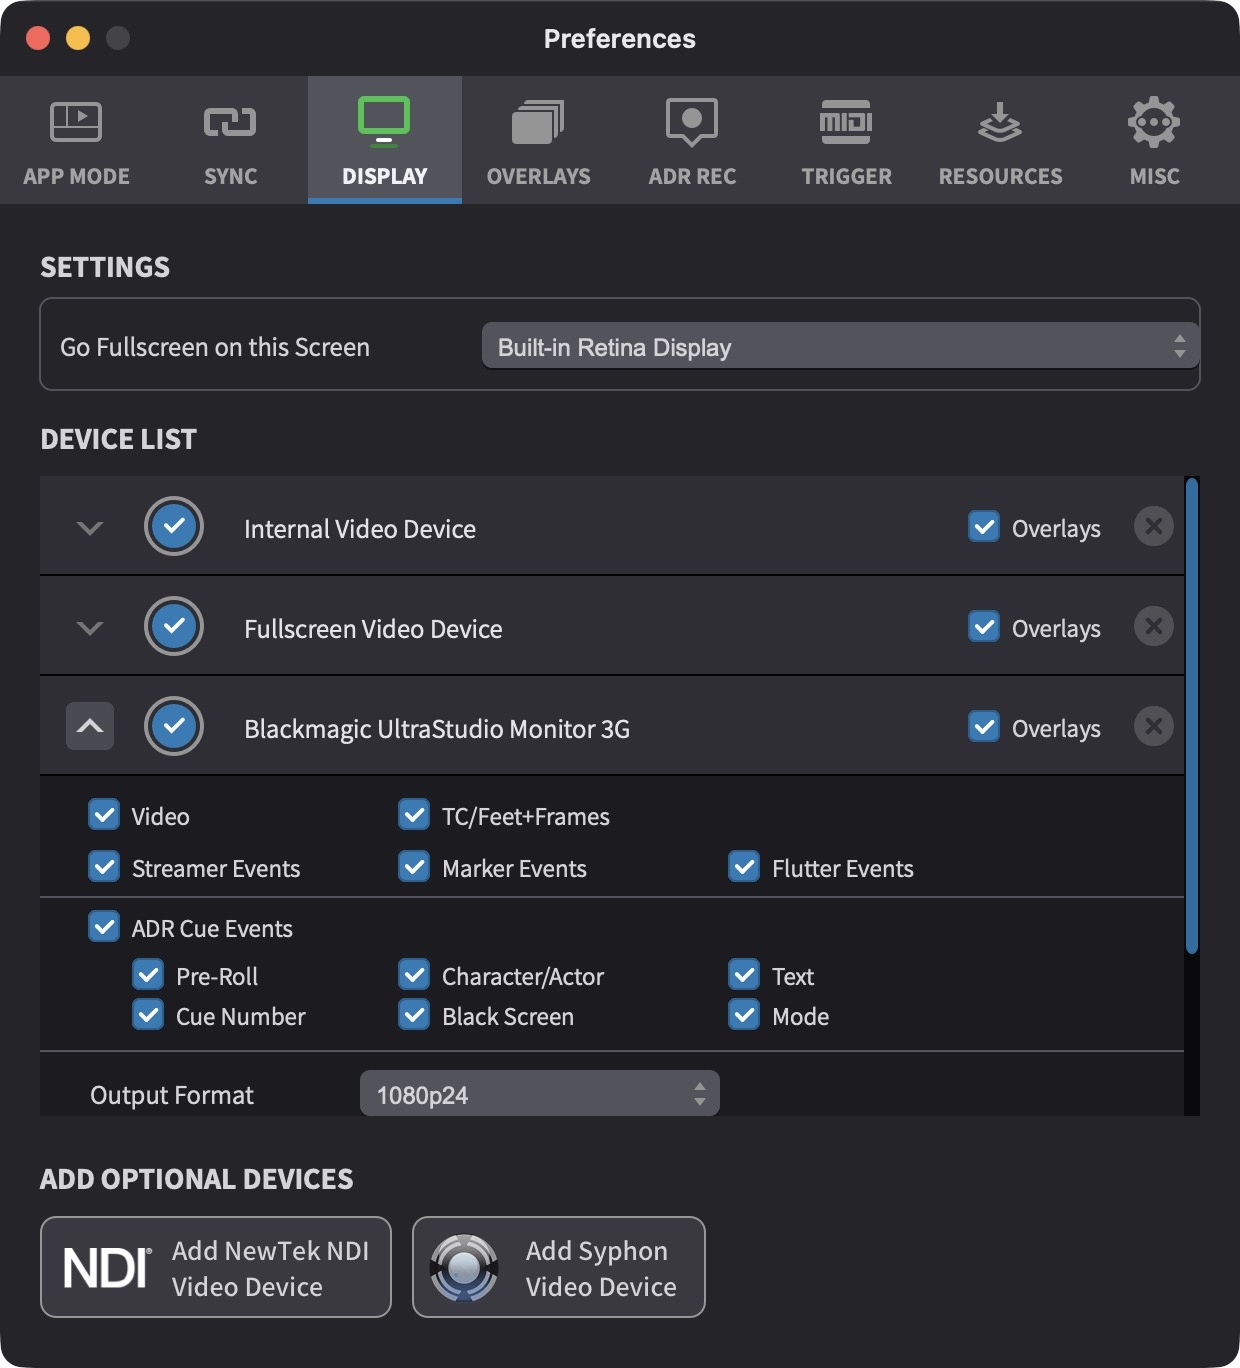
Media Mode
In Media Mode, the Device List shows all available video output devices - including video hardware, the Fullscreen Video Device, and the Internal Video Device - each with independent overlay controls. Click on the left-most grey arrow of the relevant video device to show the expanded settings, so that the arrow is pointing up.
Each device can independently show or hide Streamer overlays using the Streamer Events checkbox. The Overlays checkbox on each device toggles all overlay types on or off for that device. This allows flexibility when setting up multiple outputs - for example, Streamers can be visible on a conductor's monitor while an editor's display remains clean.
 {width=70%}
Global Toggle Shortcuts
To toggle all overlays across all devices globally, press Shift & Command & B, or select Toggle Overlays Globally from the View menu.
Streamer Settings
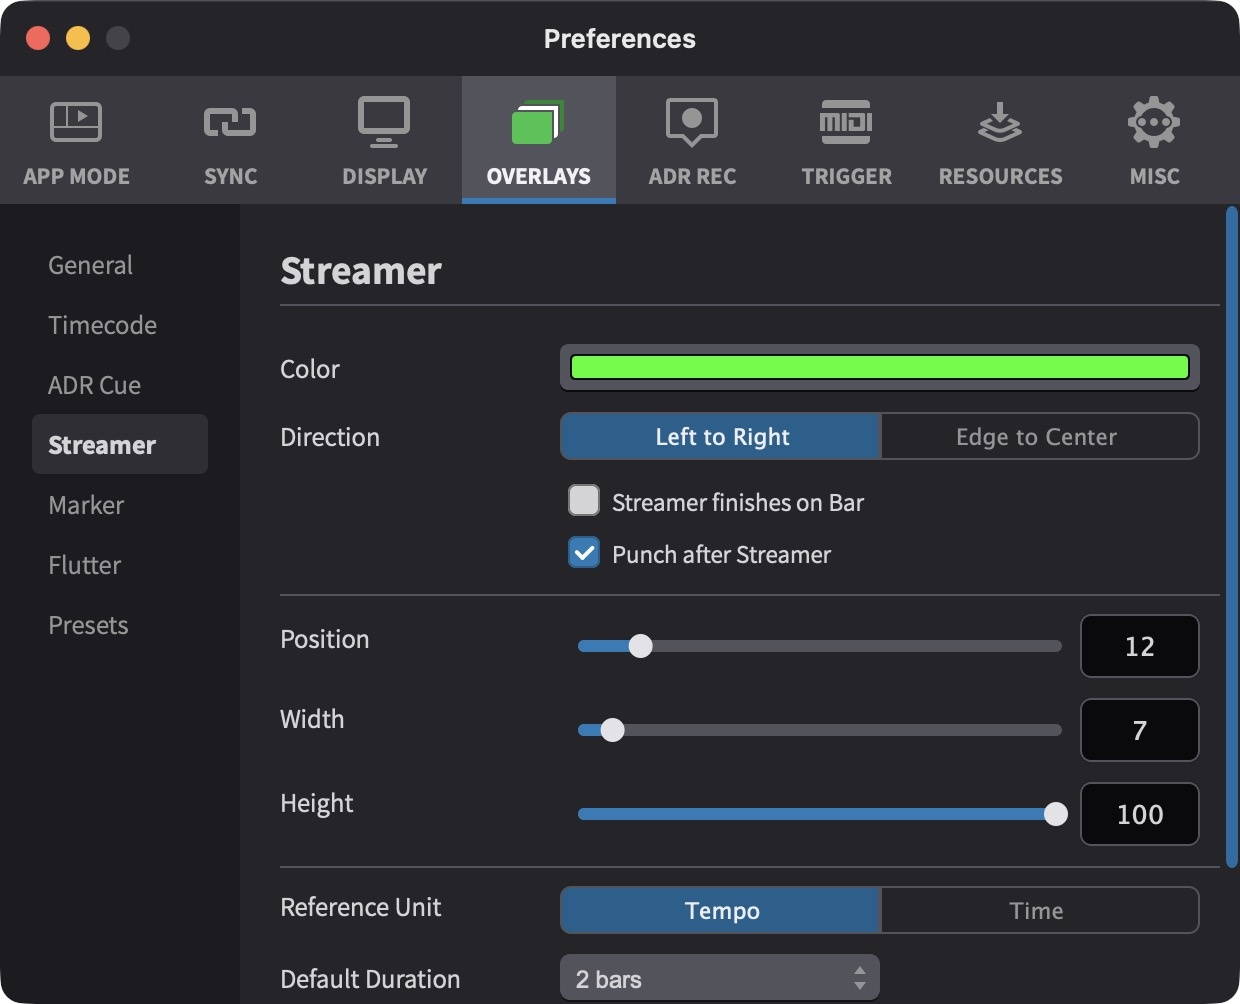
All Streamer overlay settings are configured in Preferences / Settings → OVERLAYS → Streamers tab. The available options provide complete control over how Streamers appear and behave.
 {width=70%}
When a setting is adjusted, a temporary preview of the overlay is automatically displayed on all available video devices for a few seconds, allowing settings to be fine-tuned visually. Overlays do not need to be enabled in the Device List, and events do not need to be added to the timeline, in order to preview settings changes.
If overlays are visible when adjusting settings but not during playback, ensure that the overlay type is enabled for the relevant device in the Device List (Preferences / Settings → DISPLAY tab), and that overlays have not been disabled globally via Toggle Overlays Globally in the View menu.
Overlay appearance settings apply globally - they are shared across all video devices, projects, and timelines.
Color sets the colour of newly created Streamer events. This acts as a default and can be overridden per-event in the Event List. A colour is chosen from the Base Colors palette and adjusted using the Lightness slider. The colour picker also includes an Opacity slider, which can be used to make the Streamer semi-transparent.
Direction sets the direction of the Streamer animation. Left to Right displays a single bar moving across the screen from left to right. Edge to Centre displays a bar from each edge of the screen, both moving simultaneously towards the centre.
Streamer finishes on bar toggles an optional bar on the right side of the screen that marks the end of the Streamer. If this is not checked, the Streamer will end at the right edge of the display. This setting only applies when the Direction is set to Left to Right.
Position: Top-Bottom adjusts the vertical positioning of the Streamer. Moving left positions the Streamer lower on screen, while moving right positions it higher.
Size: Width adjusts the horizontal width or thickness of the Streamer.
Size: Height adjusts the vertical extent of the Streamer - for cases where it is desirable to have the Streamer not cover the entire height of the video. Moving left shortens the Streamer, while moving right makes it taller.
Reference Unit
Reference Unit selects between Time-based and Tempo-based Streamers. The reference unit that is active at the moment a Streamer is created determines its type. A Time-based Streamer has a duration measured in seconds, while a Tempo-based Streamer has a duration measured in bars and an additional tempo (BPM) field. Once created, a Streamer's type cannot be changed - a Time-based Streamer cannot be given a tempo, and a Tempo-based Streamer cannot be converted to a Time-based duration.
Duration and Tempo
Default Duration sets the duration used when creating a new Streamer event. When the reference unit is set to Time, the duration can be set to 1, 2, 2.67, 3, 3.3, or 5 seconds. When the reference unit is set to Tempo, the duration can be set to 1, 2, or 4 bars.
Default Tempo sets the default tempo used when creating a new tempo-based Streamer. Each tempo-based Streamer can have its tempo adjusted individually after creation, allowing different Streamers to play back at different tempos within the same project. This setting is only available when the reference unit is set to Tempo.
Cue Pro currently only supports 4/4 musical timing for the Tempo setting.
Punch After Streamer
Punch After Streamer controls whether a Punch is displayed at the very end of each Streamer event. When enabled, a flashing circle appears at the Hit Point as the Streamer finishes. This applies to both standalone Streamer events and Streamers displayed as part of ADR Cue events.
When scoring to celluloid film, a streamer was created by manually scribing a diagonal line across a 35mm work print, terminating the scribe with a physical hole punched in the film - hence the term "punch."
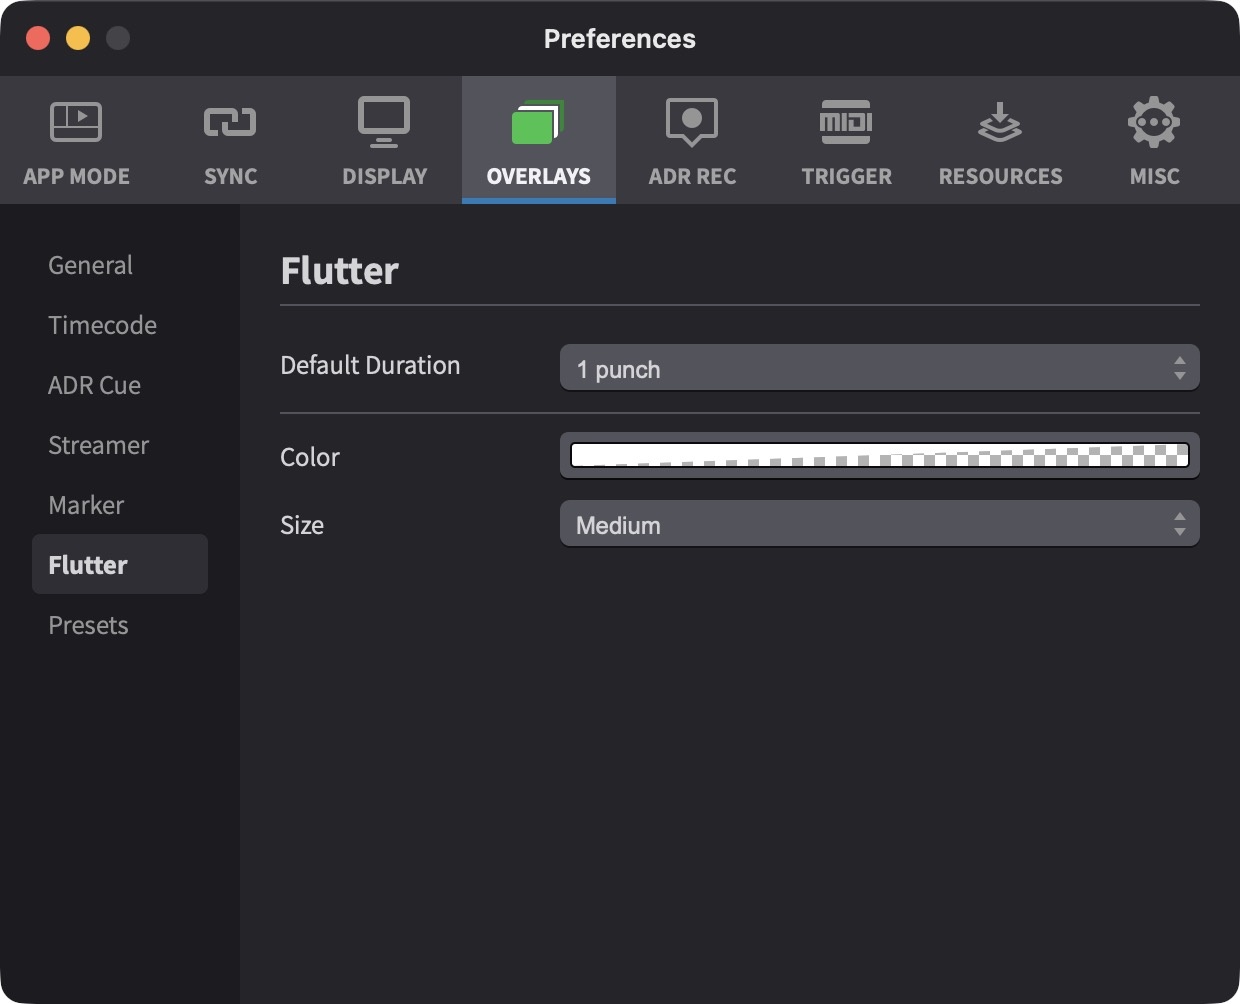
The visual appearance of the Punch is configured in the Flutter tab in Preferences / Settings → OVERLAYS. Color sets the colour of the Punch - a colour is chosen from the Base Colors palette and adjusted using the Lightness slider. The colour picker also includes an Opacity slider, which can be used to make the Punch semi-transparent. Size sets the size of the Punch circle on screen (Small, Medium, or Large).
Note: Unlike Streamer overlays - which have independent settings for standalone Streamers and the Streamer element of ADR Cues - the Punch settings in the Flutter tab are shared across both contexts. There is currently no independent Punch configuration within the Streamer & ADR Cue settings.
 {width=70%}
Audio Beeps
Play Audio Beeps toggles audible beeps during the Streamer. In Time mode, the Streamer plays 3 beeps. In Tempo mode, the Streamer plays 4 beeps per bar.
Streamers in ADR Cues
ADR Cue events can include a Streamer as part of the pre-roll countdown. The visual appearance of Streamers within ADR Cues - including colour, direction, and duration - is configured independently in the ADR Cue overlay settings, not in the Streamers tab described above. Changes made to the settings in the Streamers tab affect only standalone Streamer events on the STREAMERS track. For details on configuring ADR Cue Streamers, see the ADR Cue Overlays chapter.
Overlay Presets
Overlay settings can be saved and managed through the Presets item in the OVERLAYS sidebar in Preferences / Settings. A Default preset is always present and cannot be deleted or renamed. The currently active preset is highlighted, and a modified indicator shows when unsaved changes exist.
Loading a preset: Double-click the preset name to load it.
Saving changes to a preset: Click the Save button (↓) on the preset row. The Default preset cannot be overwritten. When the current settings have been modified since the preset was last loaded or saved, an asterisk (*) appears after the preset name to indicate unsaved changes.
Reverting a preset: Click the Revert button (↑) on the preset row to discard unsaved changes and restore the preset's last saved state.
Creating a new preset: Click the + button below the preset list.
Renaming a preset: Click the preset name in the list. The Default preset cannot be renamed.
Deleting a preset: Click the Delete button on the preset row. The Default preset cannot be deleted.
Importing and exporting presets: Use the
Import (↓) and Export (↑)
buttons at the bottom left of the Presets page to share
.dispPref preset files between studios, editors, or
machines.
 {width=70%}
Smooth Rendering
Because Streamers sweep across the screen during playback, their motion can appear stepped or jerky at low video frame rates such as 24 fps. Enabling Smooth Overlay Rendering decouples the overlay rendering from the video frame rate, producing fluid, continuous Streamer movement. For full details on enabling and configuring smooth rendering, see the Display Setup chapter.