CueLink Setup
Introduction
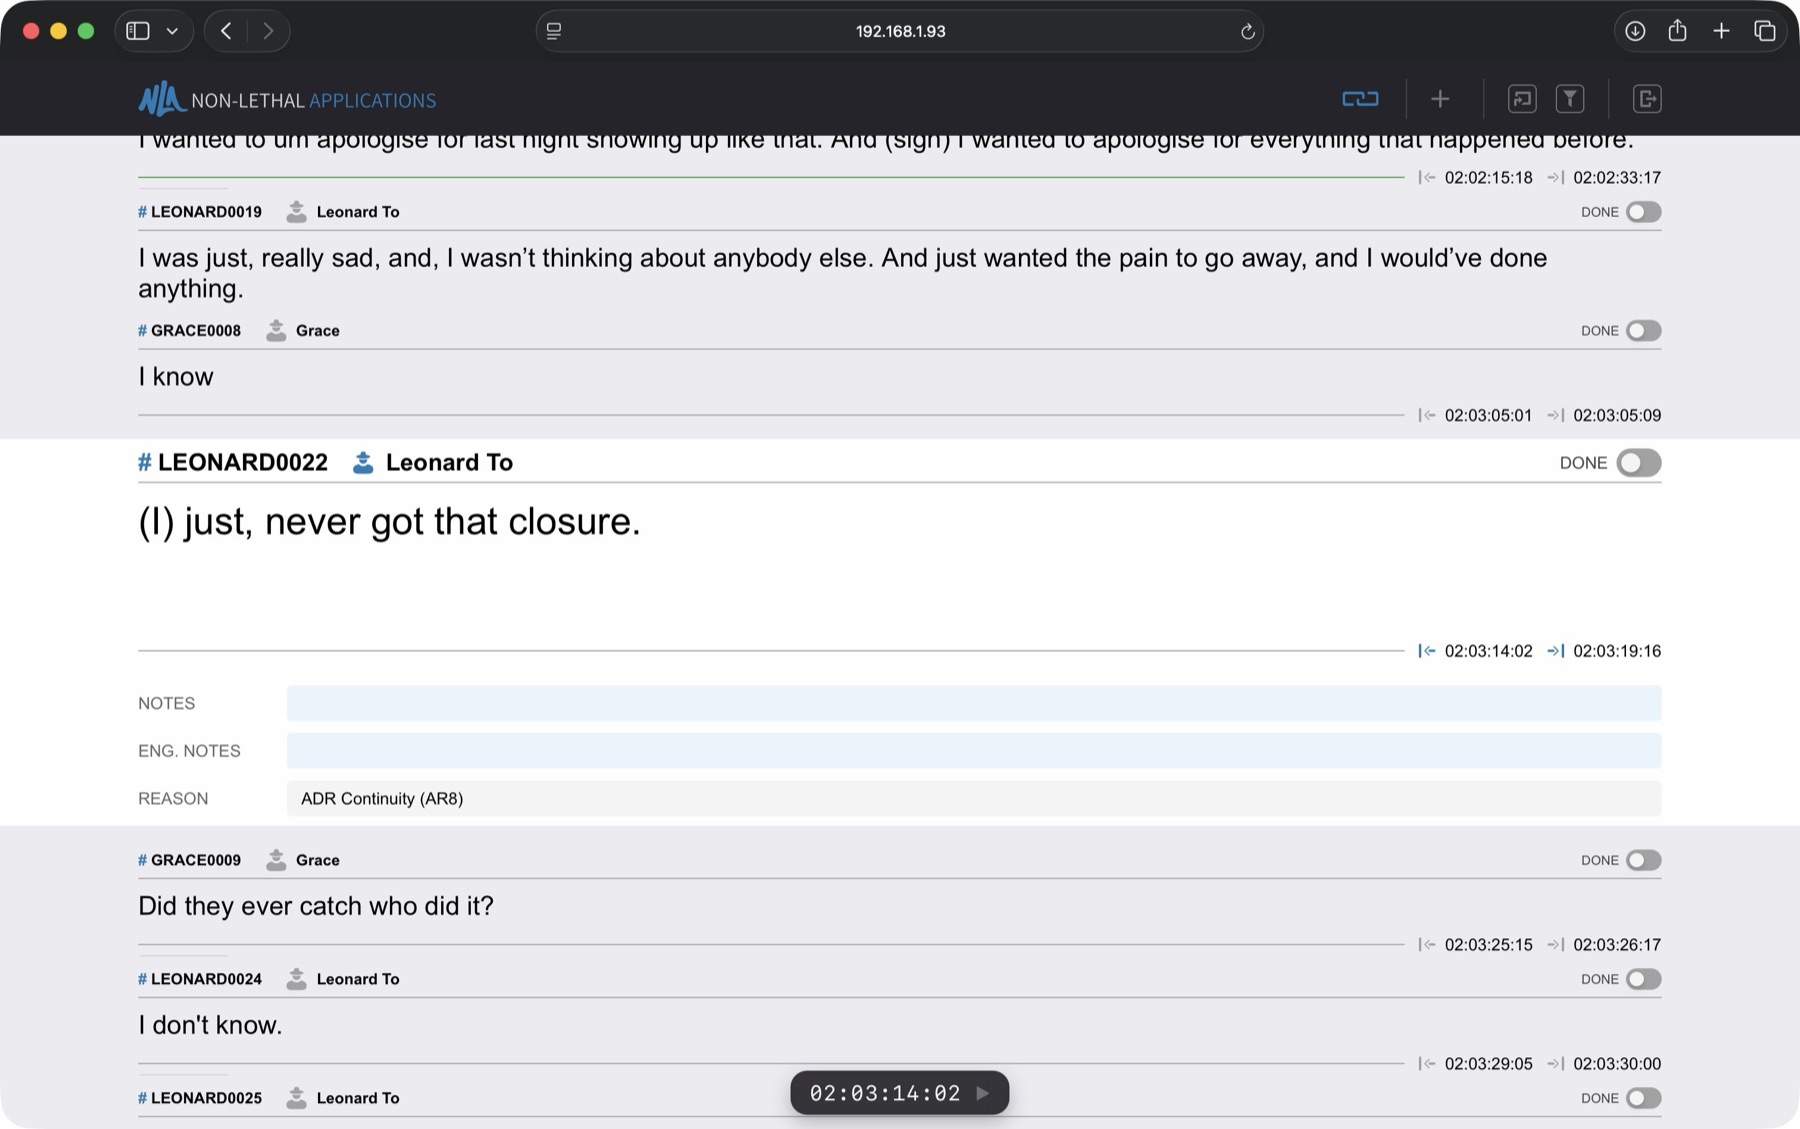
CueLink allows devices on the local network - such as Macs, PCs, tablets and smartphones - to access ADR Cue events on the current active Cue Pro Timeline live. This enables any authorised participant in the recording session to follow the current cue being recorded on their own device through a web browser of their choice, without the need for any additional software.
 {width=100%}
Participants who have been granted Editor privileges - for example the Director or Dialogue Editor / Supervisor - can make changes to cues on their devices that are immediately updated on the displayed ADR Cue video overlays. With Cue Pro Studio, editors can also create new cues, adjust timecodes, and use the hand-drawn Scribble annotation tool. A floating transport bar keeps editors informed of Cue Pro's current playback state and timecode position in real time.
 {width=55%}
CueLink operates using standard networking protocols for remote access via external devices. It is simple to set up and has been designed to be especially user-friendly and intuitive to operate on external devices, with no or minimal explanation needed. The following chapter explains how to set CueLink up for use in a recording environment.
The CueLink settings are stored with Cue Pro's global preferences and are not project dependent. This allows for quick switching between different projects, with all users still connected.
Getting Started with CueLink
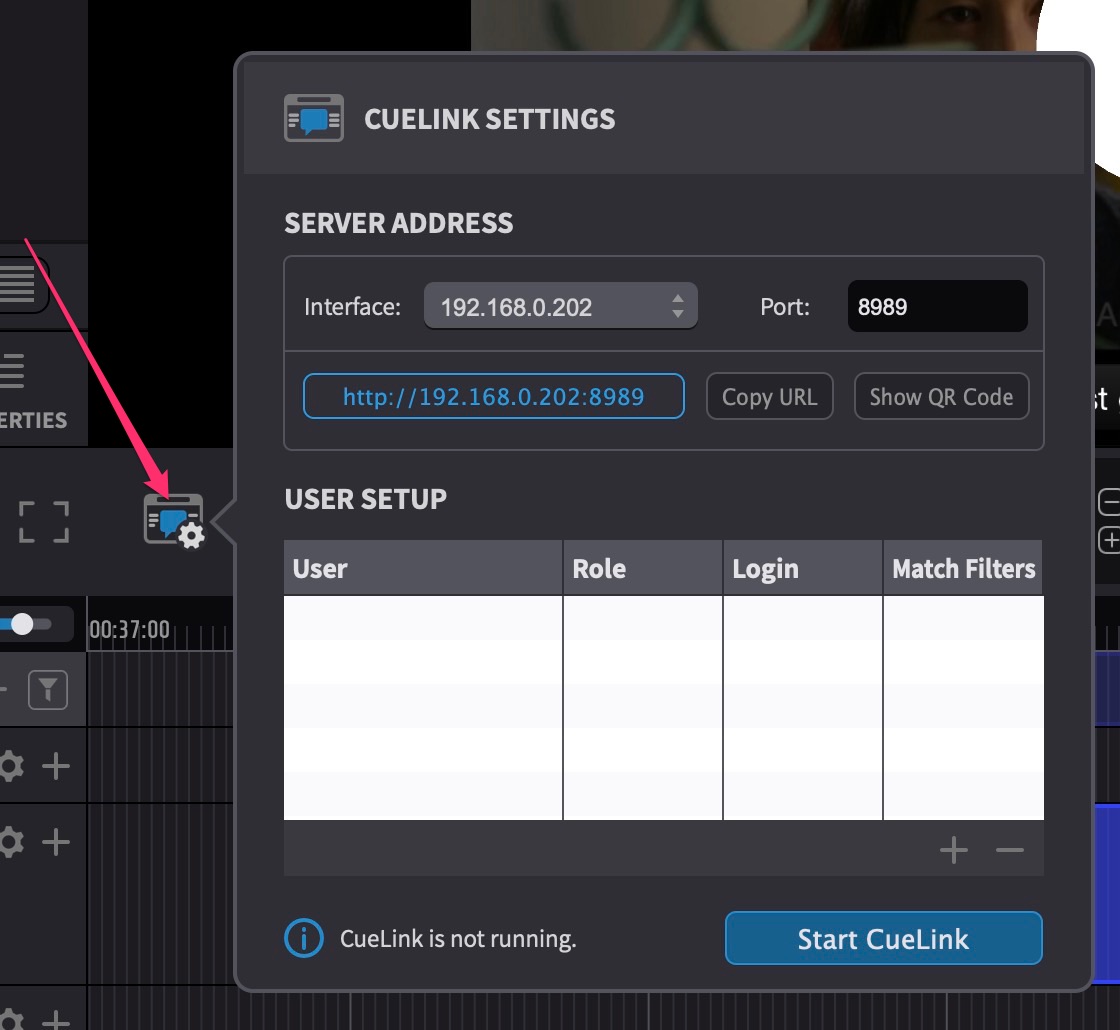
To activate CueLink and configure its settings, click the CueLink button located in the main window controller bar of Cue Pro, which will open the CUELINK SETTINGS pop-up panel.
 {width=55%}
Defining the CueLink connection address (Interface & Port Settings)
Interface
The Interface value determines the main part of the IP address that other devices will use to connect to.
In the Interface field, select the IP address that corresponds to the Cue Pro computer's address on the shared network.
In many cases, this will be the Wi-fi network address as seen in the Cue Pro computer's network settings found in either Apple menu → System Settings → Network or Apple menu → About This Mac → More Info → System Report → Network. In other cases, this may be another network connection, such as wired ethernet.
Port
By default, the Port field is set to 8989. In most basic setups, this should not require changing. However, in the event that this port number is in use by other services on the computer running Cue Pro, enter a different free port number. If in doubt or experiencing trouble connecting, check the port assignments to the Cue Pro computer in the router setup, or consult the network administrator.
Once the rest of this chapter's setup is complete and CueLink is
running, the combination of the
Interface address and
Port number is the address each person
attending the session should be supplied, in the following
format: http://(IP address):(port number). In the
example above, CueLink would be accessed at:
http://192.168.0.166:8989
Users
Overview
Multiple users can utilise CueLink simultaneously, such as a voice talent in a live room and an editor in a studio. Users are defined and configured in the CUELINK SETTINGS panel. A separate User profile should be defined for each person or device connecting to CueLink. Though it is possible for more than one person to share a defined user profile, this is generally not advisable as it will likely cause conflicts with different settings, filters and viewing preferences set by each device sharing the same user profile.
Each user profile includes a definable User name, Role, Login code, and Match Filters setting.
Adding a new User profile
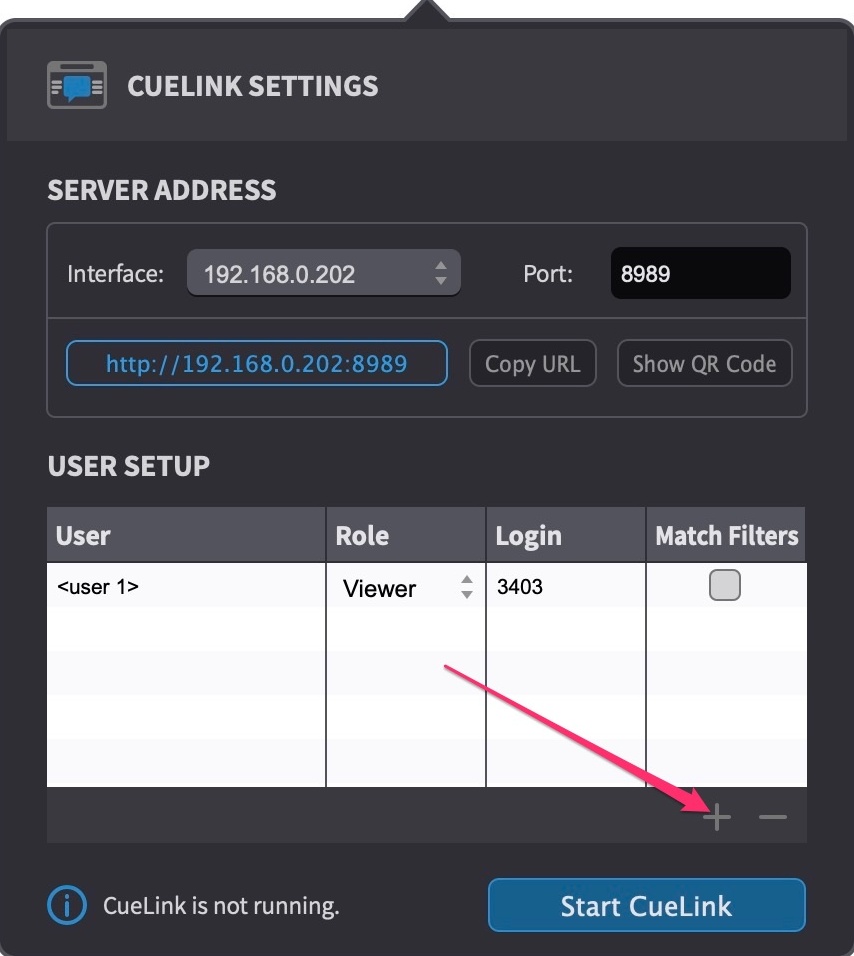
To create a new User profile, click the + icon located at the bottom right of the User table in the CUELINK SETTINGS panel.
 {width=50%}
The new user profile will appear in the table named <user 1>. If another profile already exists called <user 1>, the next available number will be used, e.g. <user 2>.
By default, the Role field will be set to Viewer, and the Match Filters field will not be enabled.
Add as many user profiles as required for each person connecting with a device.
Deleting a User profile
To delete an existing User profile, select it in the list and press the backspace key, or click the - icon located at the bottom right of the User table in the CUELINK SETTINGS panel.
This can be done for multiple User profiles selected in the list simultaneously.
Setting a User Name
Click on the User field to define a name for each user. The User name helps with organisation and appears only in the settings panel - the person logging in does not need to know the user name in order to log in.
Setting a User Role
The Role field specifies user permissions.
Users with their Role set to Viewer can access events in a read-only mode. The fields visible are Cue Number, Character name, Actor name, Text, and associated Notes. Viewers can also see the Done status of each cue but cannot change it.
Users with their Role set to Editor see additional fields including Engineering Notes, the Reason field, and the Done switch. Editors can edit the Text, Notes, Engineering Notes and Done fields live during a session. Any changes made are updated immediately on the ADR Cue video overlays in Cue Pro. Reason codes are viewable through CueLink but cannot be modified.
With Cue Pro Studio, Editor users gain additional capabilities: adjusting the In and Out timecodes of existing cues, creating new ADR Cues directly from CueLink, hand-drawn Scribble annotations on cue text, and a floating transport bar showing Cue Pro's current timecode and playback state. Scribble is also available to Viewer users with Cue Pro Studio.
Note: Scribble requires a stylus input device such as Apple Pencil on iPad or a compatible stylus on Windows touch devices - finger touch input is not supported. If voice talent will be using Scribble to annotate cue text during recording, ensure a compatible stylus is available for their device.
For full details on using all CueLink features on a remote device, see the Accessing CueLink on a Remote Device chapter.
Setting a Password manually
When a new user is created, a unique numeric password is automatically assigned to each user.
To define a login password manually, click on the Login field and type a new 4-digit numeric code.
Once the rest of this chapter's setup is complete and CueLink is running, each person attending the session should be supplied their login password.
Match Filters
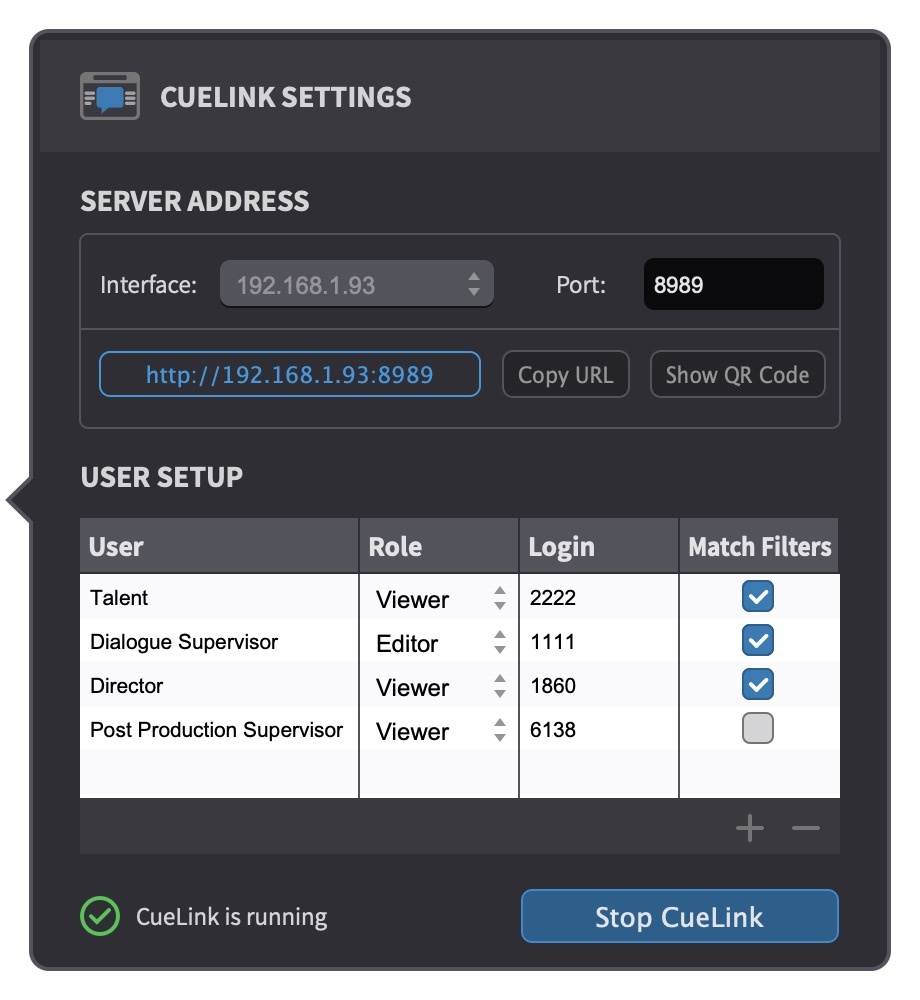
The Match Filters feature enables users to access only those events that match the filter parameters set in Cue Pro. For instance, if a filter is set in Cue Pro to display only events for one character, CueLink users will also see only those events for that character. If Match Filters is not enabled, users will see all events for all characters listed in the Cue Pro Timeline, regardless of any filter settings.
Enabling Match Filters is beneficial in ADR recording scenarios where only specific lines need attention, reducing distractions for the talent.
Conversely, disabling Match Filters is useful when a participant needs to see all dialogue during recording - for example, a dialogue supervisor, director, or dubbing supervisor who wants the full script visible so they can give the talent better direction about what the other characters are saying around them.
Select the option that best suits operational needs.
Starting CueLink
To start CueLink, simply click the Start CueLink button at the bottom of the CUELINK SETTINGS panel.
 {width=55%}
Once the CueLink service has started sharing the project, the status confirmation to the left of the button should say CueLink is running, with a green tick to the left of it.
The login address and passwords can now be shared with each user.
The CueLink connection will remain active to all devices - even if the Cue Pro project is closed and another is opened.
Sharing the CueLink Login address
The CueLink login address can be shared with users on their own devices by one of three methods:
For mobile phone and tablet users, the quickest method is clicking the Show QR Code button. Users point their device camera at the QR code and once the QR code is recognised, tap the link button which appears. This will instantly open the CueLink login page in their default web browser.
A more generic method for any device type is to click the Copy URL button to copy the login address to the clipboard and paste it into a message in a messenger app or email.
The last method is to verbally quote the address as shown in the blue box to the left of the Copy URL button.
To access CueLink in a browser on the same computer, click the URL button shown in the blue box to the left of the Copy URL button. This will instantly open the CueLink login page in the default web browser.
Changing User Settings During a Session
User settings such as Role and Match Filters can be changed in the CUELINK SETTINGS panel while CueLink is running - there is no need to stop and restart the CueLink server. However, changes are not automatically propagated to users who are already connected. Any affected user must log out and log back in for the updated settings to take effect. It is good practice to inform the user before making changes so they know to reconnect.
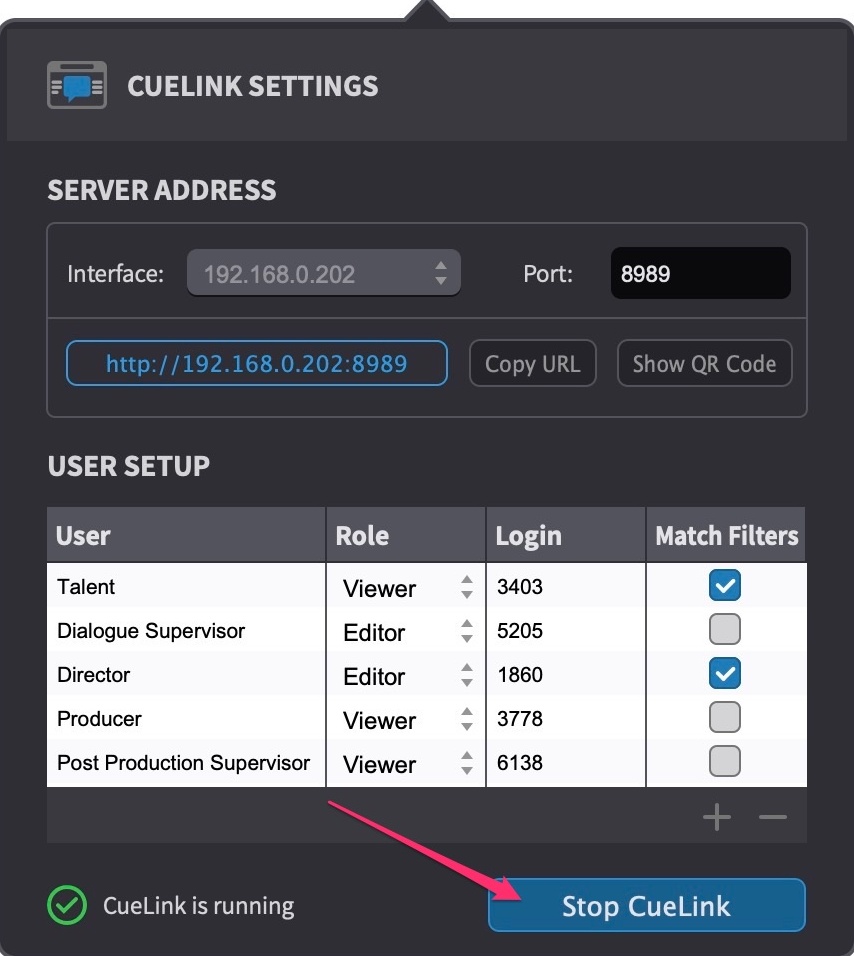
Terminating CueLink
To stop sharing the current Cue Pro Timeline via CueLink, simply click the Stop CueLink button at the bottom of the CUELINK SETTINGS panel.
Once the CueLink service has stopped, the status confirmation to the left of the button should say CueLink is not running, with a blue i to the left of it.
All users that were connected will be disconnected. As a precautionary security measure, users will automatically be logged out after 12 hours of connection.
If Cue Pro is quit, the current CueLink session will also be terminated.
Integrating External Systems with CueLink API
Available in: Cue Pro Studio
CueLink includes an API that allows external systems to access character and event data from the active CueLink session programmatically. This is intended for facilities that want to integrate CueLink with their own studio infrastructure - for example, connecting to a booking system to automatically update remaining recording time based on cue completion progress, or feeding live session data into a custom dashboard.
The API is available while CueLink is running and requires an API key for authentication. Cue Pro generates this key automatically on first launch, and the same key is reused on every subsequent launch. To find the API key, open Cue Pro Preferences and go to the Misc tab - the key is shown in the CueLink API Key field, where it can be copied for use in the external system.
The API provides two endpoints, both prefixed with
/v2/api/:
GET /v2/api/characters - returns the full character
list for the active Timeline, including character names and
assigned actor names.
GET /v2/api/events - returns all events in the
active Timeline, including cue numbers, timecodes, text, notes,
and completion status.
All API responses are encrypted. The API key must be included with each request as a query parameter, an Authorization header, or an X-API-Key header.
A standalone sample application is available as a free download from the Non-Lethal Applications resources page: https://non-lethal-applications.com/nlalib/download.php?type=cuelink-sample-app. The sample app is a single HTML file that can be opened directly in a browser and demonstrates how to connect to the API, including authenticated requests and response decryption. It is intended as a starting point for building custom integrations.
For further integration support, please contact Non-Lethal Applications.