Working with Clip Groups in Pro Tools
ADR cues created as clip groups within Pro Tools® can be imported into Cue Pro using one of two methods:
- Direct import from the active Pro Tools session — the simplest approach. Cue Pro reads the clip groups directly from the connected Pro Tools® session. Requires Pro Tools 2025.6 or later.
- Import from a Pro Tools Session Info text file — for use when the clip groups are in a different Pro Tools® session, or when using a Pro Tools® version earlier than 2025.6. The clip group data is first exported from Pro Tools® as a text file, then imported into Cue Pro.
Both methods use the same clip group naming conventions for track and region names, and both require the same preparation steps before import.
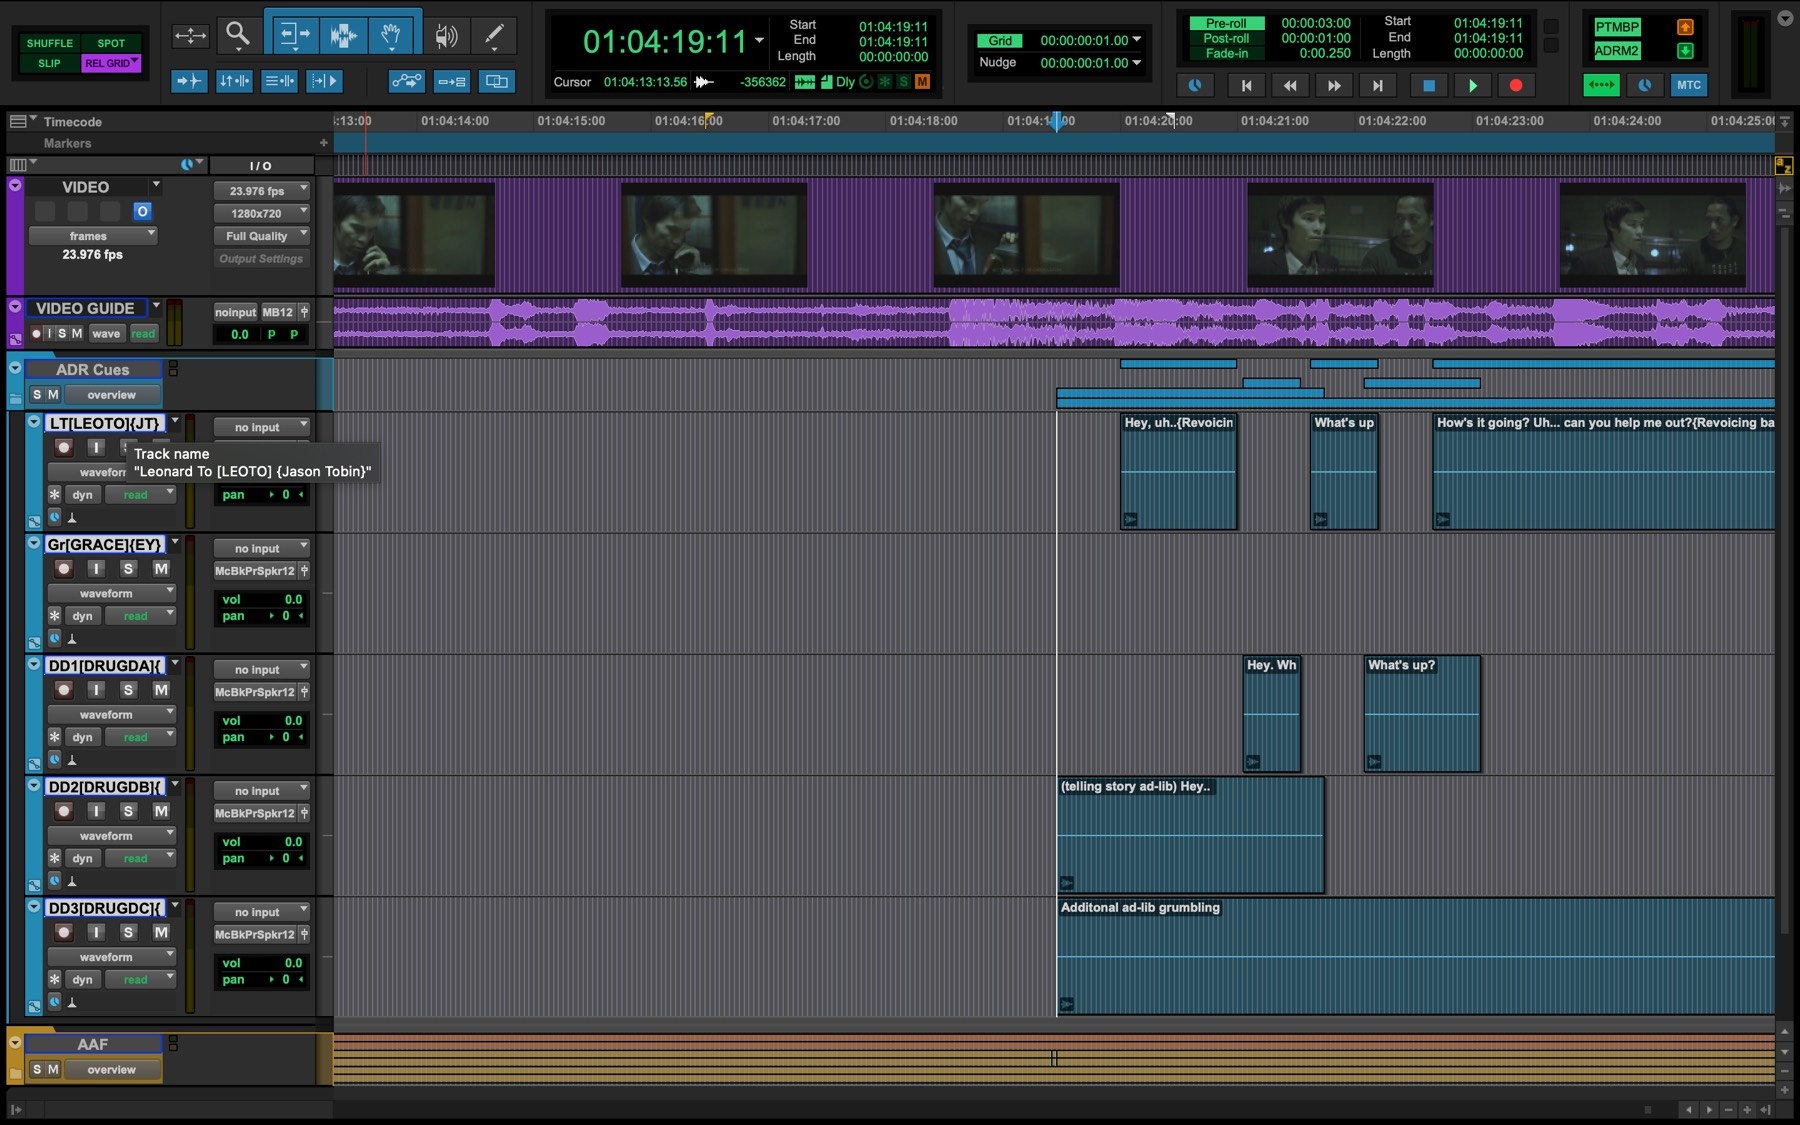
Here's an example of a simple Pro Tools® session containing ADR cues as clip groups for 5 actors:
 {width=70%}
The region names contain the line text (and an optional comment) and the track names contain information about the character. The cues for each actor are contained in that actor's track respectively.
Preparing for Import
Track Naming Syntax
The track name can contain the character name, the character prefix and the actor name. These are differentiated by the addition of square, curly, or no brackets.
- Character Name: abc - plain text
- Character Prefix: [abc] - text contained in square brackets
- Actor Name: {abc} - text contained in curly brackets
Example: Leonard To[LEOTO]{Jason Tobin}
Region Naming Syntax
The region name can contain the cue text, reason code and an optional comment. These are differentiated by the addition of curly, square, or no brackets.
- ADR Cue Text: abc - plain text
- ADR Cue Comment: {abc} - text contained in curly brackets
- ADR Cue Reason Code: [xRx] Cue Pro reason code contained in square brackets
Example: This is the adjacent reality. [AR4] {clarity on 'adjacent'}
ADR Cue Numbering Scheme
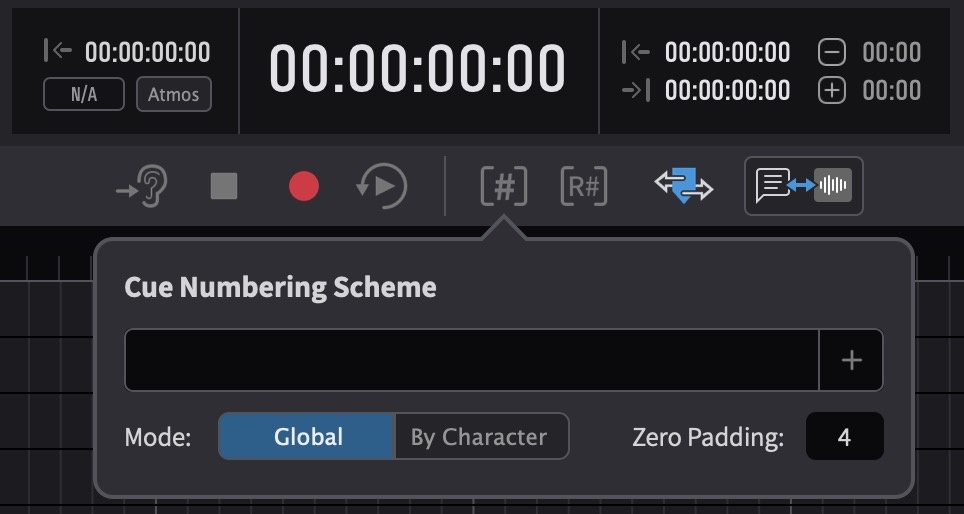
Before import, the chosen ADR Cue numbering scheme for imported cues should first be set by clicking the Cue Numbering Scheme button in the controller bar.
 {width=70%}
Click the + on the right of the Cue Numbering Scheme field. There are 4 fields to chose from:
- Char Name
- Char Pfx
- Pic Version
- Ep/Reel
Once the desired fields are added, they appear as boxes in the field box to the left. Their order can be shuffled by clicking a box and moving it to the desired point in the cue name. Additionally, fixed text can be added between, before or after them that will be used as part of the cue name.
To choose whether cues are named Globally or By Character, use the Mode selector.
Use the text box to the right of Zero Padding to select the number of digits in the cue number. This is done by adding zeroes to the start of the cue number so that all cue numbers are the same length, e.g. 0001, 0164, 1265, etc. With a zero padding of 3, Cue Pro will add leading zeros to all numbers so they are all 3 digits long (e.g. 001).
Setting the Timeline Frame Rate
It is vital that the frame rate of the Timeline is set correctly before importing cues. Failure to do so will cause discrepancies in the duration and location of the cues - especially when the correct frame-rate video is eventually added to the Timeline. Setting the frame rate is done either automatically by simply adding video to the current Timeline; or if no video is present, by clicking the pencil icon to the top right of the active Timeline and in the Edit Timeline Settings window that appears, selecting the relevant frame rate from the TC Frame Rate pull-down menu.
Method 1: Importing Directly from the Active Pro Tools Session
This is the simplest and recommended method. Cue Pro reads the clip groups directly from the connected Pro Tools® session - no file export is required.
To import, select the tracks in the Pro Tools® session containing the clip groups to be imported. In Cue Pro, go to the Event menu and choose Create Events From Clip Group Tracks. This feature requires Pro Tools 2025.6 or later.
Character Tracks are created or matched automatically for each imported track, and ADR Cues are generated for all valid clip groups on those tracks. After import, there is no live link between those new character tracks and the Pro Tools clip group tracks. So once they are imported into Cue Pro, if any additional cues are added later - to avoid needing to import tracks again, this should ideally be done in Cue Pro.
Method 2: Importing from a Pro Tools Session Info Text File
Use this method when the clip groups are in a different Pro Tools® session to the one currently connected, or when using a Pro Tools® version earlier than 2025.6.
Exporting the Session Info Text File from Pro Tools
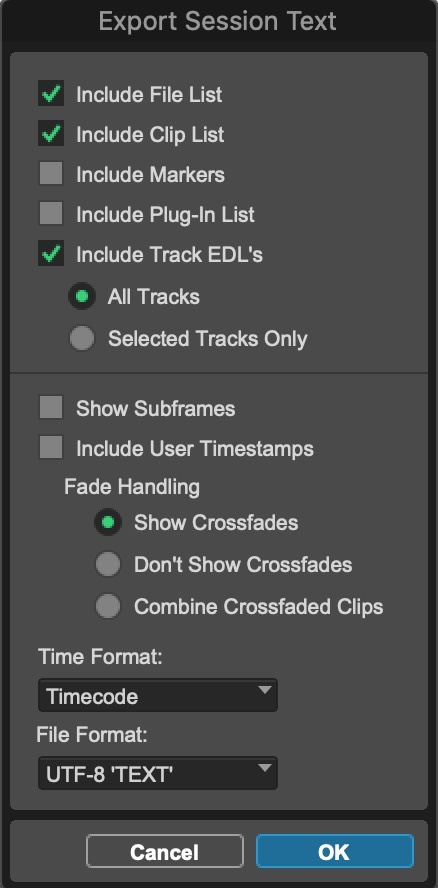
In the Pro Tools® session containing the clip groups, select File → Export → Session Info as Text.
Copy these settings as shown:
 {width=40%}
Make sure to select Timecode as the time format. It is recommended to use UTF-8 'TEXT' as the File Format as this also supports non-ASCII characters like Umlauts and other non-US character sets.
Importing the Text File
Select File → Import Events from File and choose the Pro Tools® Session Info text file from the browser window and click Open.
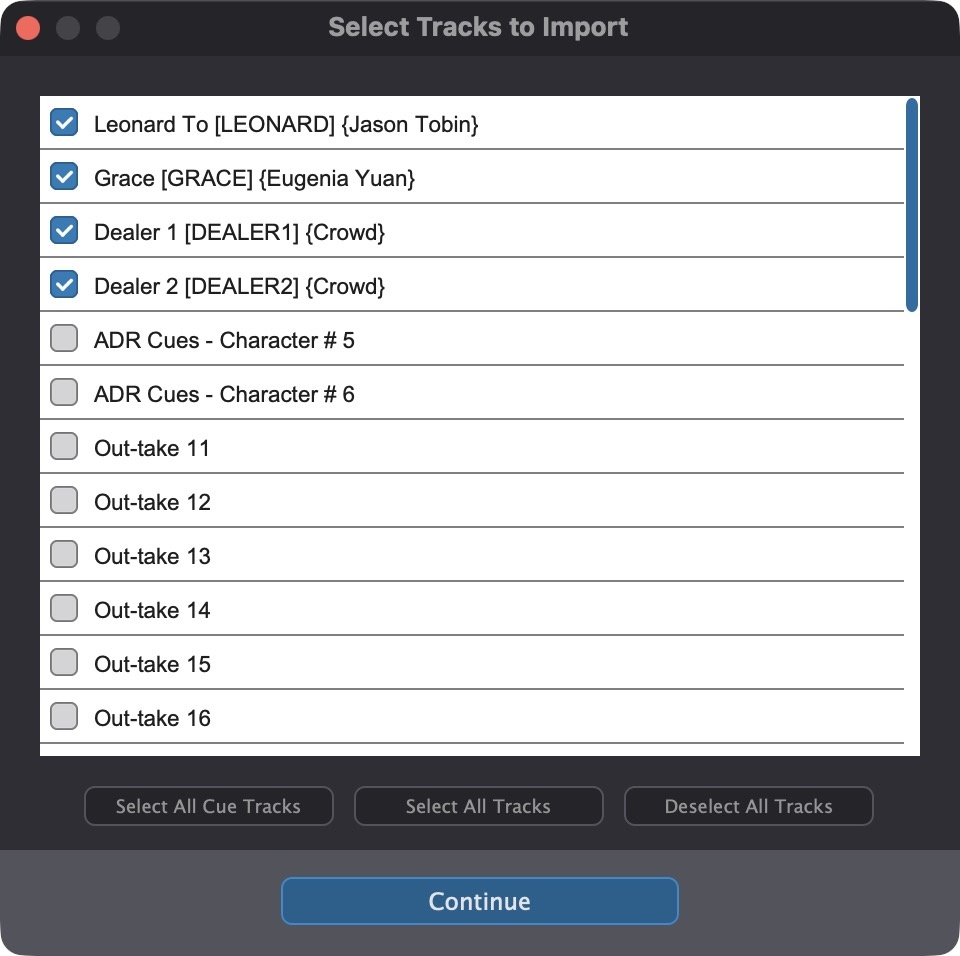
The Select Tracks to Import Window
The Select Tracks to Import window appears, allowing for selection of which character tracks to import.
 {width=70%}
This window does not appear for any other file formats.
There are a few useful buttons to help select more tracks quickly. These include:
Select All Cue Tracks - Activates only the tracks with recognised ADR cues.
Select All Tracks - Activates all tracks
Deselect All Tracks - Deactivates all tracks
Once the desired tracks have been chosen, click the Continue button at the bottom.
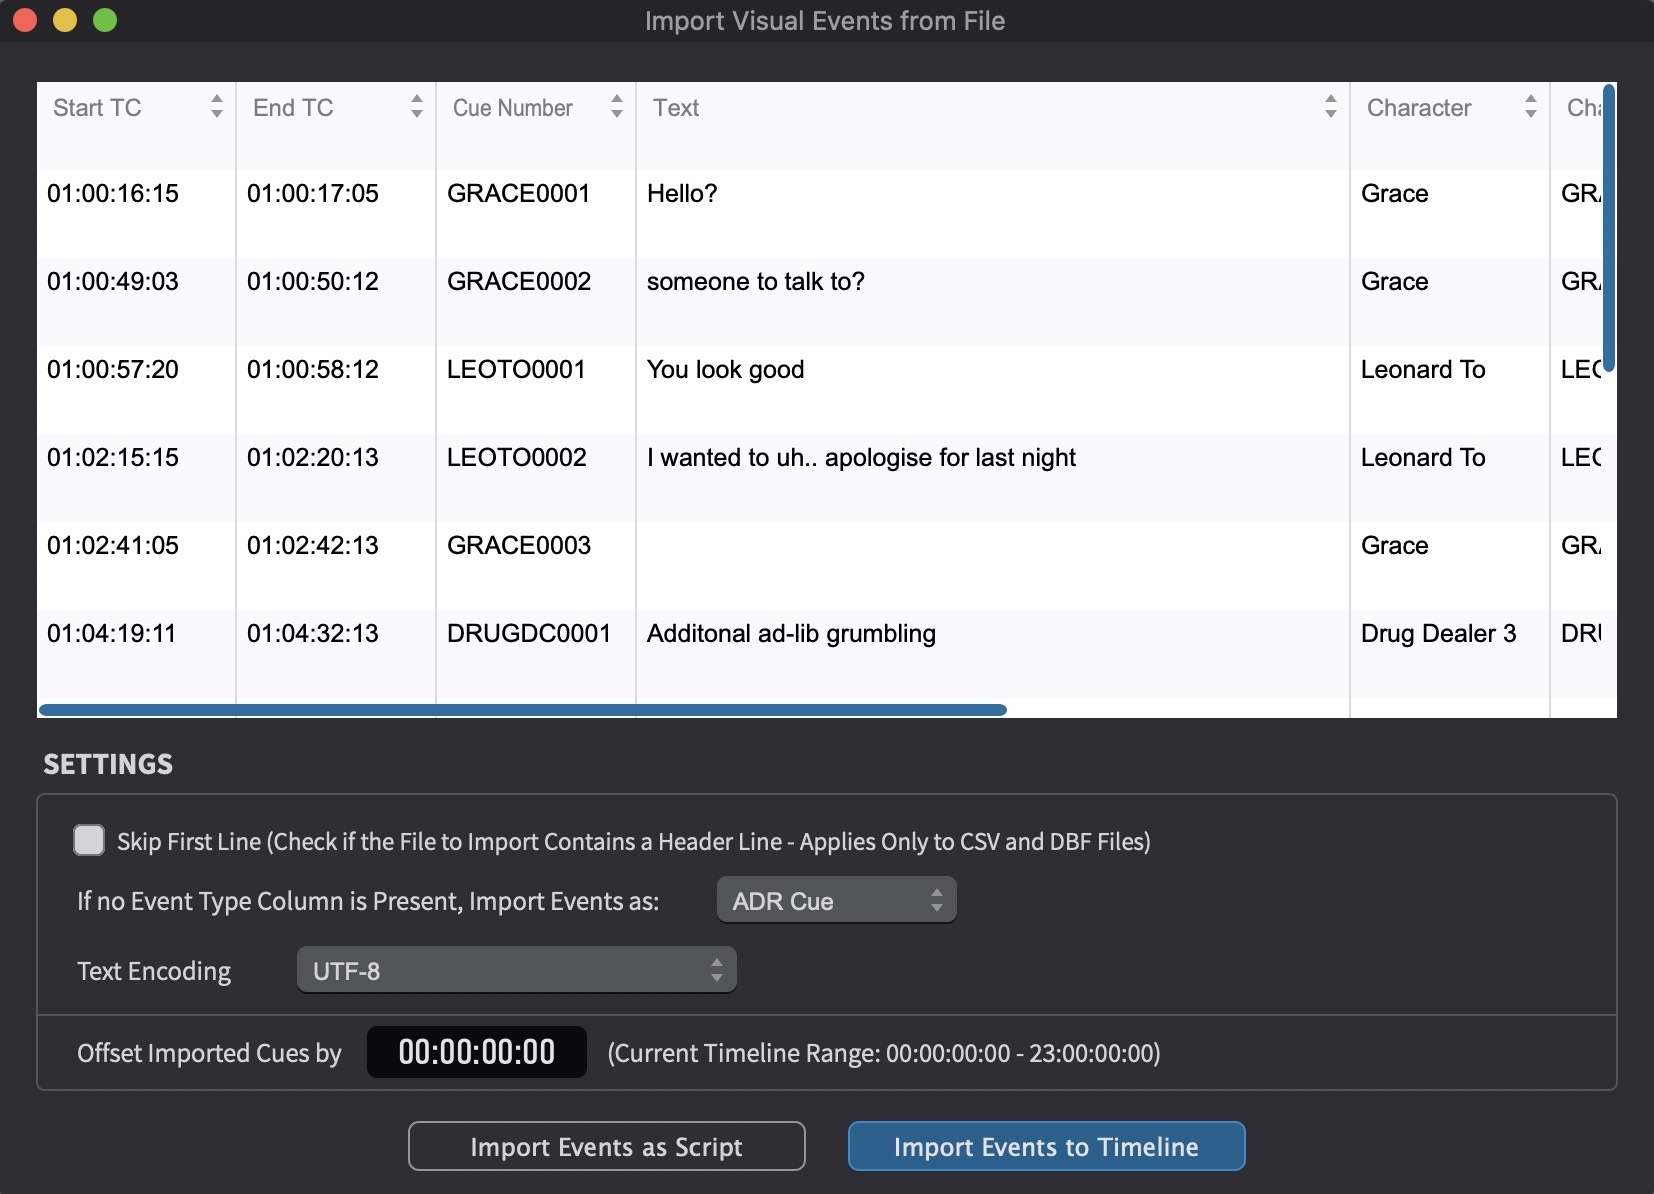
The Import Visual Events from File Window
The Import Visual Events from File window will appear next.
The window is separated into two sections: the top section shows the column mapping of the ADR cues in a table-like manner; and the bottom shows the import settings.
 {width=80%}
ADR Cue Column Mapping Table
For Pro Tools Import, these column headings are fixed to prevent any import errors.
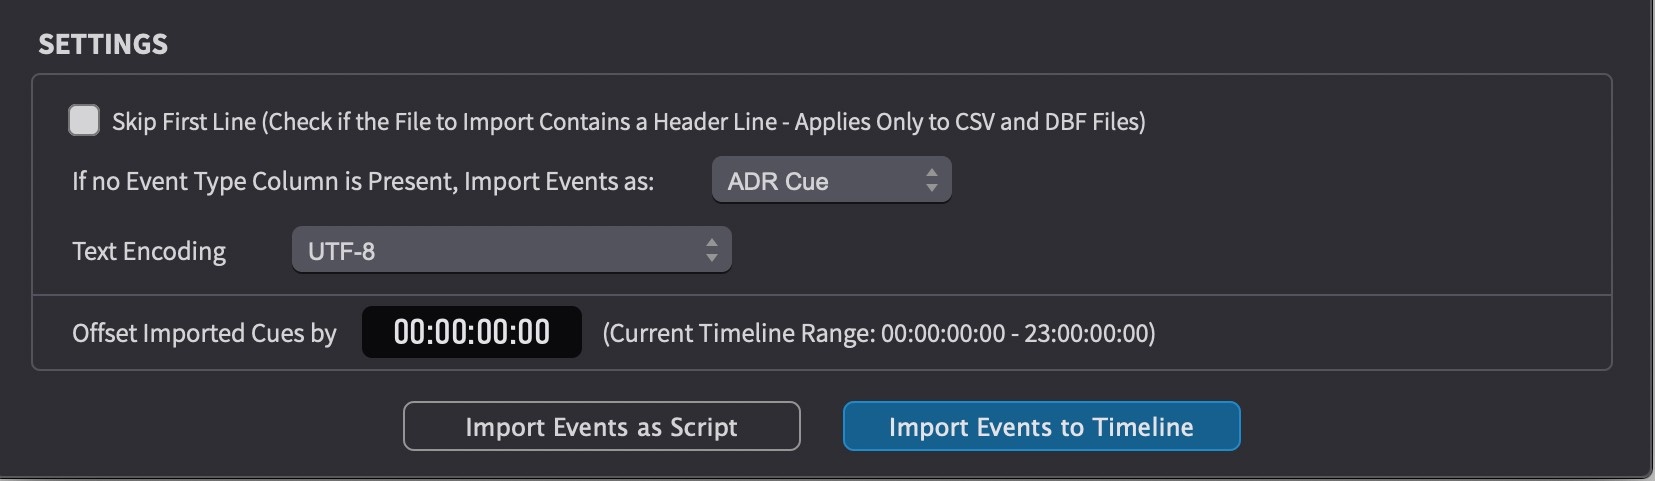
ADR Cue Import Settings Section
The bottom half of the Import Visual Events from File window contains a number of import related settings.
 {width=80%}
Skip First Line - this setting is not applicable for Pro Tools import.
Set the If no Event Type Column is Present, Import Events as: field to ADR Cue.
Text Encoding - Set this to UTF-8 or the same setting as used when exporting the Pro Tools Session text file. If unsure of the exact text encoding format of the file, UTF-8 is a good default starting point as it also supports non-ASCII characters like Umlauts and other non-US character sets. Every text file has an internal text encoding. The encoding determines how the file content should be interpreted. A text file basically is nothing more than a sequence of bytes and Cue Pro needs to know which character set to use to decode the bytes into human readable characters. That is why it is important to match the same export and import Text Encoding types. It is unfortunately not easily possible to detect the character set programmatically (it usually works for UTF-16 and for UTF-8). If uncertain about the text encoding used in the text file, try different text encodings until the best results are achieved. Problems will usually be visible with special characters like German Umlauts for example.
Offset Imported Cues by - add or subtract a defined timecode offset to all cues when importing them. For example, if the timeline start timecode is set to 10:00:00:00, but the imported cue sheet references a 1 hour start, enter 09:00:00:00 in the text box here to offset all imported cues by 9 hours. Negative values are also permitted.
To bulk import the cues into the timeline, click the Import Events button. Character Tracks will be created for all valid clip group tracks in the text file and ADR Cues will be created for all the valid clip groups.
Or to show the cues as a script to add each event manually one by one using the Import Script window, click Import Events as Script.
Sending ADR Cues to Pro Tools as Clip Groups
ADR Cues created in Cue Pro can be sent to Pro Tools as clip groups on a per-character basis. This creates region groups on the selected Pro Tools track, encoding the cue data using the naming conventions described in the Preparing for Import section above.
Clip groups use a simple naming convention that can only encode the dialogue text, a single reason code, and an optional comment. Everything else in an ADR Cue is lost in the transfer. This includes: Alt Text (translations), Notes, Engineering Notes, Take counts (selected and alternate takes), Recording Track assignments, Done status, TBW and B&E flags, On/Off Screen indicator, Open Ended flag, Pre Roll Color overrides, Forced Narrative settings, Reconf State, and all Anchor positions within cues. Cue numbering is also reassigned on import based on the current numbering scheme — original cue numbers are not preserved. For these reasons, clip groups should be considered a basic compatibility bridge for legacy workflows. To preserve the complete metadata for each cue, it is strongly recommended to manage ADR Cues within Cue Pro rather than round-tripping through clip groups.
To send ADR Cues to Pro Tools, first filter or select the cues for one character. This is easily done on the Visual Events Track by clicking the Filter button to the left of the timeline start and choosing a character from the Char Filter field, then dragging a selection over the desired filtered events in the timeline.
In Pro Tools, ensure a track is selected to receive the cues. To avoid overwriting existing clips, a new or blank track is recommended.
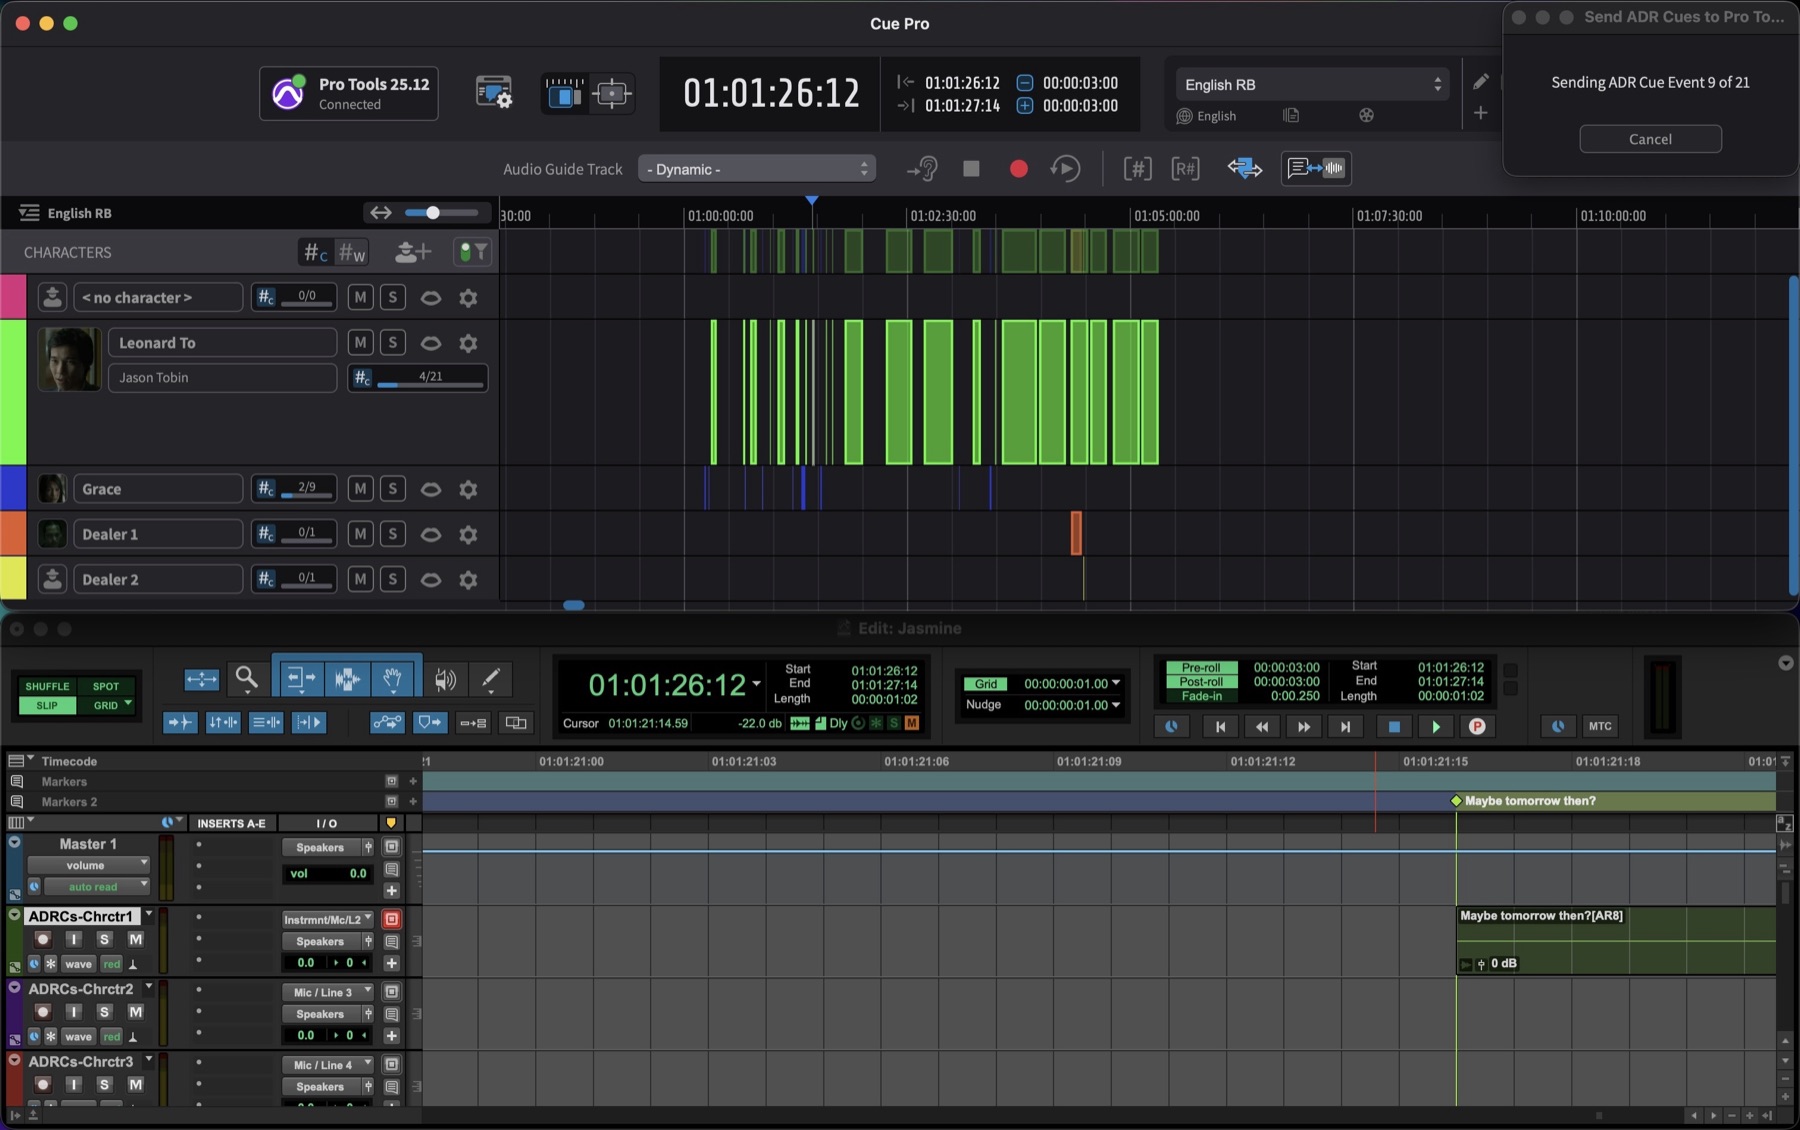
In Cue Pro, select Send Selected ADR Cues to Pro Tools from the Event menu.
 {width=70%}
Do not press any keys or move the mouse during this process - the command uses macro keystrokes to create and rename each region group in Pro Tools, and any input will interfere with the batch operation.
Repeat this process for each character.