Sync Setup - Pro Tools | Ultimate™ or Pro Tools | HD™ on a separate computer via Avid® Satellite Link
About DAW Sync
To play video in sync with Pro Tools®, Cue Pro needs a way to follow the Pro Tools® transport - knowing when it plays, stops, and where the playhead is located at any moment. This connection between Cue Pro and Pro Tools® is called DAW sync.
In Pro Tools Integrated Mode, Cue Pro synchronises automatically with Pro Tools® when the Cue Pro Connect plug-in is active when the Cue Pro Connect plug-in is active in the session - no additional setup is required. This is by far the easiest way to sync with Pro Tools® and requires Pro Tools 2025.6 or later.
In Media Mode, Cue Pro requires a sync connection to be configured manually. This chapter covers setting up that connection.
About This Configuration
This chapter covers syncing Cue Pro in Media Mode with Pro Tools® | Ultimate™ or Pro Tools® | HD™ (version 11 or higher) running on a separate computer, using Avid® Satellite Link.
Note: While Media Mode supports older Pro Tools versions for Satellite Link connectivity, Pro Tools 2025.6 or later is recommended to enable use of both Media Mode and Pro Tools Integrated Mode. Note that Integrated Mode also requires both applications running on the same computer.
This is the recommended configuration for a two-computer Media Mode setup. Satellite Link provides the tightest sync performance available - accurate scrubbing in any direction with the picture constantly updating. It is also the quickest and simplest sync method to configure. A wired ethernet connection between the two computers is required.
Note: DAW Control is not available when Pro Tools® runs on a separate computer. DAW Control relies on Apple's Accessibility API, which requires both Pro Tools® and Cue Pro to be on the same computer.
Avid® Satellite Link Setup in Cue Pro
Satellite Link setup should only need to be done once. Many of these settings should already be correctly configured by default - it's just a case of confirming they are correct.
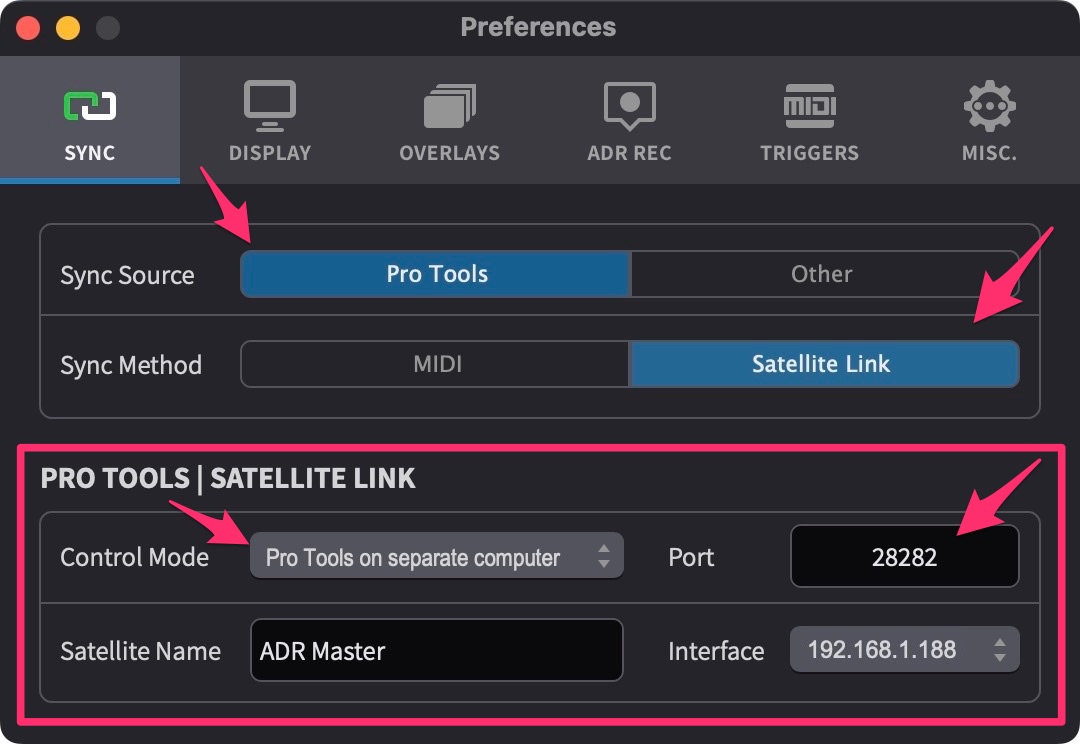
The Satellite Link options in Cue Pro can be found in the SYNC tab of the Preferences / Settings window.
 {width=70%}
Set the Sync Source field to Pro Tools.
Set the Sync Method field to Satellite Link.
In the Pro Tools | Satellite Link settings box, set the Control Mode field to Pro Tools on separate computer.
If not already, set the Port field to 28282. Port 28282 is the default port used by Pro Tools. This port number can be changed if 28282 is not usable in the network or to create different Satellite "subnets", e.g. one for each studio.
To give this computer's Cue Pro a unique Satellite name that would show up in Pro Tools®' Satellite options, type it in the Satellite Name field. This is especially useful for identifying each instance of Cue Pro, if running multiple Cue Pro Satellites on the same network.
The Network Interface address selection allows for selecting the network interface to use. Make sure to select the interface corresponding configured with the IP address also used in the Pro Tools® on the other computer being connected connect to.
Note: The steps up until this point in Cue Pro should only need to be done once. After that, Cue Pro should always be automatically connected to the Satellite network when it is available - unless the Satellite settings are changed.
Avid® Satellite Link Setup in Pro Tools® | Ultimate™ / Pro Tools | HD™
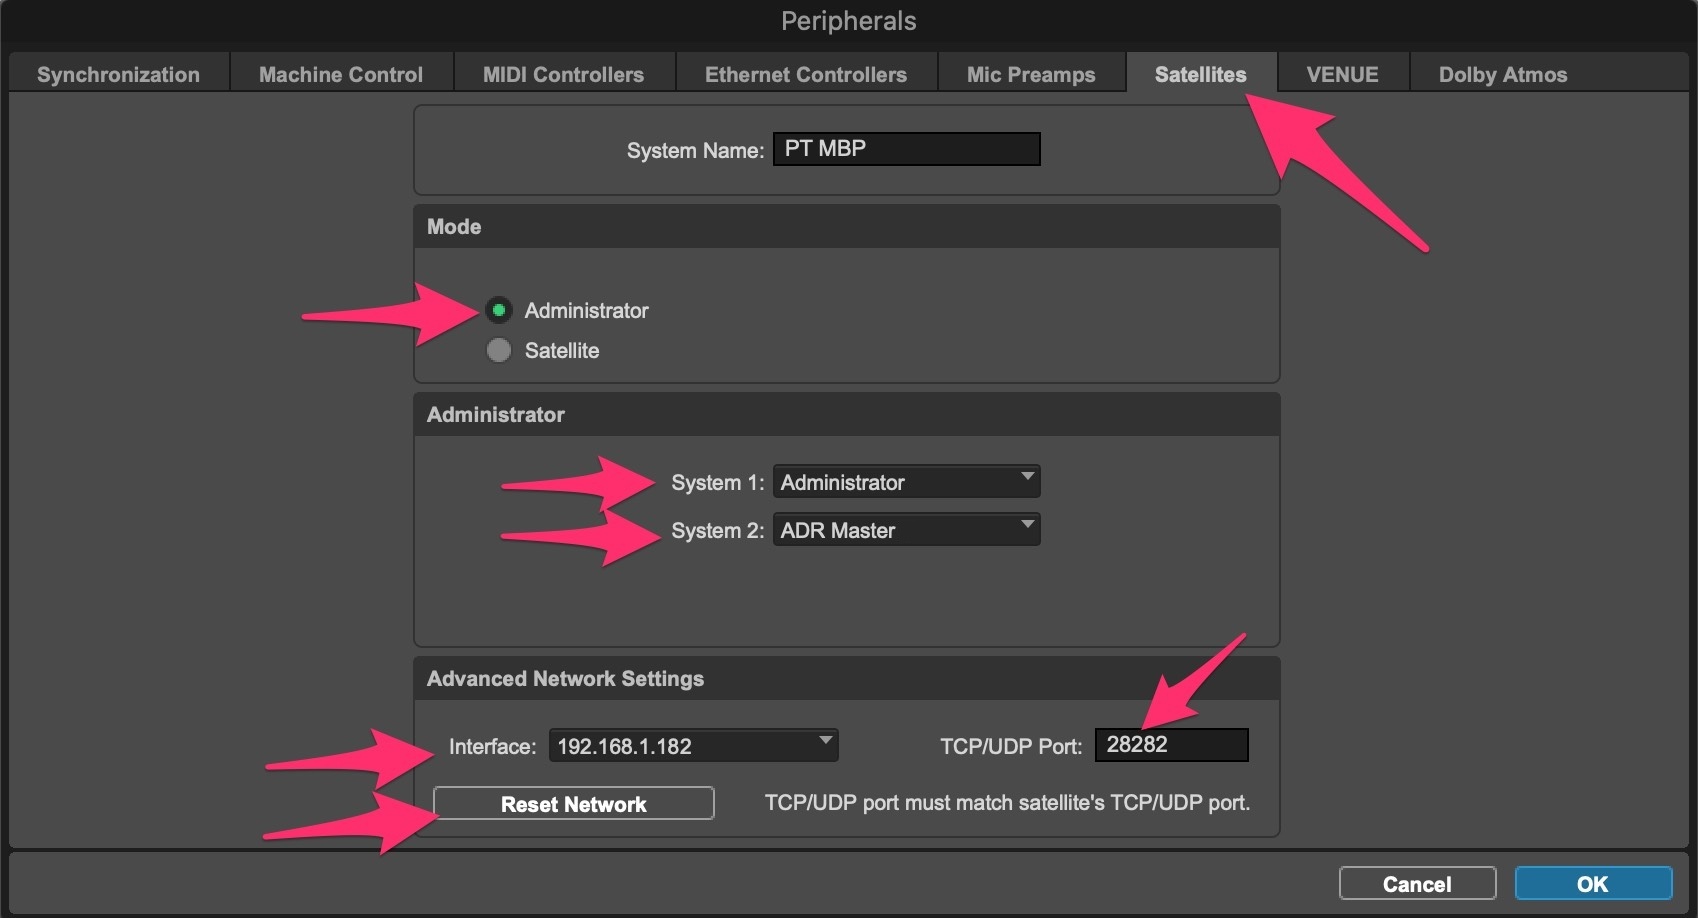
Then go to the Setup → Peripherals → Satellites tab:
 {width=80%}
Under the Advanced Network Settings, check that the Interface tab is set to the same network that was chosen in Cue Pro. Check that the TCP/UDP Port: value is set to the same value also selected in Cue Pro (28282 by default).
In the Mode section, select Administrator.
In the Administrator section, set the System 1 field to Administrator.
In the System 2 field, select the Cue Pro instance with the name defined earlier.
Note: System 2 is the default if no other Satellites are connected.
Note: If for any reason Cue Pro does not show up in the list, re-check all the settings & hit the Reset Network button. If Cue Pro still does not appear, there is likely an issue with the network configuration. Please refer to the Troubleshooting section at the end of this chapter for more information on how to solve this.
Click OK.
Cue Pro is now connected to the Satellite network, but will not yet start syncing until it is online in the Pro Tools® Transport window.
Matching Frame Rates
For Satellite Link to function correctly, the Pro Tools® session frame rate must match the timeline frame rate in Cue Pro. While playback may still work with mismatched frame rates, locating and transport positioning will behave incorrectly.
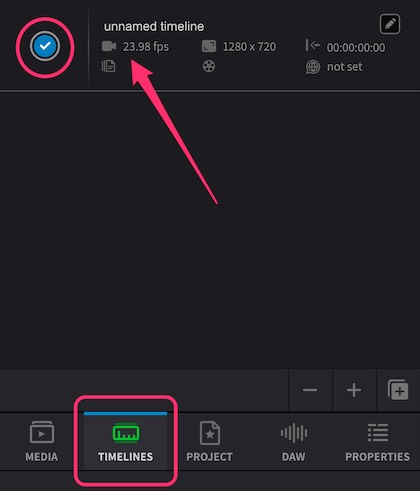
In the TIMELINES tab, locate the active timeline and check its frame rate in the summary section. If video is present on the timeline, the frame rate is derived from the video file. If no video is present, the frame rate can be set manually by clicking the pencil icon next to the timeline name and selecting the required frame rate from the TC Frame Rate menu.
 {width=50%}
In Pro Tools®, go to Setup → Session and set the Timecode Rate field to match the Cue Pro timeline frame rate.
Enabling Synchronised playback
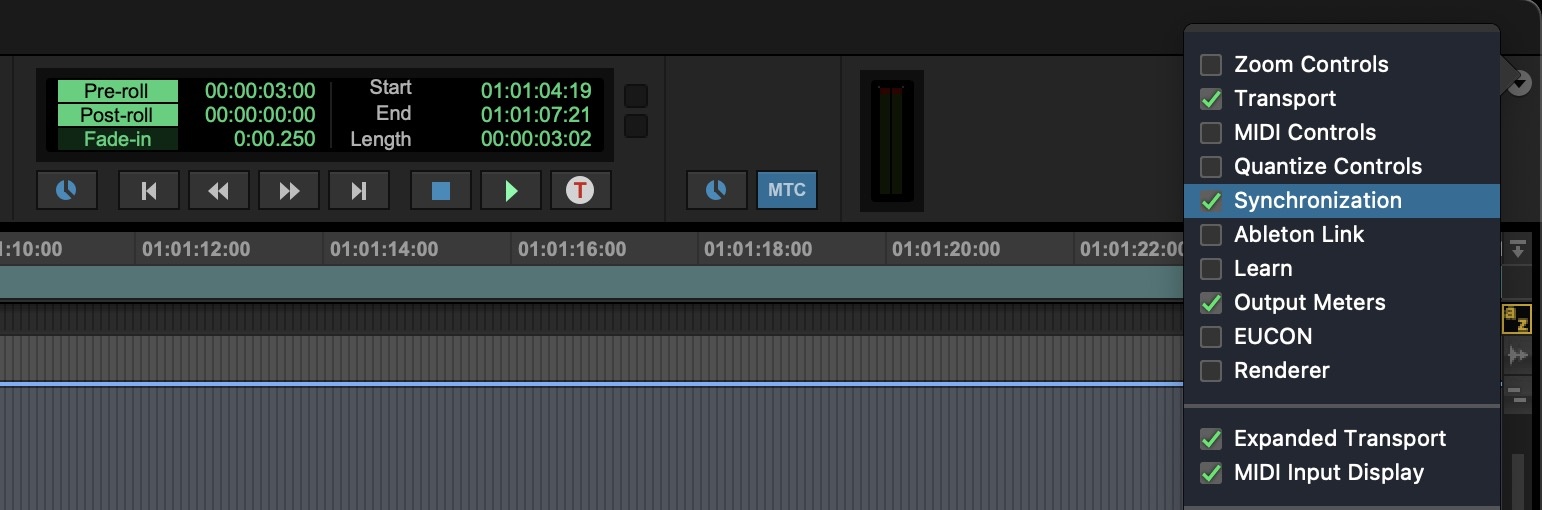
To show the Synchronization controls in the Edit window, click the arrow at the top right of the Edit window toolbar and enable Synchronization in the dropdown menu.
 {width=70%}
Note: The Synchronization controls may not be visible if the Pro Tools® Edit window is not at full size, as Pro Tools® hides certain toolbar elements when the window is too narrow. If the controls are not visible, either maximise the Edit window or use the Transport window instead.
Alternatively, the Synchronization controls can be enabled in the Transport window - click the arrow at the top right of the Transport window and enable Synchronization.
 {width=70%}
Understanding the Satellite Link Controls
The Synchronization controls area contains several buttons that control different aspects of sync behaviour:
Satellite Link buttons – These buttons (one for Pro Tools® and one for Cue Pro) control whether each system is linked to the Satellite network. When enabled, the systems share transport commands - pressing play, stop, or locating to a timecode position on one system will be mirrored on the other. Both Satellite Link buttons must be enabled for synchronised playback.
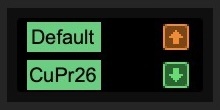
Transmit Play Selection (orange up arrow) – When enabled, any timeline selection made in Pro Tools® is sent to all other linked Satellite systems. On the receiving systems, the selection is mirrored in their Edit window or timeline.
Receive Play Selection (green down arrow) – When enabled, Pro Tools® receives and mirrors timeline selections sent from other linked Satellite systems, such as Cue Pro.
For basic synchronised playback where both applications follow the same transport and timeline position, enable all four buttons (both Satellite Link buttons plus both arrow buttons).
 {width=20%}
Selective Sync for Independent Editing
In some workflows, transport controls may need to remain linked while allowing independent timeline selections. For example, in a multi-room facility where an editor is working in Cue Pro while a mixer works at a separate Pro Tools® console, the mixer may need to make selections without affecting the editor's view.
To allow independent timeline selections while maintaining transport sync:
- Keep both Satellite Link buttons enabled (for shared transport control)
- Disable the Transmit Play Selection button on the system that needs to make independent selections
- The other system will continue to transmit its selections if its Transmit button remains enabled
This allows one operator to scrub, locate, and make selections without those selections being sent to other linked systems. When ready to sync timeline positions again, simply re-enable the Transmit Play Selection button.
These same Transmit & Receive Play Selection options are also accessible from Setup → Preferences / Settings → Synchronization → Satellites.
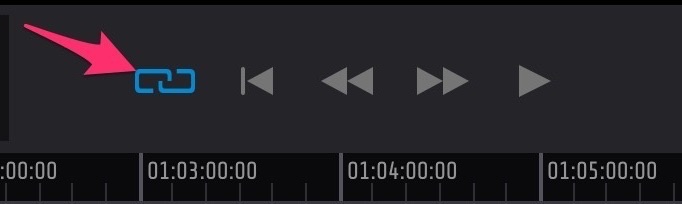
When the Cue Pro Satellite Link button is enabled in Pro Tools®, this automatically enables the Sync button to the left of Cue Pro's Transport controls.
 {width=30%}
Cue Pro Satellite Link is now online & ready to go. Hit play in Pro Tools® and Cue Pro will play back in sync.
Once Satellite Link has been configured, this setup does not need to be repeated. On subsequent launches, simply enable the Satellite devices in the Pro Tools® Edit window toolbar or Transport window to go online.
Note: When Cue Pro is closed while Pro Tools® is still running, Pro Tools® may ask whether to reconnect to the Satellite Link client. If No is selected, Pro Tools® will remove Cue Pro from the Satellite Link Peripherals page, requiring it to be re-added the next time. To avoid this, close Pro Tools® before closing Cue Pro. Likewise, when launching, open Cue Pro first and Pro Tools® second - this allows Pro Tools® to detect the existing Satellite Link connection automatically.
Satellite Link Network Troubleshooting
As Satellite Link is a network based protocol, the vast majority of problems with connecting Cue Pro to a Pro Tools system are likely to be caused by a network configuration issue. So if the Sync Method field in Cue Pro is set to Satellite Link, yet the Cue Pro Satellite still does not appear in the Pro Tools Satellites System setup tabs, it is likely due to one of the following issues below.
Erroneous IP Address
Each device in the network needs to have a unique IP address to communicate with other devices in the network. Devices obtain their IP addresses in one of two ways: automatically from a DHCP server (a network device that assigns IP addresses to devices), or through a manual assignment by the user. In most cases, the router will be the DHCP server.
If a device is configured to use a DHCP server but the server is not configured correctly, macOS will assign an automatic IP address because it could not obtain one from the network's DHCP server. However, this automatic IP address prevents the device from communicating effectively on the network. This can be identified if the interface field in either or both Cue Pro & Pro Tools are set to a value that begins with 169.254.x.x. (these addresses are called "Automatic Private IP Addressing" (APIPA) addresses). Another way to confirm if this is the case is by opening the macOS System Settings (or System Preferences in older versions of macOS) and selecting the Network section. From there, select the primary network interface and select "Details…" & check if the IP address currently assigned to the chosen network interface starts with "169.254.x.x".
How to fix it:
-
Use a DHCP Server: Ensure the network has an active DHCP server that has been enabled & correctly configured to assign IP addresses. This is managed by the router or a dedicated DHCP server on larger networks. If unsure about configuring the device's network settings, consult the device's manual or reach out to the network administrator for assistance. If it has been confirmed that the DHCP Server is active & setup correctly, rebooting the router can sometimes resolve this issue by refreshing the DHCP settings and allowing the device to receive a correct IP address.
-
Assign a Manual IP Address: If using a DHCP server is not an option, or does not resolve the issue, manually assign an IP address to the device. This involves selecting an IP address that fits within the network's address range but is not already in use. Manual IP Address assignment may require additional network information, such as the Subnet Mask, Gateway, and DNS servers, which can be obtained from the network administrator or the network settings of another device on the network.
Choosing the correct network interface
If it has been confirmed that the correct IP adresses have been assigned, there may be a conflict with multiple network connections. Many computers have more than one network interface built-in - usually wired ethernet and WiFi. When using SatelliteLink, it can be a possible cause for connection problems if both are enabled at the same time - even though only one is being used.
How to fix it:
- Please make sure to disable all other network adapters that are not required for use with SatelliteLink. The preferred network interface is ethernet, hence disabling the Wi-Fi interface in from Apple menu → System Settings → Network is strongly advised.
Firewalls
It is vital to ensure that if any Firewalls are active acrosss the network, that they are allowing Satellite Link network traffic to pass.
How to fix it:
-
Unless specifically required, please ensure that the macOS Firewall has been disabled. This can be done from Apple menu → System Settings → Network.
-
If the macOS Firewall must be kept active, please ensure that the chosen & default port value (28282 by default) - are configured to allow communication on these port values. Please consult the device's manual or reach out to the network administrator for assistance.
-
If a Firewall service is running on the router or a dedicated server, ensure that communcation to the chosen computers has been allowed on the chosen port numbers (28282 by default).
General Sync Issues
If Satellite Link is connected but playback is not working correctly, check the following:
Satellites Online - In the Pro Tools® Transport window, ensure both Satellite devices (Pro Tools® and Cue Pro) are enabled, and that the orange Transmit and green Receive Play Selection buttons are active.
Sync button enabled - The Sync button to the left of the transport controls in Cue Pro should be blue (enabled).
Timeline frame rate mismatch - Ensure the Pro Tools® session frame rate matches the timeline frame rate in Cue Pro. While playback may still function with mismatched rates, locating and transport positioning will not work correctly.
If playback is jumpy or frames are being skipped - This is often caused by mismatched frame rates between Pro Tools® and Cue Pro - ensure both are set to the same frame rate (see Matching Frame Rates above).
If the Satellite Link Online buttons are not visible in the Pro Tools® Edit window - Pro Tools® hides certain toolbar elements when the Edit window is not at full size. Maximise the Edit window, or use the Transport window instead where the Synchronization controls are always accessible.
If Cue Pro needs to be re-added in Satellite Link Peripherals after every restart - This typically occurs when Pro Tools® is left running after Cue Pro is closed. Pro Tools® may prompt whether to reconnect to the Satellite Link client, and if No is selected, the client is removed from the Peripherals page. To avoid this, always close Pro Tools® before closing Cue Pro. When launching, open Cue Pro first and then Pro Tools® - this allows Pro Tools® to detect the existing Satellite Link connection automatically.
Timeline range mismatch - Ensure the timecode range of the timeline matches the timecode range of the Pro Tools® session. For example, if Pro Tools® starts at 01:00:00:00 but the Cue Pro timeline starts at 10:00:00:00, playback will only begin when Pro Tools® reaches 10:00:00:00.
If synchronised playback still does not work after following these steps, please contact support@non-lethal-applications.com.