Spotting and Editing Video and Audio Files
Working with video and audio in Cue Pro differs significantly based on the operational mode in use.
Pro Tools Integrated Mode
In Pro Tools Integrated Mode, video and audio files are managed within Pro Tools itself. Cue Pro does not have its own video or audio tracks in this mode - it draws overlays onto the Pro Tools video window and reads cue data from the Cue Pro Connect plug-in.
Audio scrubbing in this mode is routed through a Pro Tools track chosen via the Audio Guide Track selector on the Controller Bar - see the Audio Setup chapter for details. For other aspects of Pro Tools integration, see the DAW Sync and Recording chapters.
Media Mode
In Media Mode, Cue Pro has its own video and audio tracks in the timeline, enabling import, spotting, and editing of media files directly within the application. The remainder of this chapter covers Media Mode workflows.
Import
Media Tab Import
To add audio &/or video files to the current project without inserting them on the current active Timeline, add the files directly to the Media Tab. This can either be done by selecting the files in macOS Finder & dragging them to the Media Tab, or by going to File → Add Media To Project and selecting the files to be added. The shortcut for Add Media To Project is Shift & Command & O.
Selecting a clip on the timeline highlights its corresponding media file in the Media Tab, making it easy to identify which source file a clip belongs to.
Timeline Import from the Finder
To add audio &/or video files to the current project by inserting them on the current active Timeline, select the desired files in Finder.
The order in which the files appear in the selection will determine the order in which the files will be spotted. The files highest in the list will be spotted first. Therefore sorting files in the Finder window by the most desirable column header (eg Name) before selecting and dragging the files can help ensure the most desirable spotting order.
Drag & drop the selected files from macOS Finder, directly onto an existing track (such that a ghost region appears on the track), or to the new track area of the Timeline below the last track (such that a plus sign is shown in the blank area).
When files are dragged from the Finder or from the Media Tab to the empty area of the Timeline below the last existing track (so that the plus sign appears), a new track will be created automatically and the files will be placed there. Dragging files from one existing track to another only moves them between existing tracks and will not create a new track.
When a new video track is created in this way, the track name is taken automatically from the first video file being dragged into the empty area. Tracks created first using the Add Track function will not be named automatically from the file.
Note: If a ghost region or plus sign does not appear, this means that the media has not been recognised & will not be imported / spotted. Drag & drop the files again until either the ghost region or plus sign appears.
The Spot Media window will be shown next, where the placement preferences can be selected.
Once the desired spotting options have been set, click the Import button at the bottom of the window to complete the import process. Adding files directly to the Timeline will also add them to the Media Tab.
Timeline Spotting from the Media Tab
To add audio &/or video files that already exist in the current project to the current Timeline, first select the desired files in Media Tab. The order in which the files appear in the selection will determine the order in which the files will be spotted. The files highest in the list will be spotted first. Therefore manually ordering files in the Media Bin before selecting and dragging the files can help ensure the most desirable spotting order.
Drag the selected files from the Media Tab onto an existing track (such that a ghost region appears on the track), or to the new track area of the Timeline below the last track (such that a plus sign is shown in the blank area).
Note: If a ghost region or plus sign does not appear, the media has not been recognised and will not be spotted. Drag & drop the files again until either the ghost region or plus sign appears.
The Spot Media window will be shown next, where the placement preferences can be selected.
 {width=60%}
Once the desired spotting options have been set, click the Import button at the bottom of the window to complete the import process.
Avoiding file placement overlaps
In order to prevent files being overlapped with files already on the Timeline at that position on the spotted track, or being spotted at the same time to similar positions, the next free track will be used. Where no extra free tracks are available, new ones will be created. The only exception is the first file in a selection of files, which will overlap if specifically placed over an existing file.
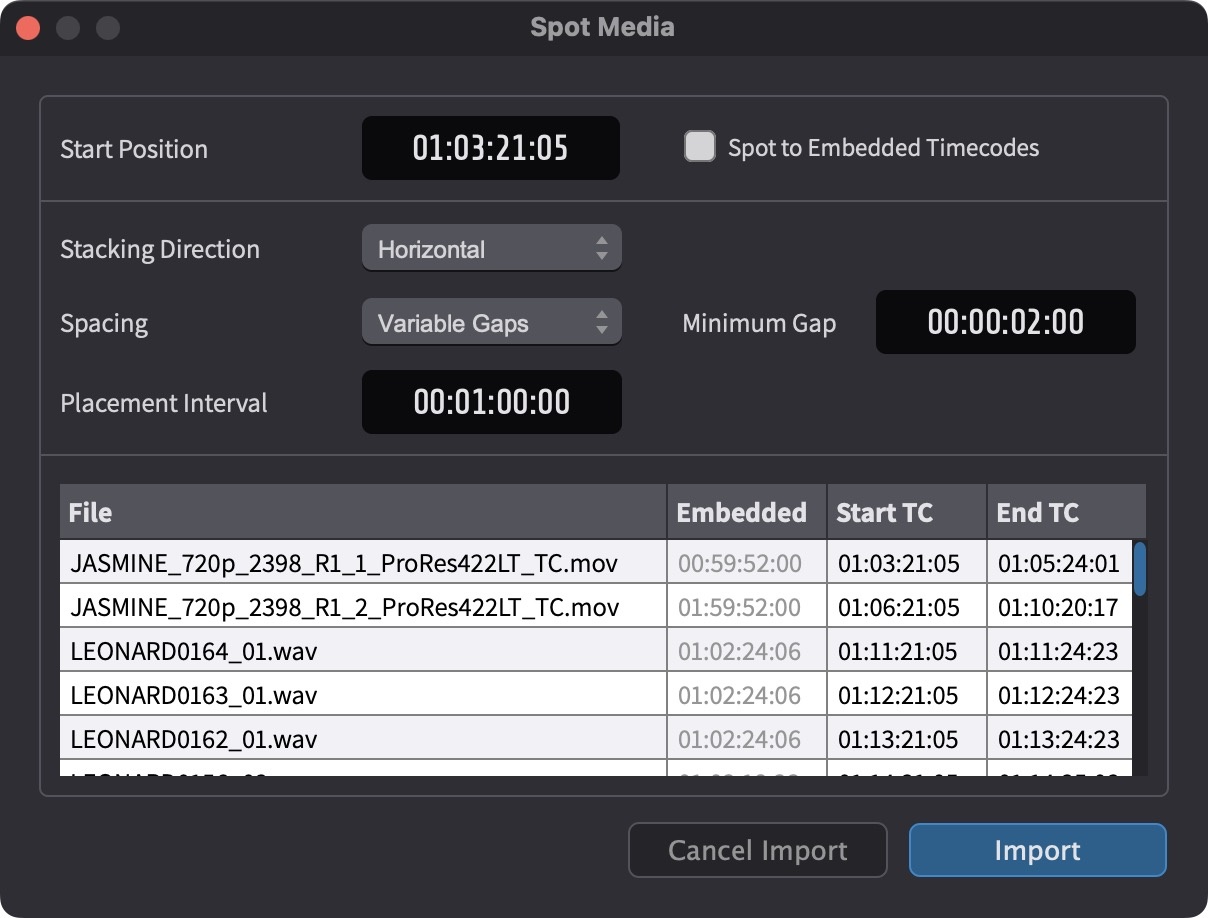
The Spot Media Window
The Spot Media window appears when dragging audio &/or video files to the Timeline from either the Media Bin or the Finder. It offers advanced & intelligent Timeline placement options. This is especially useful for batch placement of multiple files with either fixed or variable spacing requirements. Files can be placed horizontally one after the other on an existing track, or stacked vertically over multiple tracks at a specific point. Batch horizontal spotting to the embedded timecode timestamp of BWAV audio files or video files that have container formats which support embedded timecode matadata is also supoorted. For audio import, only BWAV files support being spotted to their embedded start timecodes.
Note: When the Spot Media settings would place one or more files in a timecode range that does not yet exist within the current Timeline Start and Duration values, Cue Pro will automatically adjust the Timeline start and/or extend the Timeline duration so that the full spotted range is available.
Bypassing the Spot Media window
To quickly import files using the same settings last set in the Spot Media window, simply hold the Command key while dragging the files.
Note: Especially when dragging from the Finder, to make sure that the file selection is not affected, it is advised to start dragging the files first, and then to add the Command key.
The Spot Media window will not be shown & the files will be imported directly using the same settings as set on the previous import.
Spotting multiple files to the same Timeline location (Vertical Stacking)
Select the desired files from either the Media Bin or the Finder. Drag and drop them to the desired location on an existing track (such that a ghost region appears on the track), or to the new track area of the Timeline below the last track (such that a plus sign is shown in the blank area). Unless bypassing the Spot Media window with the Command key, the spotting location does not need to be exact at this stage, as this can be modified next in the Spot Media window. If the files are dragged on top of an existing file on an existing track in the Timeline, the first file selected will overlap this file. If consequent files would also overlap existing files, they will be placed on new tracks in order to prevent further file overlaps.
Set the Stacking Direction field to Vertical. When the Stacking Direction field is set to Vertical, the Spot To Embedded Timecodes field is disabled.
If the Start position needs to be modified from the location that the files were placed on the Timeline, enter the desired timecode value in the Start Position field. All remaining fields will have no effect with the above settings.
Click the Import button at the bottom of the window to complete the import process.
The first selected file will be placed on the track that the files were dropped onto at the set Start Position. The next selected file will be placed at the same Start Postion on the next available track below the first (unless there is already an exisiting file on that track on or around that location - in which case the next track down with enough free space to accommodate that entire file will be used). If there are no more existing tracks to place the file onto, a new track will be created. The same procedure will continue for all the remaining files.
Spotting multiple files horizontally on a Timeline with fixed spacing gaps inbetween
Select the desired files from either the Media Bin or the Finder. Drag and drop them to the desired location on an existing track (such that a ghost region appears on the track), or to the new track area of the Timeline below the last track (such that a plus sign is shown in the blank area). Unless bypassing the Spot Media window with the Command key, the spotting location does not need to be exact at this stage, as this can be modified next in the Spot Media window. If the files are dragged on top of an existing file on an existing track in the Timeline, the first file selected will overlap this file. If consequent files would also overlap existing files, they will be placed on new tracks in order to prevent file overlaps.
Set the Stacking Direction field to Horizontal.
Disable the Spot To Embedded Timecodes field.
If the Start postition of the first selected file needs to be modified from the location that the files were placed on the Timeline, enter the new timecode value in the Start Position field.
Set the Spacing field to Fixed Gaps.
Set the desired duration of the space between the end of each previous file & the start of the next file in the Gap Duration field.
Click the Import button at the bottom of the window to complete the import process.
The first selected file will be placed on the track that the files were dropped onto at the set Start Position. A gap the length of the Gap Duration field will be added after the end of the first file. The next selected file will be placed after the gap on the same track (unless there is already an exisiting file on that track on or around that location - in which case the next track down with enough free space to accommodate that entire file will be used). If there are no more tracks to place the file onto, a new track will be created. The same procedure will continue for all the remaining files.
Spotting multiple files back-to-back
Follow the same directions above for Spotting multiple files with a fixed spacing inbetween, but instead of setting the Gap Duration to the amount of space required between each file, set this field to 00:00:00:00.
Spotting multiple files at fixed intervals (Variable Gaps)
This is a useful option where the start point of files of varying durations need to be at a consistently incrementing timecode values, eg every hour or minute.
Select the desired files from either the Media Bin or the Finder. Drag and drop them to the desired location on an existing track (such that a ghost region appears on the track), or to the new track area of the Timeline below the last track (such that a plus sign is shown in the blank area). Unless bypassing the Spot Media window with the Command key, the spotting location does not need to be exact at this stage, as this can be modified next in the Spot Media window. If the files are dragged on top of an existing file on an existing track in the Timeline, the first file selected will overlap this file. If consequent files would also overlap existing files, they will be placed on new tracks in order to prevent file overlaps.
Set the Stacking Direction field to Horizontal.
If the Start position of the first selected file needs to be modified from the location that the files were placed on the Timeline, enter the new timecode value in the Start Position field.
Set the Spacing field to Variable Gaps.
Set the desired start position of each following file in the Placement Interval field. For example, to place each consequent file one minute after the start of the previous file, the Placement Interval should be set to 00:01:00:00.
To allow at least a certain minimum gap size between files, set this value in the Minimum Gap field. For example, to make sure that there is at least 10 seconds gap between each file, set the Minimum Gap field to 00:00:10:00. If the placement interval is set to every minute (00:01:00:00), and a file of 55 seconds duration is spotted, the next minute would be skipped and the next file would be placed two minutes after the start of the 55 second file.
Click the Import button at the bottom of the window to complete the import process.
The first selected file will be placed on the track that the files were dropped onto at the set Start Position. Providing the Minimum Gap duration can be honoured, the start of the next selected file will be placed at the value of the Placement Interval relative to the start of the previous file on the same track, unless there is already an existing file on that track on or around that location - in which case the next track down with enough free space to accommodate that entire file will be used. If there are no more tracks to place the file onto, a new track will be created.
If the Minimum Gap duration would not be honoured, in this case the next file would be placed at the next placement interval that would allow at Minimum Gap duration to be honoured.
The same procedure will continue for all the remaining files.
Spotting files onto the Timeline to their embedded timecode timestamp start points
BWAV audio files & certain video containers such as .mov & .mxf can contain a start timecode timestamp embedded into the metadata of the file.
To spot one or more of these supported video &/or audio file types to their embedded timecode start points, select them in either the Finder or the Media Bin and drag them onto an existing track (such that a ghost region appears on the track), or the new track area of the Timeline.
Note: If a ghost region does not appear, the media has not been recognised and will not be imported / spotted. Drag & drop the files again until the ghost region appears.
In the Spot Media Window that appears, first ensure that the Stacking Direction field is set to Horizontal. Vertical Stacking Direction only allows all files to be placed at one specific point. Though if necessary to prevent overlaps, Horizontal mode will still stack some files that would have overlapped existing files on the chosen track, onto the next available track, or create new tracks.
Next, enable the Spot To Embedded Timecodes field.
Note: If all files being imported have an embedded timecode start (shown in the Embedded column), the remaining fields are hidden and have no effect on placement. If only some files have embedded timestamps, the remaining fields are applied only to files without embedded timecode; files with embedded timecode are still spotted to their embedded start positions.
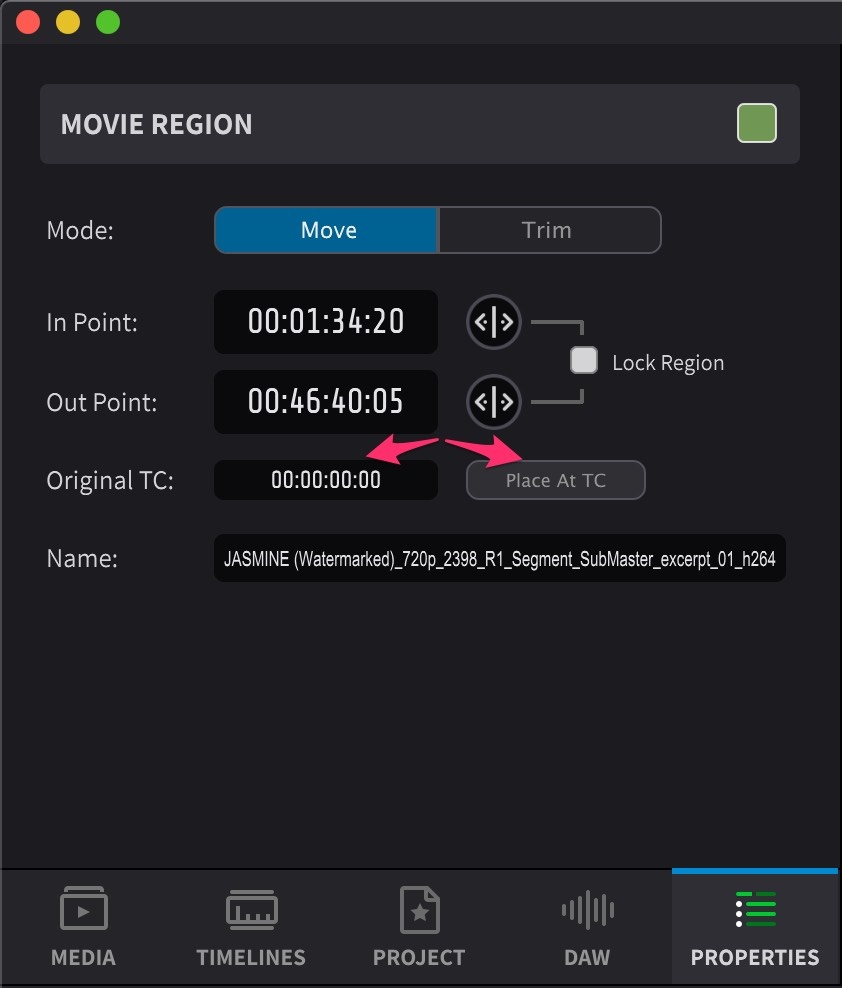
Moving a file on the Timeline to its embedded timecode start
Embedded timecode support is limited to compatible video and BWAV files that support embedded timecode start metadata fields.
There are two ways to snap the start position of a file in the Timeline to its embedded timecode start point:
- select the file and press Shift & P
- double-click the file to bring up the PROPERTIES Tab with the Mode set to Move, then click the Place At TC button.
 {width=60%}
Both methods will work for multiple files too.
Note: For example, if a movie file has an embedded timecode of 00:00:00:00 and the Timeline has a start timecode of 01:00:00:00, Place at TC will not allow the file to be placed until the Timeline Start value has been set to at least 00:00:00:00 & the Timeline Duration to a length long enough to allow for the length of this file at the very least.
Setting the start timecode manually
To enter a specific timecode start, double-click the region in the timeline and enter the start timecode numerically in the Movie Region or Audio Region properties tab panel that appears in the top left Tab section (with the Mode tab set to Move).
Note: Where there is a burned-in timecode display on a video file, this timecode value is usually the current first frame being displayed after the file has been double-clicked.
Regions can also be dragged left and right outside of the boundaries of the timeline view to enable the Timeline Auto Scroll feature. Drag further to scroll faster, and drag less to scroll more slowly.
For more exact positioning, with the region still selected in the Timeline, use the , and . keys to nudge the region left and right in one frame increments. Add the Option key modifier to move the region in increments of 1 second and the Control key modifier to move in increments of 5 seconds.
Overlapping regions
If video or audio regions are placed overlapping others in the Timeline, the overlapping regions take precedence - the underlying regions will not play at the points where they are being overlapped. Underlying video or audio regions remain intact in the Timeline once the overlapping regions are removed.
Selecting Regions
To perform editing operations on video or audio regions in the timeline, first select one or more regions:
- Single region: Click on a region to select it.
- Multiple regions (range): Click and drag across the timeline to select all regions within the selection range. Even partial selections will select the entire region.
- Add to selection: Hold Command while clicking additional regions to add them to the current selection.
- Extend selection: Hold Shift while clicking another region to extend the selection to include all regions between the first and last selected.
Selected regions are highlighted and can then be moved, duplicated, deleted, or otherwise edited using the operations described below.
Moving to other tracks
Click on one or more selected regions and drag up or down to move them onto tracks above or below the current track.
Hold down the Control key to temporarily lock the start position of the regions in place when moving them.
Duplicating
Hold down the Option key while dragging one or more selected regions to duplicate them.
Deleting
To delete one or more regions, first select them as described above, then press the Delete key.
Muting
One or more selected regions can be muted by pressing Command & M. Pressing again will unmute them.
Locking
To permanently lock the Timeline position and prevent further editing of one or more selected regions, double-click a region to show the Properties tab and enable the Lock Region option. When multiple regions are selected, locking applies to all selected regions.
Zooming
Horizontal Timeline Zooming can be achieved by clicking on the desired area in the Timeline or Visual Event track and using any of the following methods:
-
Holding down the Option key & and scrolling up & down with a mouse or Trackpad.
-
Using the Pinch gesture on a Trackpad.
-
Moving the Zoom Slider found above the Visual Events track.
-
Using the R & T hotkeys
The R & T Keys jump between average set zoom levels with each button press, whereas the other methods allow for really precise & quick zooming.
Use the zoom slider to the left of the Timeline zoom slider to increase or decrease the audio waveform size vertically.
Note: The Vertical zoom setting does not affect the output volume.
 {width=60%}
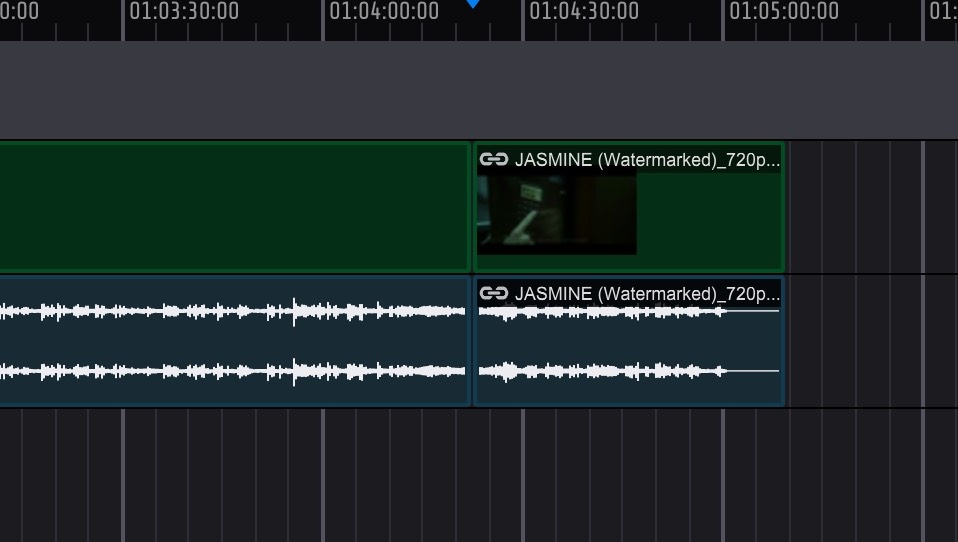
Separating
Position the cursor in the upper half of a video or audio region (above the vertical midpoint), then click on roughly the area to be separated. Zoom in if necessary to better see the area.
To scrub the audio and better identify the separation point, position the cursor in the upper half of the waveform, then hold down the Control key while clicking and dragging left and right.
To fine tune the edit point, move the edit cursor left or right in one frame increments using the , and . keys. Use the Option key to move the edit cursor in increments of 1 second and the Control key to move the cursor in increments of 5 seconds.
Once the edit point has been found, press B to separate the region, or use the menu function Edit → Cut Regions at Selection.
 {width=60%}
Using the same spotting methods detailed earlier in this chapter, the start points of the 2 regions can now be changed separately.
Trimming
When the mouse cursor is close to either the left or right region boundaries, it will change to the trim icon to indicate that the region can be trimmed by dragging the border.
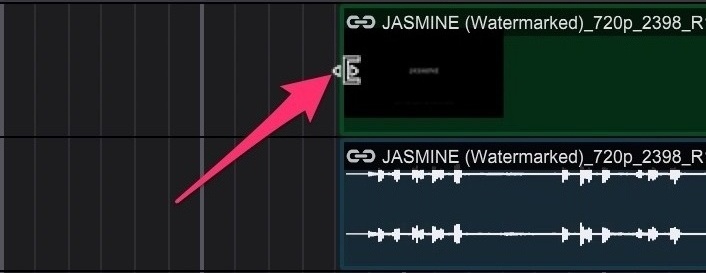 {width=60%}
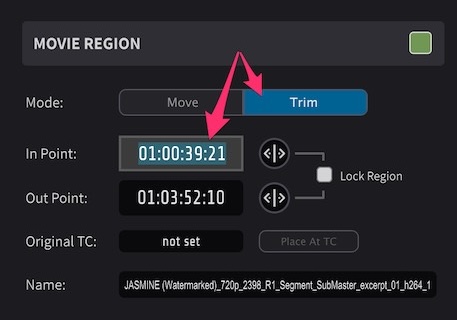
Regions can also be trimmed using the Trim mode in the Properties view to trim the start and end of the region either numerically or using the drag control button to the right of the In Point and Out Point text boxes.
 {width=35%}
Keyboard Trimming
Audio and video regions can be quickly adjusted using keyboard shortcuts.
To trim the head of the selected audio or video region, use Control & , (longer) or Control & . (shorter).
To trim the tail of the selected audio or video region, use Option & . (longer) or Option & , (shorter).
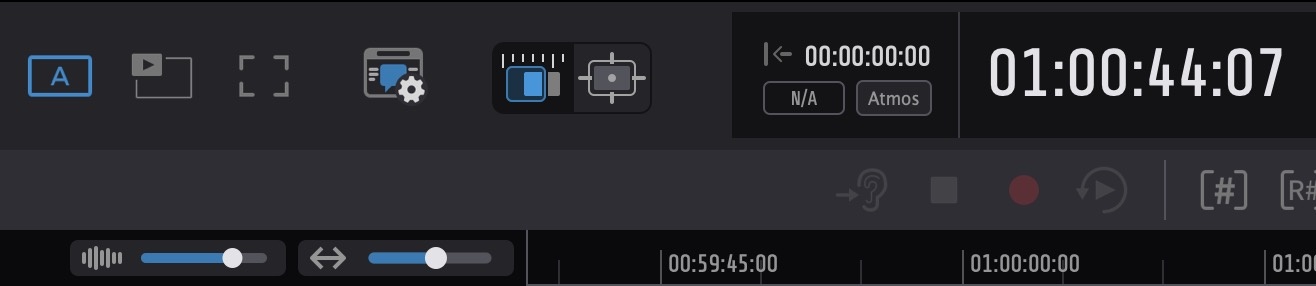
Pre-Roll and Post-Roll (standalone playback)
The Pre-Roll and Post-Roll duration fields and enable / disable buttons for standalone playback in Cue Pro are set in the Controller Bar to the left of the Link button. The Pre-Roll enable button is to the left of its duration field & the amount is set in seconds and frames to the right of it. Similarly, the Post-Roll enable button is to the left of its duration field & the amount is set in seconds and frames to the right of it.
To quickly toggle both Pre-Roll and Post-Roll on or off at the same time during standalone playback, press P on the keyboard.
When the Mirror Cue Pro Pre/Post-roll to Pro Tools preference is enabled in the ADR REC tab of the Preferences / Settings window, Cue Pro's Pre-Roll and Post-Roll values are mirrored to Pro Tools whenever one of the three ADR record modes (Rehearse, Record or Review) is initiated from Cue Pro. With this preference disabled, the Pre-Roll and Post-Roll settings (and the P shortcut) only affect playback inside Cue Pro and do not change Pro Tools' own Pre-Roll or Post-Roll values.
Advanced Navigation
Click & drag the cursor in the timeline left and right outside of the boundaries of the timeline view to enable the Timeline Auto Scroll feature. Drag further to scroll faster, & drag less to scroll more slowly. This can be useful when wanting to navigate the Timeline quickly; or to select the area from the InPoint in view, to an Outpoint which is currently out of view, eg when zoomed in a lot.
Use the Tab button to quickly move the Playhead to the start, edit points, & end of each following file on selected tracks in the Timeline. Hold down the Option key simultaneously to move the Playhead in the opposite direction (towards the start of the Timeline).
Hold down the Shift key when pressing the Tab key to expand an existing Timeline selection; or to select the area from the current Playhead position through all the region boundaries being navigated through. Hold down the Option key simultaneously to select in the opposite direction (towards the start of the Timeline).
To make a numerical selection in the Timeline where the In & Out points are already known, use the numeric Timeline timecode In & Out fields in the Controller Bar section, to enter the timecode values manually.
Note: Timeline selections are treated as exclusive at the end. The end timecode marks the first frame after the selection. In other words, the range includes the start timecode but does not include the frame at the end timecode.
Sorting the Media Tab
The MEDIA Tab list can be sorted manually by clicking on a particular file & dragging it up and down in the list. A yellow line appears showing the position that the file will be moved to.
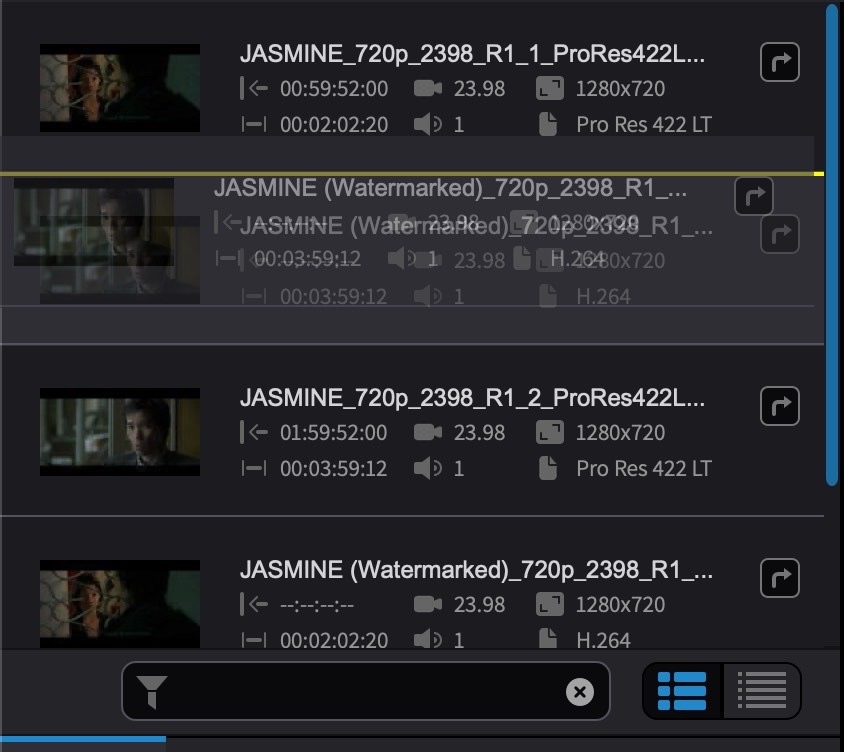 {width=50%}
Multiple files can also be selected using the standard macOS Shift & Command key modifiers, & moved simultaneously in the same way.
Move the cursor onto the file name in the list until the mouse-over window appears to see the full file name if it is being truncated in the list.
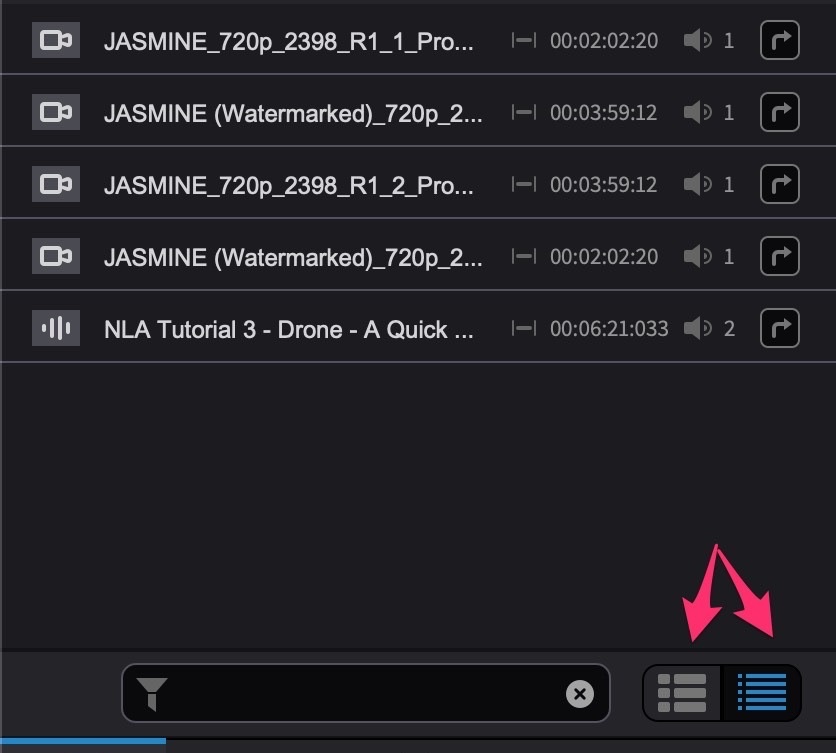
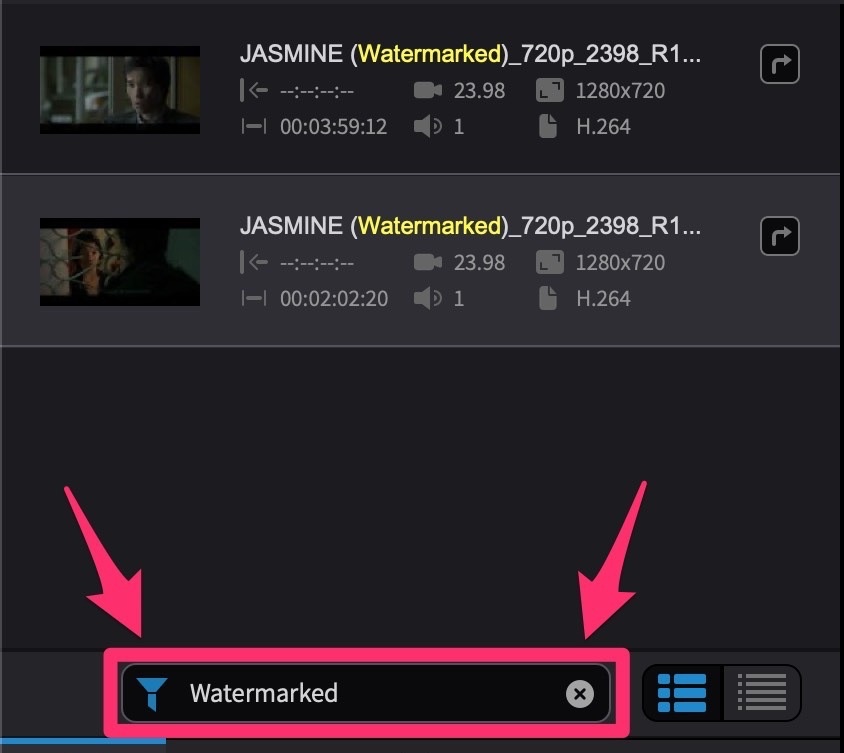
Use the buttons on the bottom right of the MEDIA Tab to choose between the default Detailed Media View on the left - where more file information is shown for each file; & Slim Media View on the right - where more files with less detail can be shown at once.
 {width=60%}
Use the search tool at the bottom of the list to show only files containing certain text. The Filter icon will go blue to show that the list is currently only showing filtered results. The search can be cleared by clicking the X button to the right of the search bar.
 {width=50%}