Adding and Editing Visual Events
Introduction

Unlike with our ADR cueing and recording solution ADR Master, where visual events can also be created from a DAW, it is only possible to manually create Visual Events in Video Sync in standalone mode.
Edit Mode
Video Sync provides two distinct editing modes for visual events using the Edit Mode toggle switch in the Controller Bar. This provides complete control over how selections behave.
Note: This manual is primarily written assuming Timeline Range Mode is active, which is the default behavior. Target Event Mode replicates the selection behavior from earlier versions, which some users prefer for certain workflows.
Timeline Range Mode
Timeline Range Mode works like a traditional range selection, mirroring the selection behavior of most DAWs. This mode is great for:
- Bulk event trimming and modifications
- Mass clean-ups across multiple tracks
- Quickly selecting and nudging entire multiple events by just dragging over them — even partially
- Multi-track editing operations
In this mode, events can be selected by dragging across multiple tracks. Even partial selections will select all events within the selection range, which also appear in the Event List. Multiple events can then be edited together — for example, nudged a few frames together.
Target Event Mode
Target Event Mode enables working with discontiguous visual event selections directly from the Event List. This mode is ideal for:
- Fine-tuning individual event timings
- Working with individual events without having to work sequentially on the timeline
- Precise event-by-event control
In this mode, a selected visual event stays targeted, even when scrubbing an audio track or nudging the playhead. The in and out points can then be updated individually with Shift & I and Shift & O keyboard shortcuts.
To deselect an event in Target mode, simply click anywhere in the visual event tracks.
It is not possible to make timeline selections in the visual event tracks when in Target Event Mode. This is done to allow discontiguous selections in the Event List — which would not be possible with a range selection.
Automatic Mode Switching
The Edit Mode is smart and will switch modes automatically to match selections made in the Event List. For example, when in Timeline Range Edit Mode and events are selected from the Event List that are not in sequential order, the Edit Mode will automatically switch to Target Event Mode to facilitate that selection. This is because discontiguous selections aren't possible in Timeline Range mode.
Navigating & Adding New Visual Events In Standalone Mode
Roughly locate to the area in the Timeline where a new visual event is to be added.
If necessary, zoom into the area using the T key, Option key & scroll up or using a pinch gesture on a trackpad.
Holding the Control key, click and drag on the Visual Event track to scrub the Timeline audio to find the exact In Point of a line.
When scrubbing audio, Video Sync will scrub all audio currently audible in the timeline - respecting the mute and solo states of all the audio tracks.
To quickly create a Streamer or Flutter Visual Event or a new Marker Visual Event with the default new event duration set in Preferences, press the relevant New Event hotkey (M, S or F).
Or to define an Out Point if adding a Marker Visual Event, while holding down the Shift & Control key, click somewhere towards the end of the line to scrub the Timeline audio to find the exact Out Point.
The selection range can be confirmed in the Selection in and out counter boxes in the Controller Bar, which can be seen to the right of the main counter.
To create a Marker with the selection, press M.
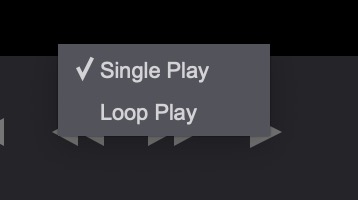
Press the space bar to play the visual event & check the overlays.
Hold down the Control key while clicking the play button to choose between Single Play and Loop Play modes.
 {width=70%}
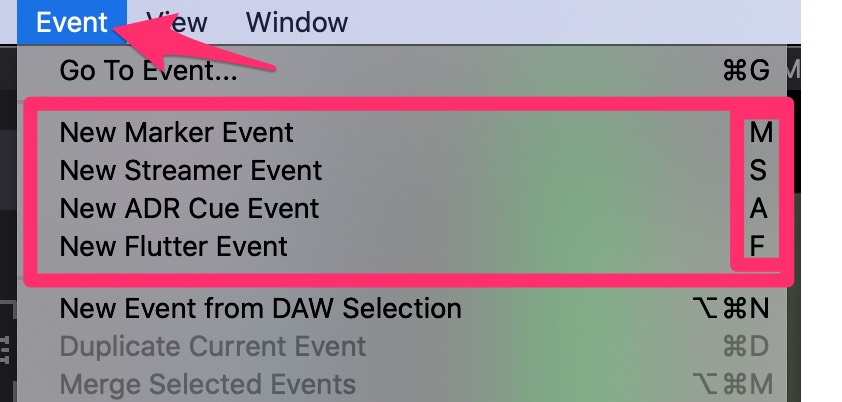
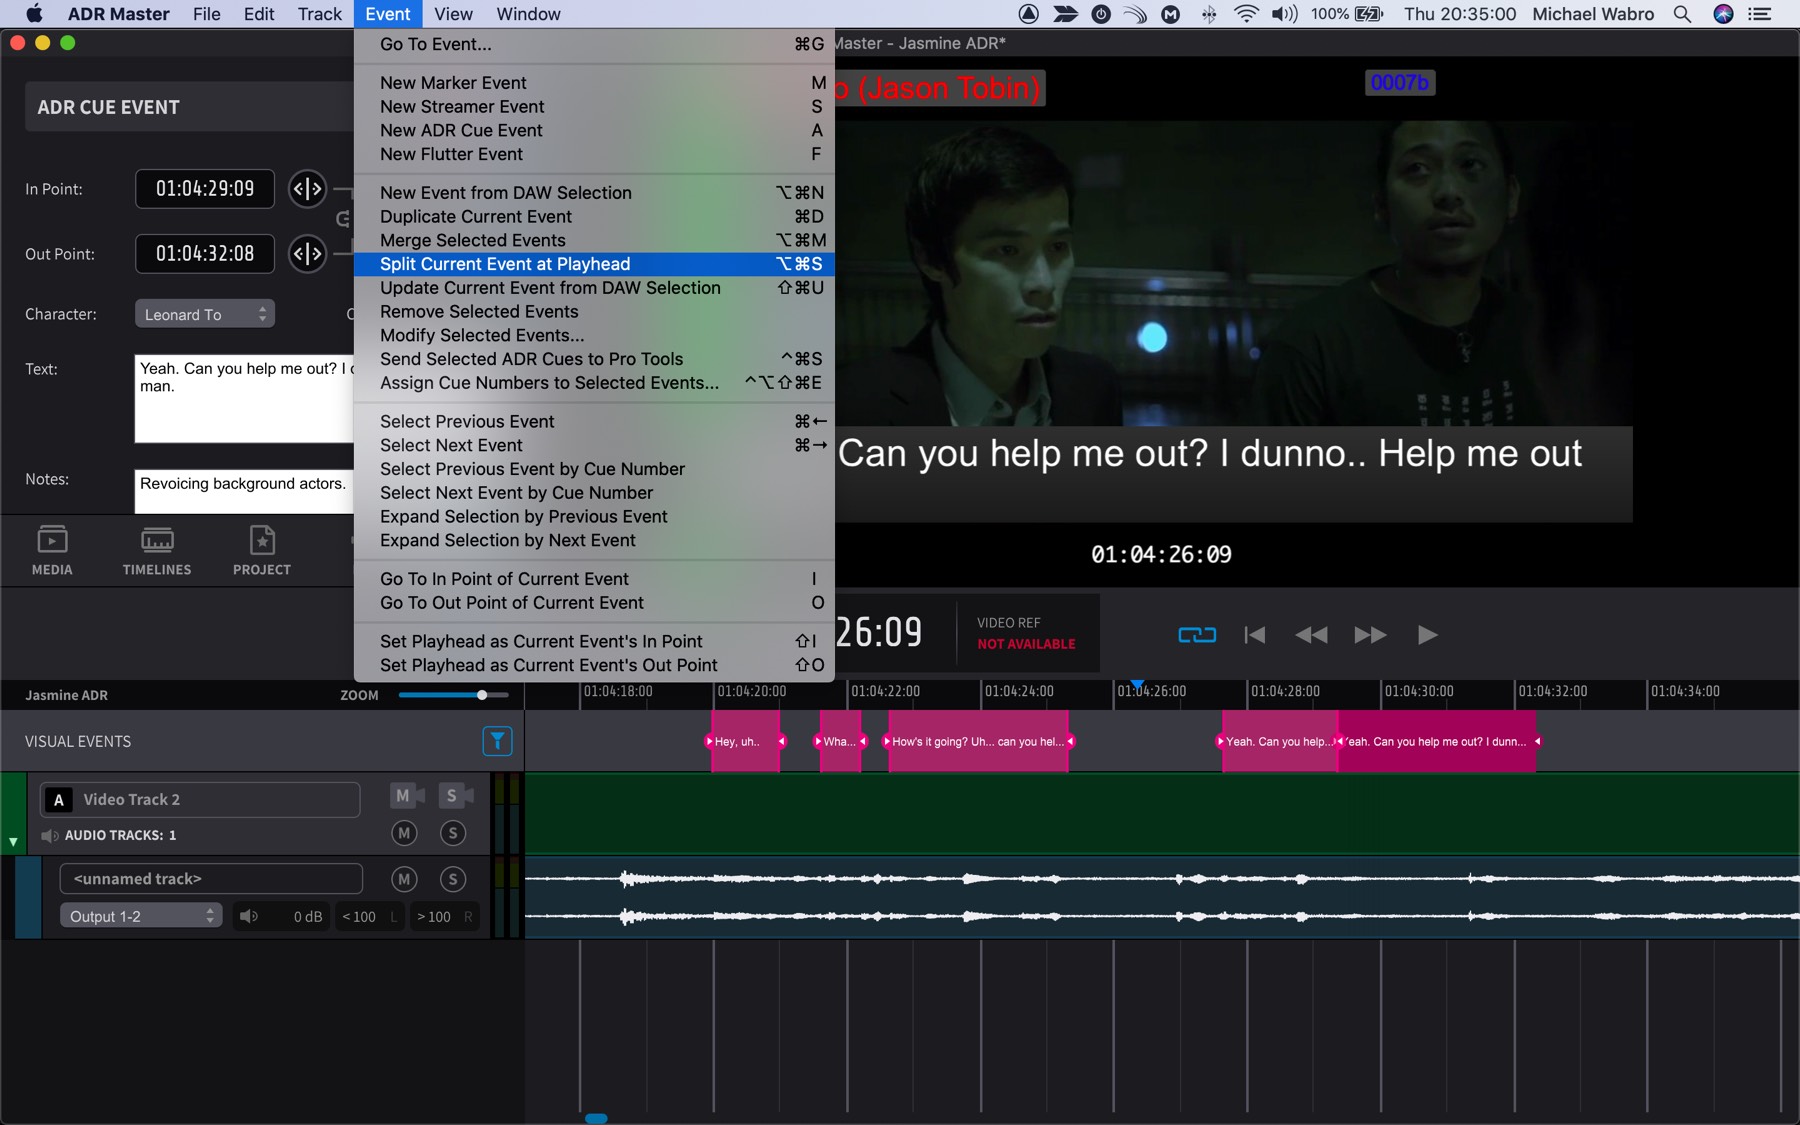
Visual Events can also be created by using the relevant New Event command for the Event menu.
 {width=60%}
If the new Visual Event type supports text (ie Markers), the Text field will automatically be selected in the Properties tab, to start entering text into.
Editing Visual Events in the Visual Events Track Timeline
Adjusting the In & Out Points
The In and Out Points of an existing Marker Visual Event can be adjusted by moving the pointer to the relevant edge so that the trim icon appears - and clicking and dragging to a new point.
To scrub trim, hold down the Control key while trimming - which will scrub the Timeline audio.
Another way of adjusting the In and Out Points, with a Marker or ADR Cue selected and showing in the Event List - is locating the playhead to the correct start frame & selecting Set Playhead As Current Event's In Point from the Event menu (or Shift & i); & then locating the end point & selecting Set Playhead As Current Event's Out Point (or Shift+O).
These shortcuts are especially useful in Target Event Mode, where a selected event stays targeted even when scrubbing or nudging the playhead, allowing fine-tuning of timings during playback.
Scrubbing the dialogue guide audio track or Visual Events track helps to identify the correct points.
Selecting Multiple Visual Events
In Timeline Range Mode, multiple Visual Events can be selected by highlighting a selection over them in the Visual Events track, or by clicking the first event & then holding the shift key to select the end event in a range. Even partial selections will select all events within the selection range.
In Target Event Mode, discontiguous events can be selected directly from the Event List. Selected events remain targeted even when scrubbing or nudging the playhead.
Moving Visual Events manually
One or more Visual Events can be moved in the Timeline by selecting them & moving the pointer below half way in the visual event so that the hand symbol displays, and then clicking and dragging it along the timeline to a new position.
Moving multiple events by an exact numeric amount
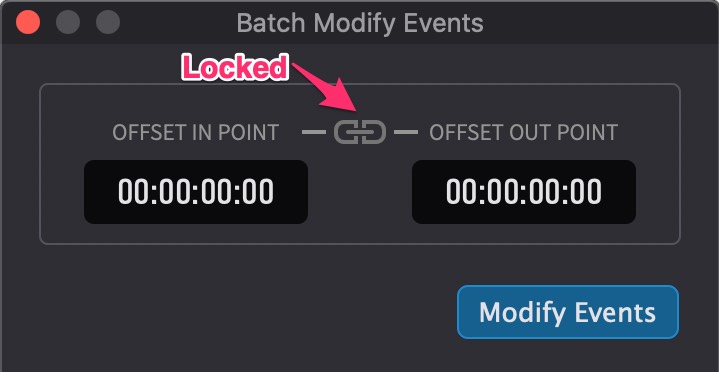
To move multiple selected visual Events simultaneously by an exact numeric amount, select them & then select Modify Selected Events from the Event menu. In the Batch Modify Events window that appears, click the lock icon, & enter an offset amount in either or both of the In Point or the Out Point fields.
 {width=50%}
The lock icon locks the duration of the cues.
Duplicating Events
Hold down the Option key while dragging one or more highlighted Visual Events to a new position in the Visual Events track or Character Lanes to duplicate them.
Or with the desired visual events highlighted, either select Duplicate Current Events from the Event menu, or use the global Apple duplicate shortcut Command+D.
Using the Duplicate Current Events function will paste the new events at the same timecode position as the original highlighted files.
Merging multiple Visual Events
Two or more Marker Visual Events can be selected in the Visual Events track and merged by choosing Merge Selected Events from the Event menu, or by using the shortcut Option+Command+M.
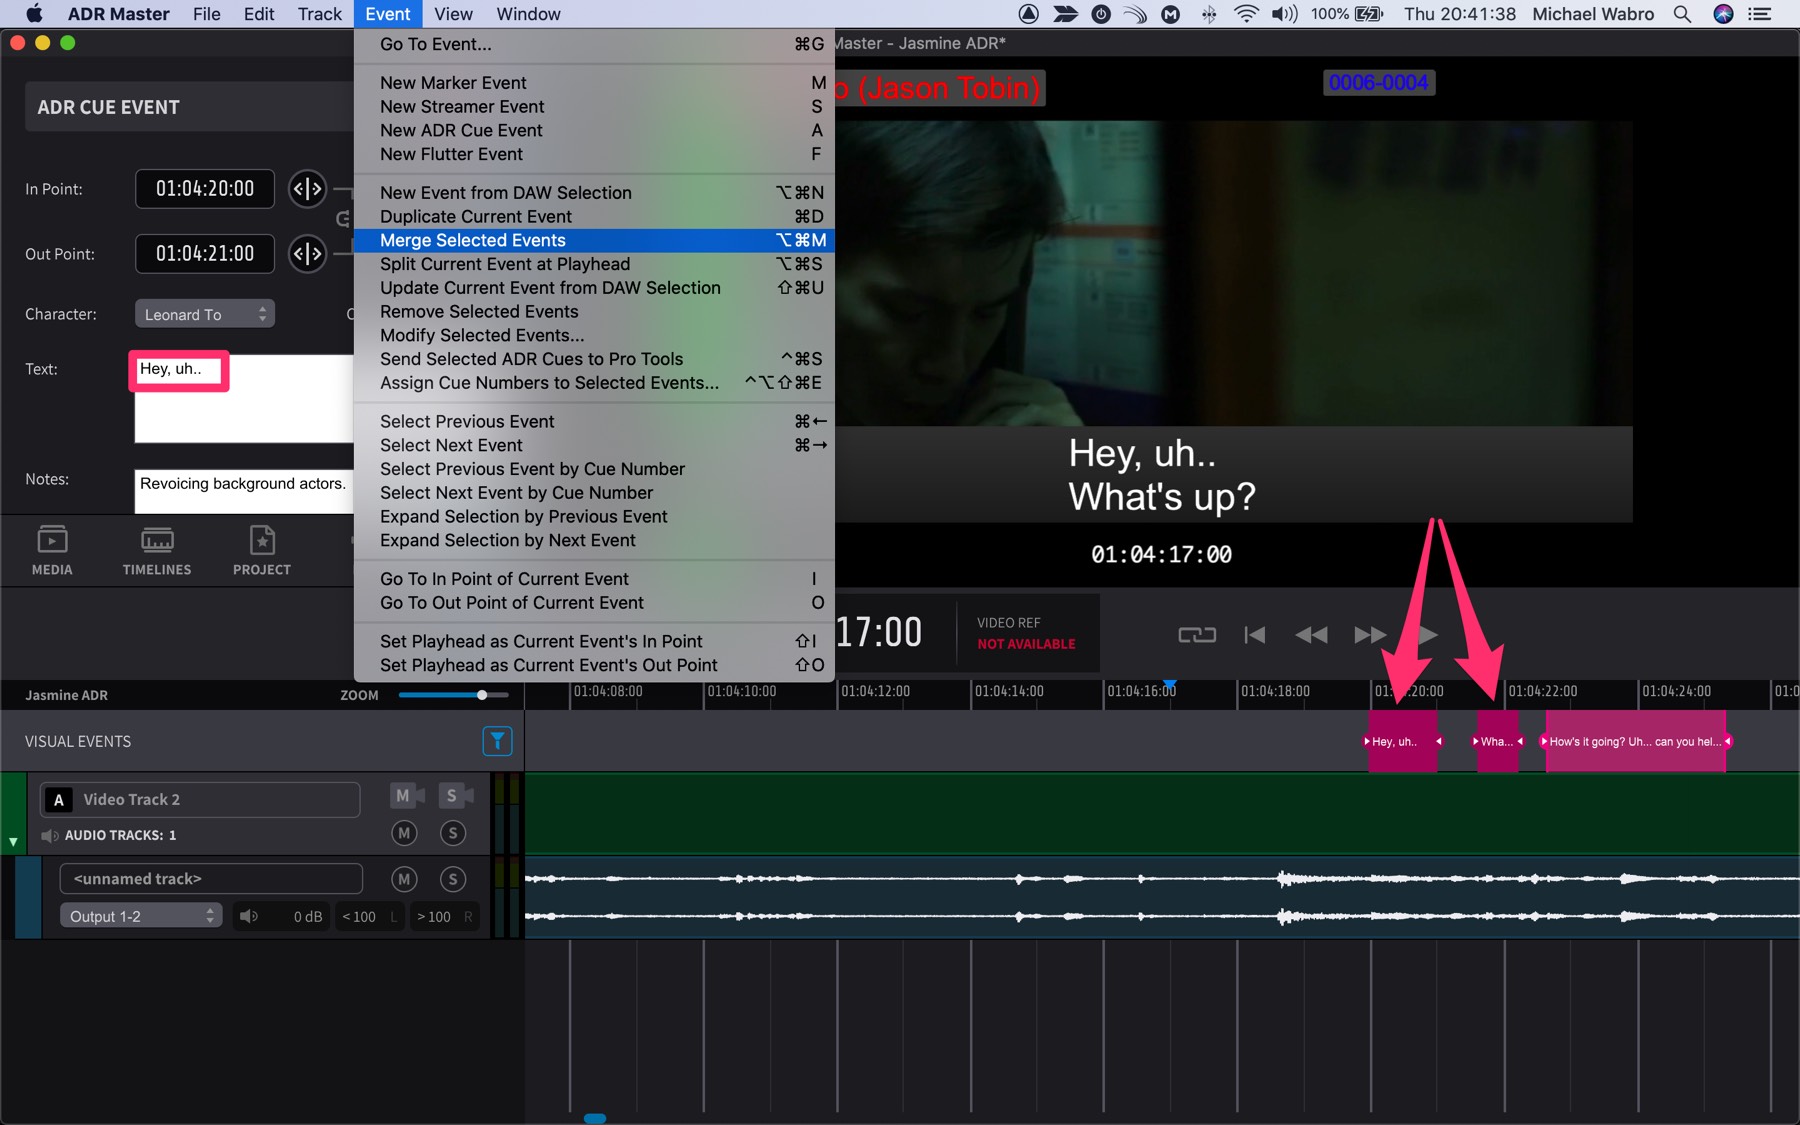
The text fields from all selected Markers are automatically joined together in the order they appear - into one resultant Marker.

Splitting a Visual Event
A selected Marker Visual Event can be split by selecting & scrubbing it in the Visual Event track to find the split point & then pressing the Bkey, or by choosing Split Current Event At Playhead from the Event menu.
The Split Text window will appear, where the corresponding split point in the text can be chosen by clicking in the window at the desired point in the text, or using the Split Text nudge hotkeys to move the cursor:
Left / Right Arrow Key: Move Insertion Marker by Word
Alt & Left / Right Arrow Key: Move Insertion Marker by Character
Click the Split button once done, or simply hit the Return key.
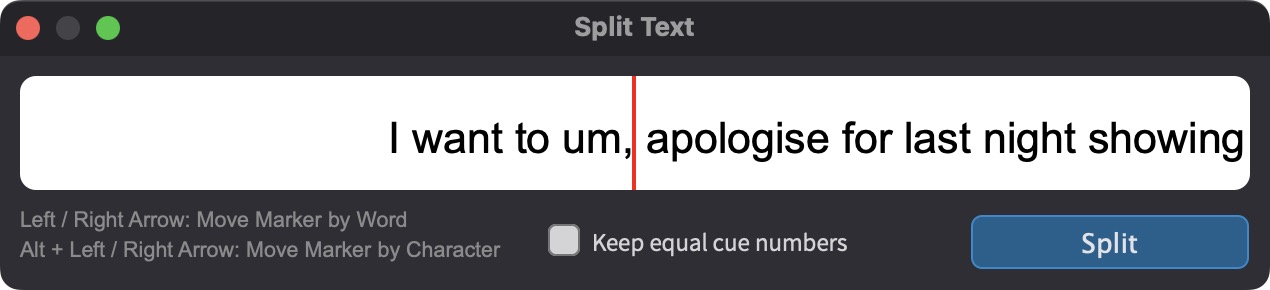
The Split Text window includes a toggle preference called Keep equal cue numbers. When enabled, both split events will keep identical cue numbers. When disabled, the cue numbers will automatically have A/B suffixes appended to them (e.g., "Cue 1" becomes "Cue 1A" and "Cue 1B").
Regardless of which naming option is chosen, selecting all split cues and playing over them will provide separate secondary timing wipes between each line.
Deleting a Visual Event
One or more selected visual events can be deleted by selecting them & then either pressing the Delete key, or selecting Remove Selected Events from the Event menu.
Muting a Visual Event
One or more selected visual events can be muted by selecting them & then pressing Command & M (Mac) or Control & M (Windows). Pressing again will unmute the events.
Editing Visual Events in the Properties Window
Any visual event's timeline position can be fine-tuned numerically, or have additional info like text added to it (where relevant to that particular visual event type)- by double-clicking it in the Timeline or Event List. This will bring the Properties tab in the top left section to the forefront - with all the relevant details for that visual event.
When creating new events from the main window, the Properties tab is shown automatically - such that the visual event's properties can be edited immediately. For Markers, the cursor jumps straight to the text box, allowing for quick text input without having to double-click the text field.
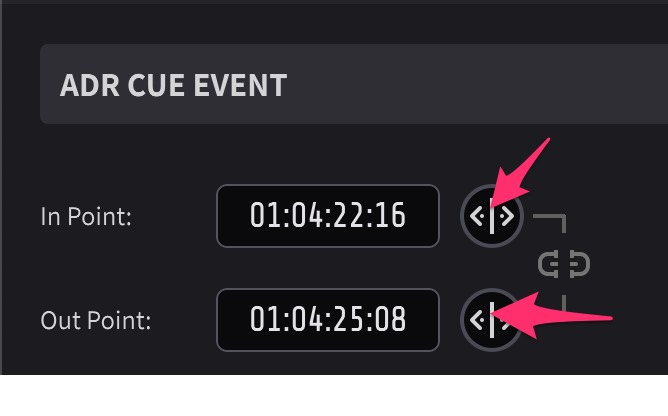
To 'scrub' adjust the value of either In or Out timecode field, click and hold the arrow button to the right of the timecode, & drag left or right to increase or decrease the value. Drag slowly for finer changes, or drag further for larger changes.
 {width=50%}
To retype the whole timecode value manually, click the field once so that the whole timecode is selected and type the full hours, minutes, seconds and frames timecode (excluding the colons).
The period and comma keys can be used as a shortcut to enter double zeroes into the timecode fields
To confirm after any new value is entered in any boxes, either hit Enter, or just click off that box.
To adjust just one timecode field, e.g. frames - double click just that field in the timecode- so that just that field is selected, & retype the value.
It is possible to edit one field this way, without the following fields changing or defaulting to zero.
To trim the start timecode of a visual event numerically while keeping the Out Point in place, the link button should be un-linked.
Likewise, to trim the end timecode of a visual event numerically while keeping the In Point in place, the link button should be un-linked.
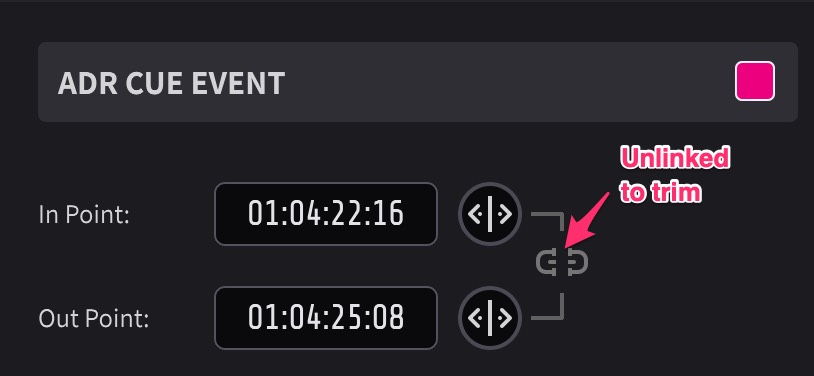 {width=50%}
To move the event, such that the duration of the Visual Event stays the same, click the lock icon shown between the lines that link the In Point & Out Point fields together - so that the link icon has no break between the two parts. When fields are edited in this mode, the other field will also be relatively changed to maintain the duration.
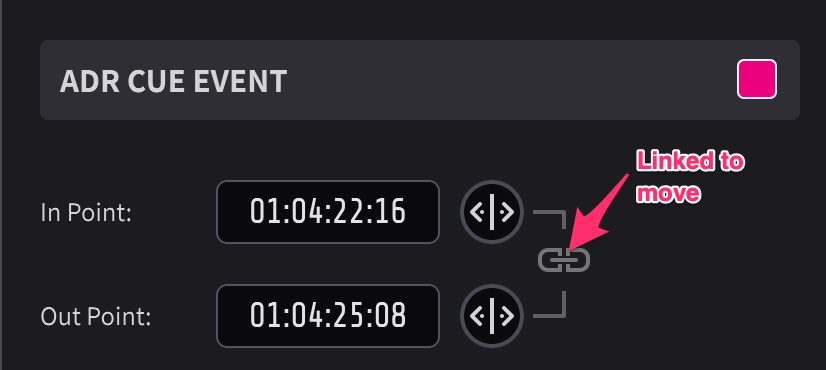 {width=50%}
For Streamer events, the in point is the point where the streamer ends whereas the start point is the first frame of the wipe or countdown.
For Marker and Flutter events, the start point and in point are identical.
While is not possible to change the Visual Event type from the Properties window, this is possible from the Event list.
Editing Visual Events in the Event List
The Event list shows the same information shown in the Properties tab in the Main window, and the same result can be achieved if event properties are modified in one or the other. The only difference is that the event list shows information for several events at a time, while the properties tab only shows information for the currently selected event (or for the first if more than one event is selected).
This means it is possible to select multiple items and edit them simultaneously - for example changing the streamer duration to the same value.
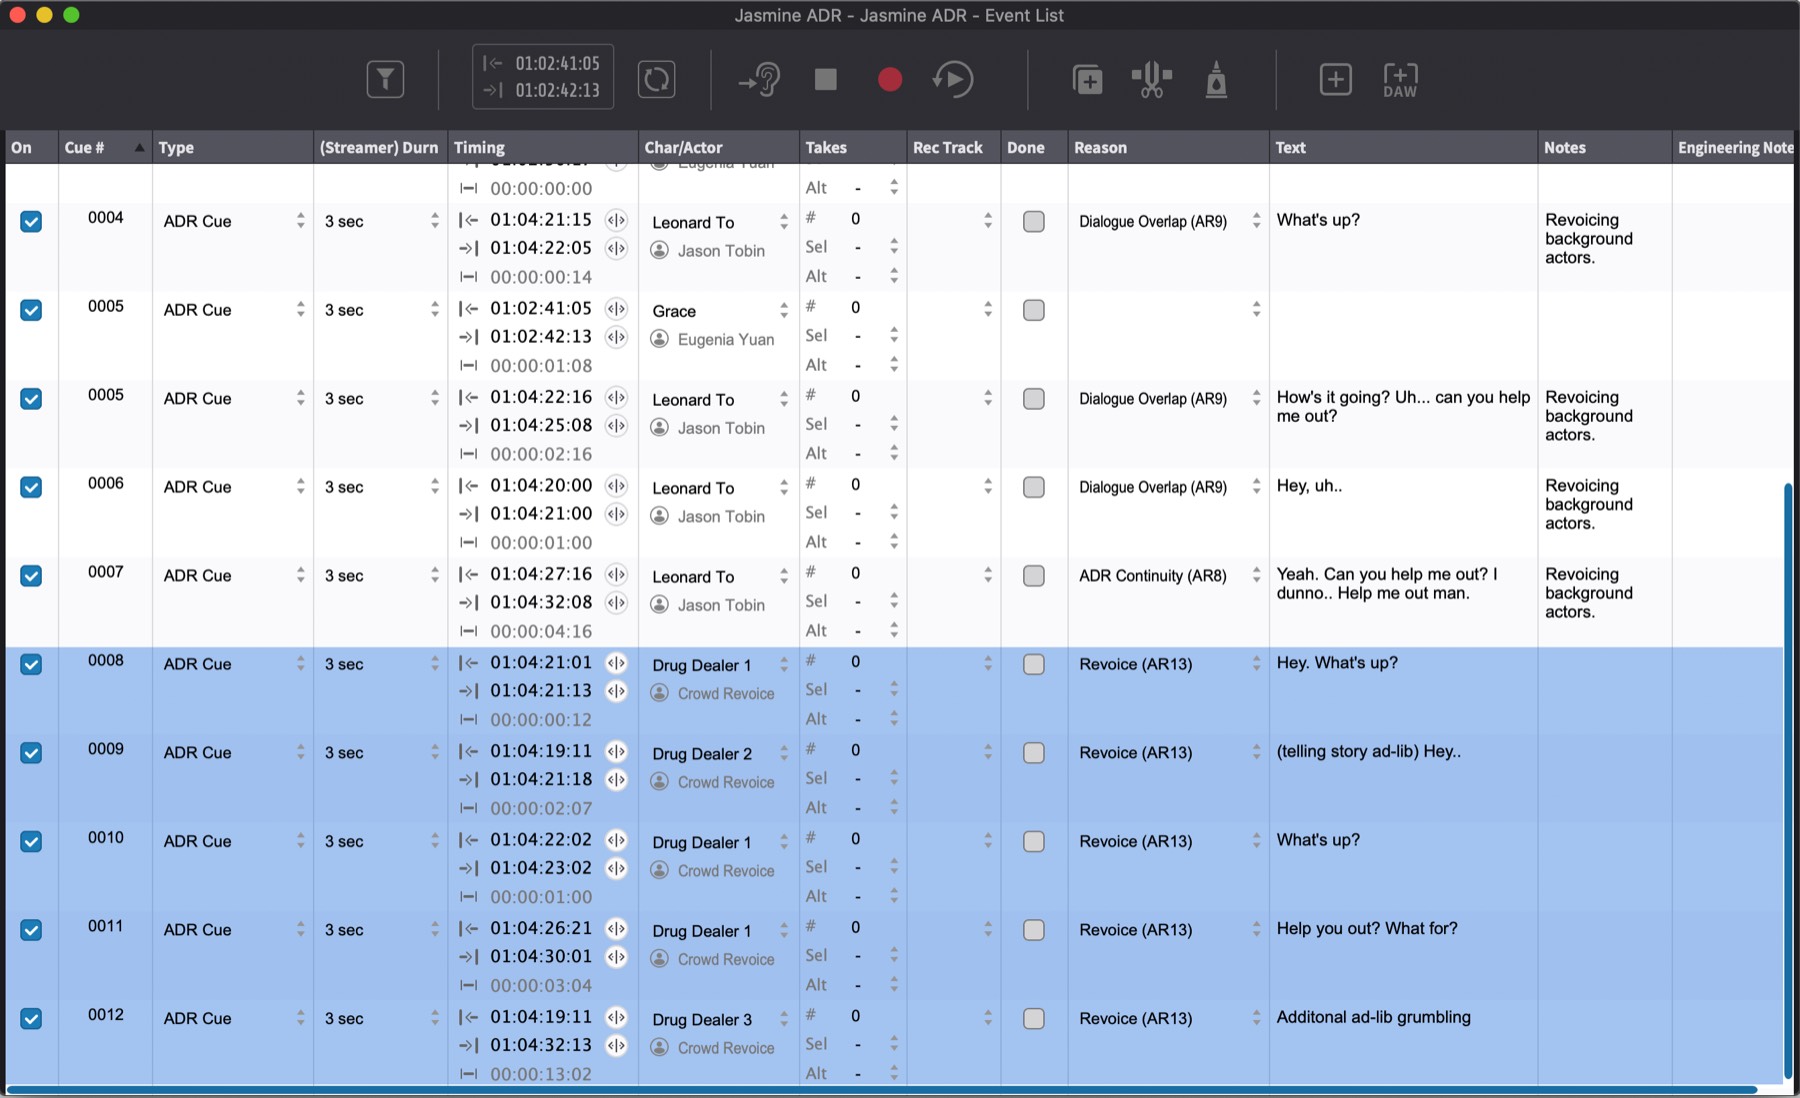
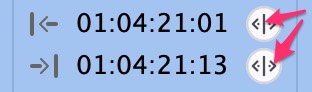
Event boundaries can be modified by dragging the timecode modifiers in the event list next to the In and Out points.
 {width=50%}
Event Selection Playhead behaviour
There are a couple of general options which dictate how the playhead behaves when any visual event is selected. These can be found under the General tab of the Overlays Preferences.
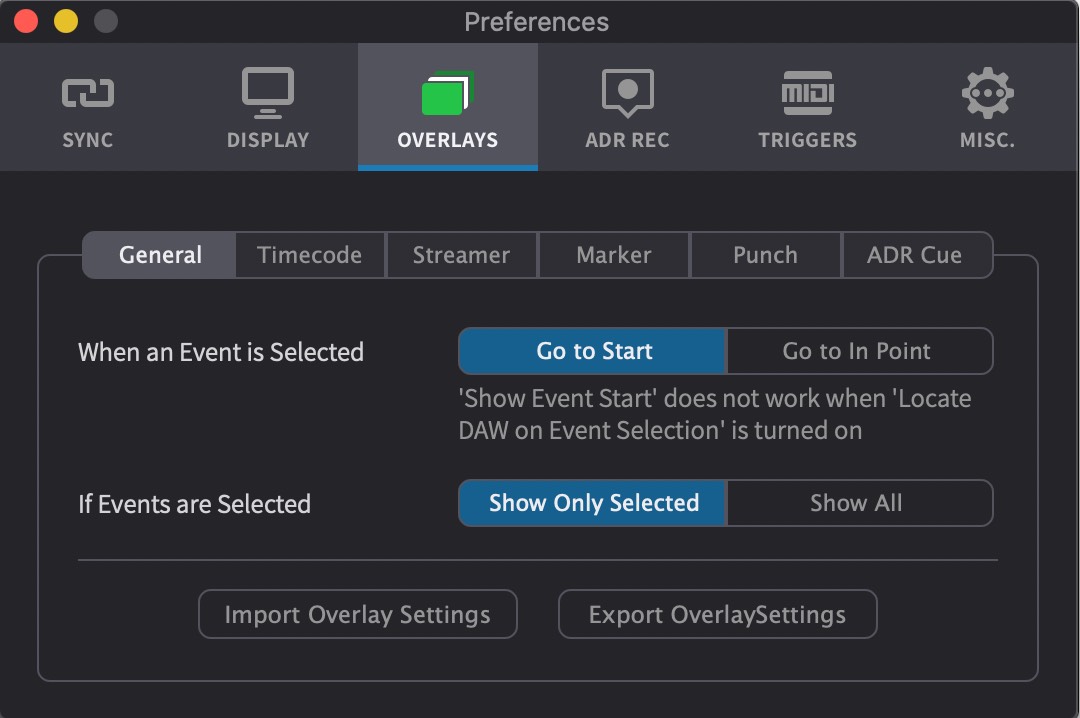 {width=70%}
When an event is selected - Go to Start or Go to In Point or Don't move Playhead - dictates whether the playhead moves to the Start of a visual event that is selected, the In Point, or does not move the current postion of the Playhead.
Go to Start does not work when Locate DAW on Event Selection is turned on.
If Events are Selected - Show Only Selected or Show All - Selects whether only the selected events are shown (if at least one event is selected); or whether all events are always shown- independent of those selected.
Duplicating Visual Events
Hold down the Option key while dragging one or more highlighted Visual Events to duplicate them.