
Display Setup
Introduction & Preparation
Video Sync is able to sync & playback to a variety of different display sources simultaneously - each with their own unique display & overlay settings. Each video device in the DISPLAY tab in Preferences / Settings offers separate settings, allowing precise control over what each video device displays.
When Video Sync is launched, it scans the system for all available video devices. PCIe cards or external devices with multiple outputs show up as separate video devices per output. Video Sync offers a maximum of one Avid®, Blackmagic or AJA hardware video device output. NDI and Syphon outputs are not subject to this limit — they are additional network-based outputs that can be used alongside the hardware device.
When using Avid®, Blackmagic and/or AJA hardware video devices, ensure that the hardware has been installed/connected according to the manufacturer's instructions, the latest driver software is installed, & the associated setup apps have been run to confirm that the video outputs are displaying correctly on external video monitor displays - independently of Video Sync.
When running Pro Tools® 11 or later simultaneously on the same computer, the Avid® Video Engine (AVE) should always be disabled. Leaving this enabled can severely impact Video Sync's performance, & in the worst case can cause the video devices to be blocked by Pro Tools® - such that they don't show up as video output devices in Video Sync. The AVE can be disabled by going to the Pro Tools® Setup → Playback Engine menu & making sure that the 'Video Engine Enable' option is not ticked.
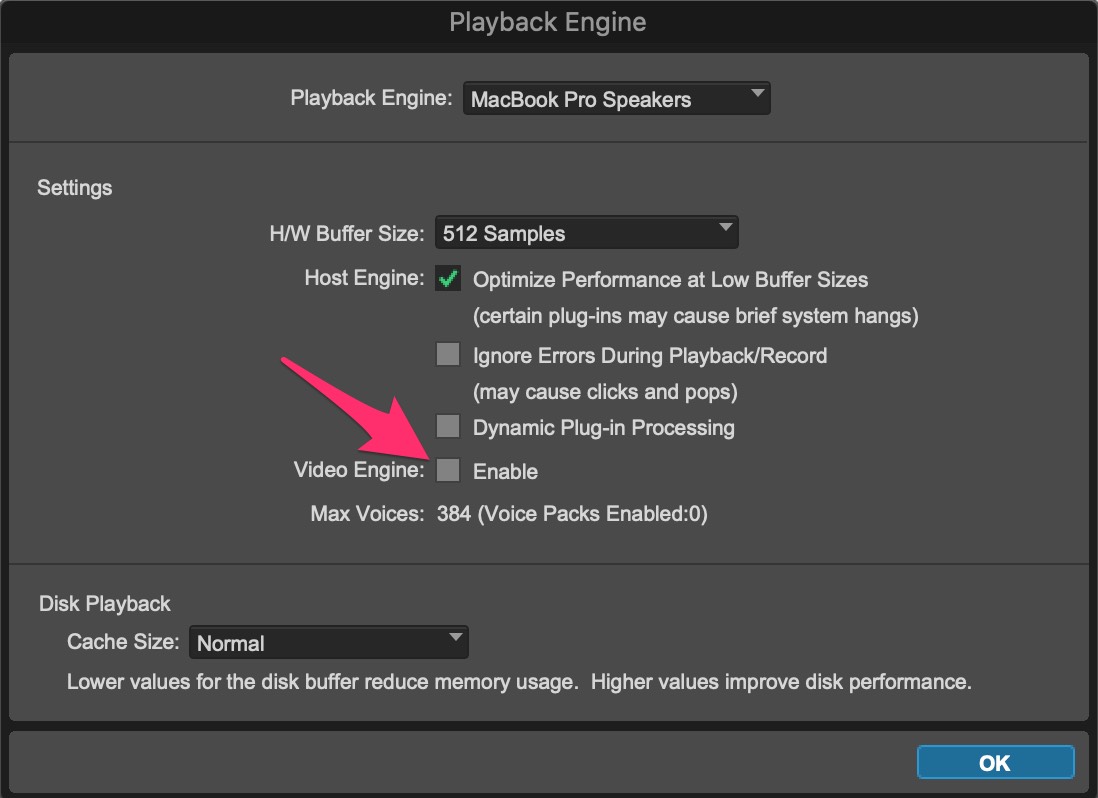
If using Avid®, Blackmagic or AJA hardware, a restart of Video Sync is required after a change is made to the Pro Tools® Video Engine Enable setting.
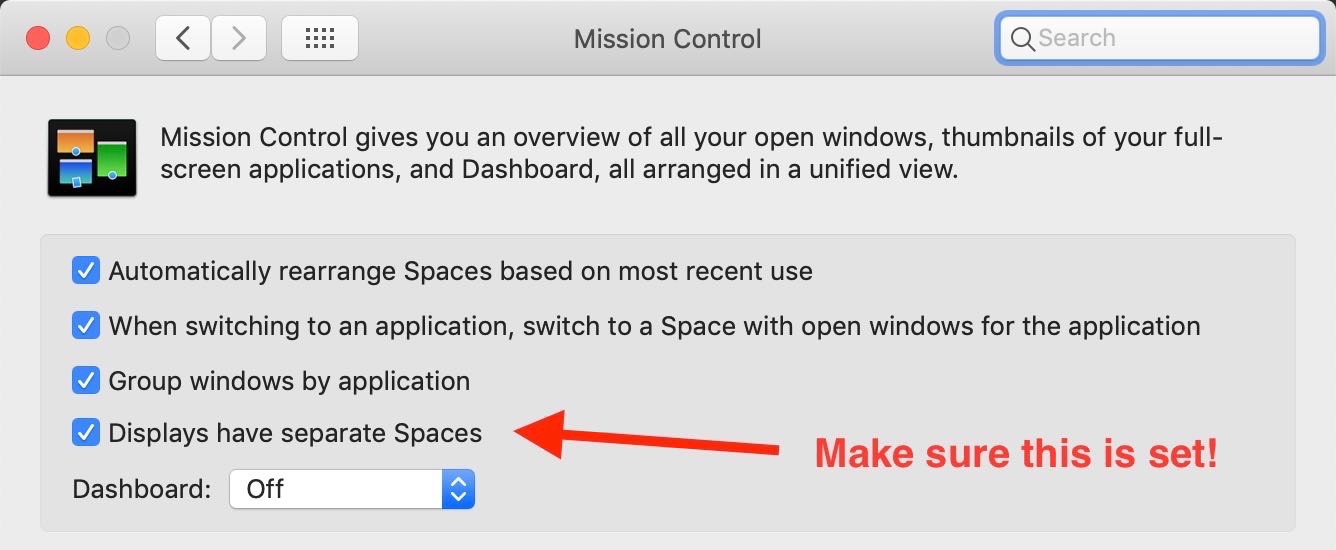
Finally, to prevent other displays going black when engaging Video Sync's dedicated video full-screen mode, please open the Apple menu → System Settings Mission Control and make sure "Displays have separate spaces" is set.
Video Devices
There are currently 5 possible types of video devices available in Video Sync:
1. Internal Video Device - The video player view in the top right of the main Video Sync window. This video device also corresponds to the Mini Player Window.
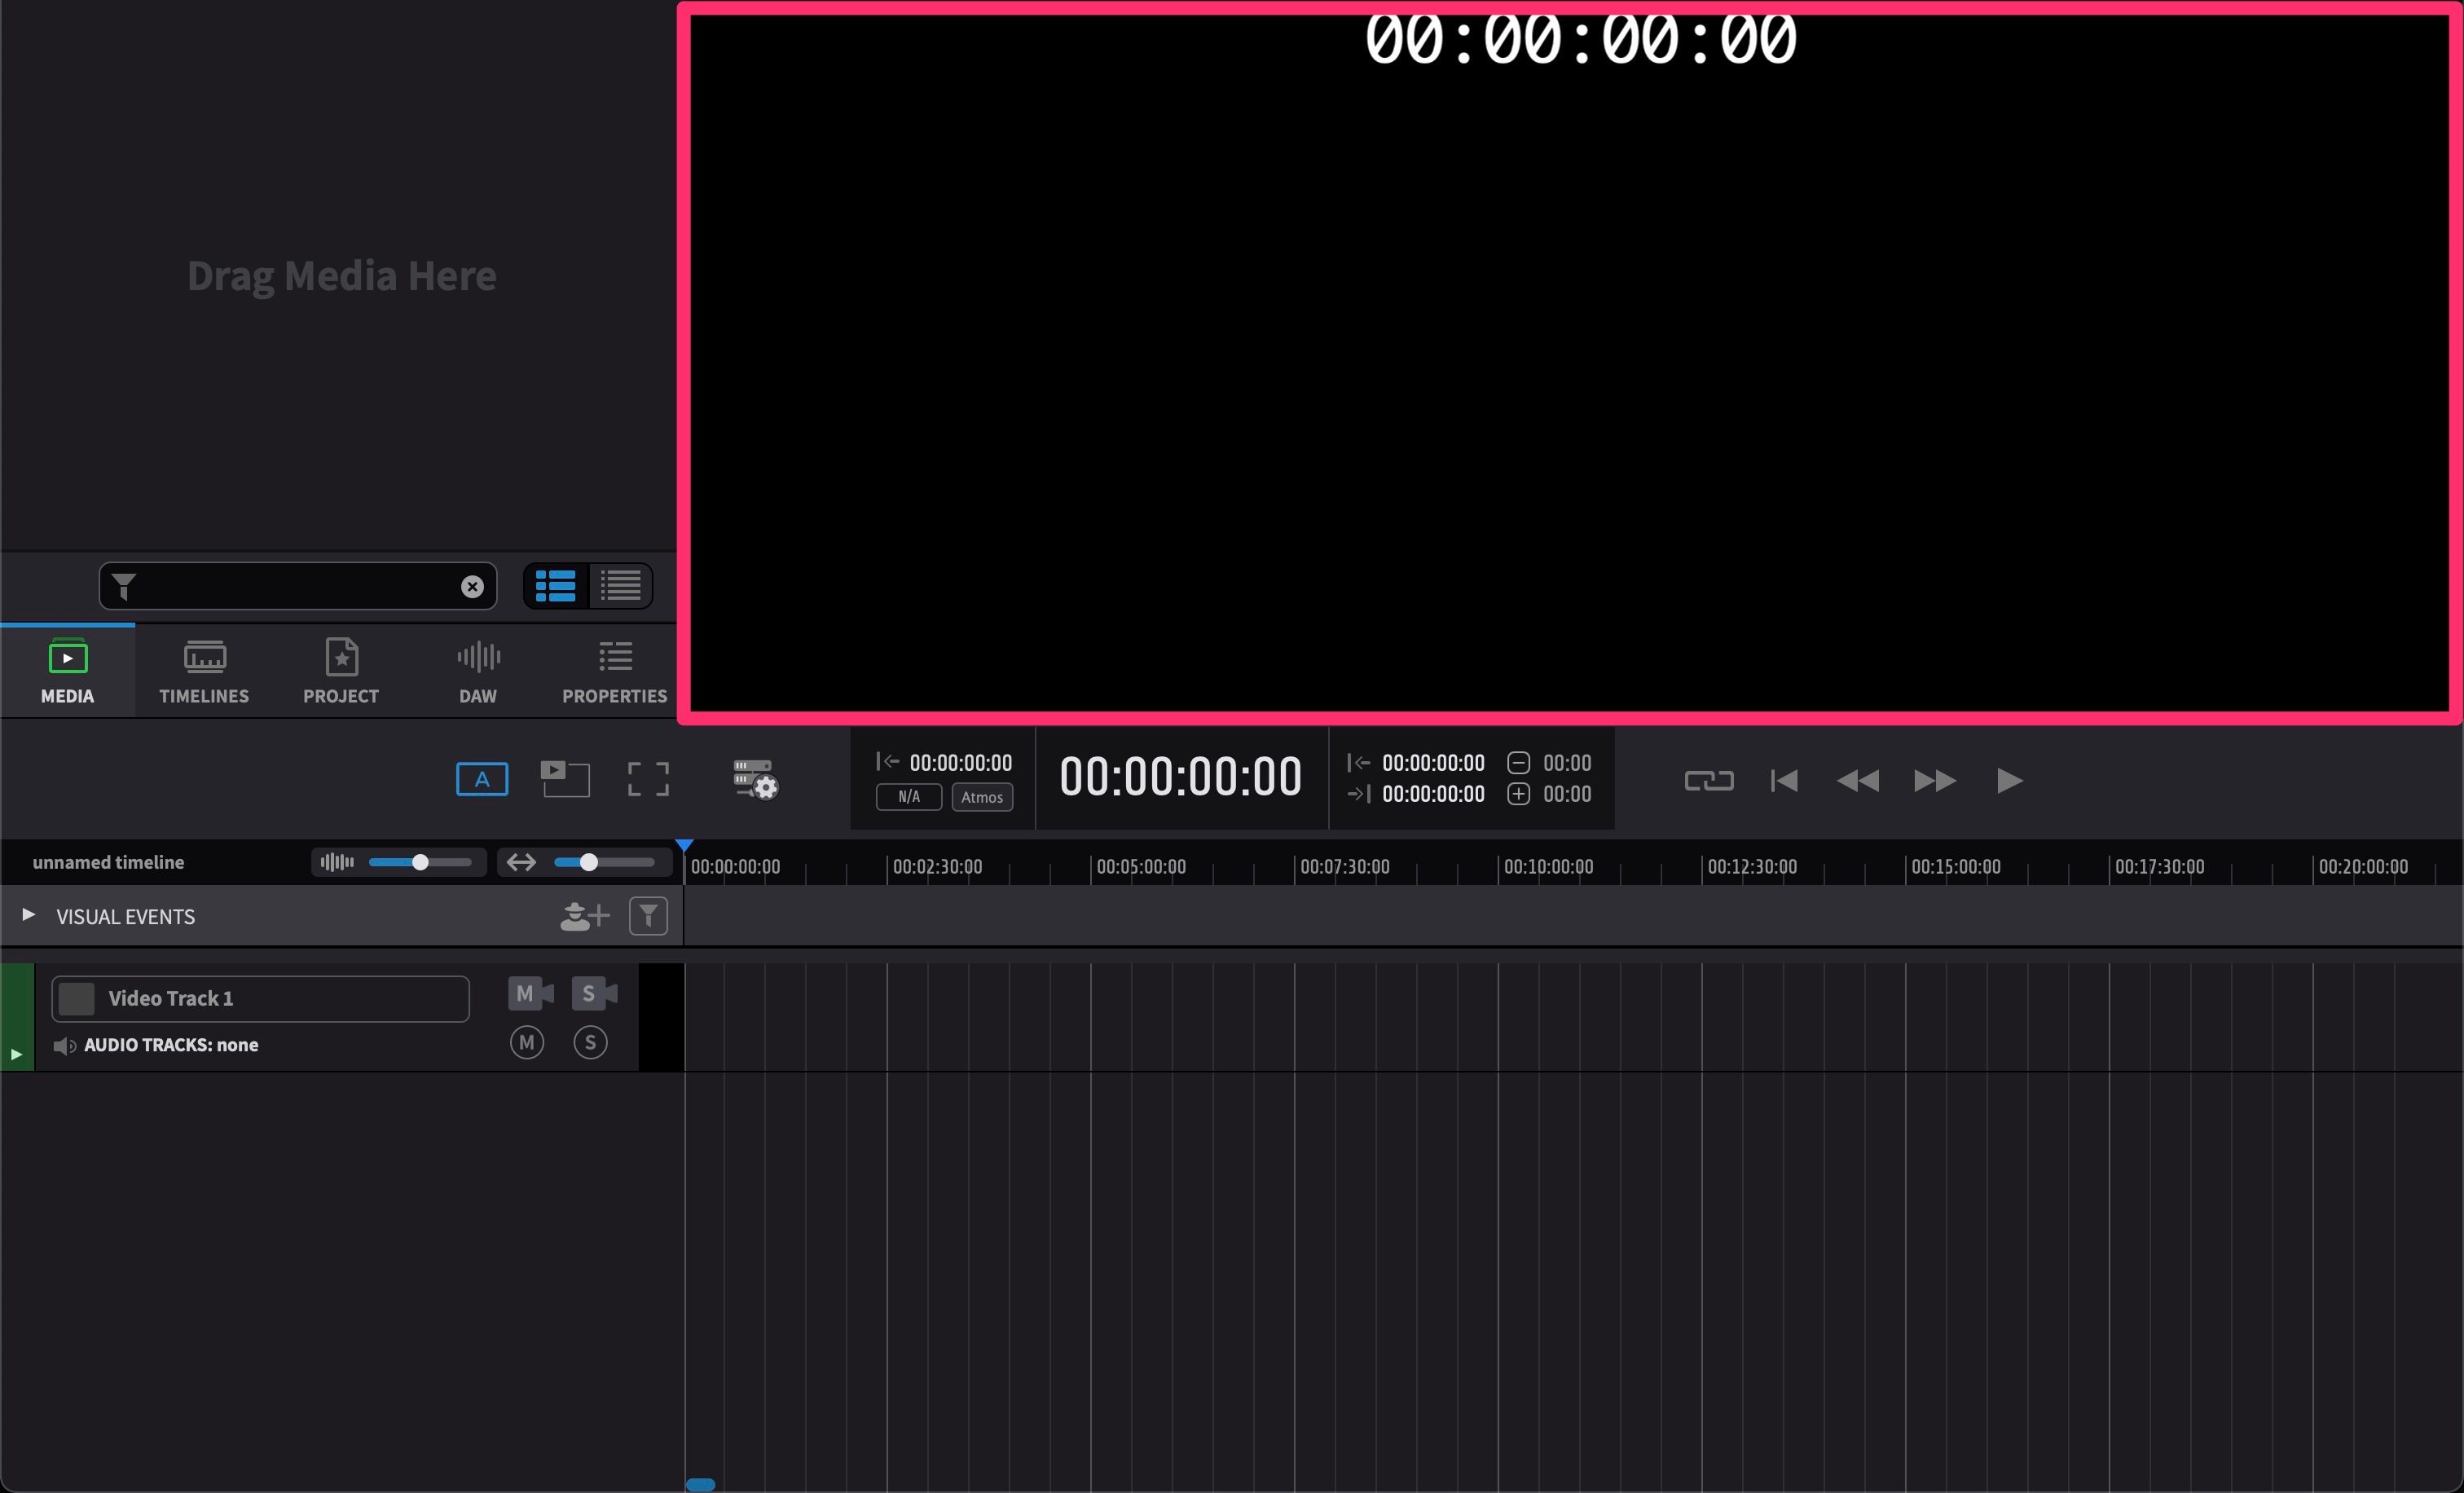
To toggle Mini Player Mode, use the hotkey combination Shift & Command & M.
The size and position of the Mini Player window is maintained - even after relaunching Video Sync.
2. Fullscreen Video Device - A specific computer monitor can be assigned to play the video in full-screen mode by pressing Command & Shift & F or by clicking the fullscreen icon in Video Sync's controller bar.
The monitor to be permanently used for the full-screen mode is assigned using the Go Fullscreen on this screen setting in the Preferences / Settings → DISPLAY tab.
3. Hardware Video Device - Video Sync supports the following video hardware:
Blackmagic Design:
DeckLink, UltraStudio, & Intensity Ranges
AJA (Video Sync Pro only):
KONA, Io & T-TAP Ranges
Avid:
Artist I/O DNx Range (Video Sync Pro only for AJA based hardware
such as the DNxIP & DNxIV)
4. NDI Video Device - NDI (Network Device Interface) is a protocol for sending video frames with metadata over a standard local network. An NDI display sends the Video Sync output — optionally including overlays — over the network instead of to a directly attached monitor or hardware video device. Any NDI-compatible receiver on the same network can pick up the stream, which is useful for feeding remote client displays, streaming/recording systems or additional workstations without extra video cabling. As with the other display devices, NDI outputs are listed in the DISPLAY tab of Preferences / Settings where they can be enabled, disabled and configured individually. For details on NDI technology and how to add an NDI device, see the NDI Setup section below.
5. Syphon Video Device (Video Sync Pro only)
Video Sync features support for the Syphon framework. This allows Video Sync to share video frames with other Syphon-enabled applications in the most efficient way possible - directly on the GPU. Using this technology, it is possible to playback movie files in sync to a timecode source and to feed it to other applications to e.g. map the video onto an uneven surface by using third party software such as Resolume, Millumin or MadMapper.
If a very wide or tall movie is required to be projected, it is also possible to use multiple copies of Video Sync on different machines all attached to the same timecode source. Each copy will then playback a separate movie file containing a part of the original file small enough to be displayed by one projector.
Display Device List
The Device List shows all video devices currently available on the system. Access the Device List from Video Sync menu → Preferences / Settings → DISPLAY tab.
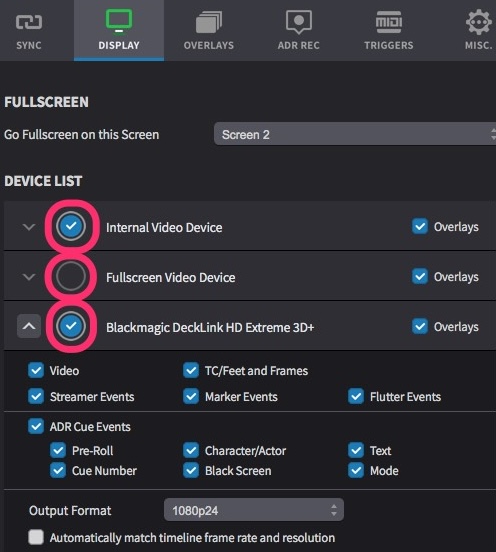
Each display device in Video Sync can be enabled/disabled individually by toggling the blue circular Device ON/OFF switch immediately to the left of the device name.
At the bottom of the DISPLAY tab there are two buttons: Add NewTek NDI Video Device and Add Syphon Video Device. When one of these buttons is clicked, Video Sync adds that network‑based display device to the list above and the other button is greyed out, so only one of these options (either NDI or Syphon) can be added at a time.
The settings chosen in the Device List are applied globally to Video Sync - and are independent of specific Project or Timeline settings.
NDI Setup
About NDI
NDI (Network Device Interface) sends video frames and metadata over a standard local network connection. Unlike a hardware video device, which requires a physical cable between the computer and a monitor, NDI transmits the video as a network stream that any compatible receiver on the same LAN can discover and display. There is no limit on how many devices can receive the stream simultaneously — a single NDI output can feed any number of monitors, recording systems or workstations on the network at once. NDI is a one-way broadcast from the sender to the receivers — there is no back channel from the receiver to the sender.
Video Sync supports standard NDI (sometimes referred to as NDI Full Bandwidth), which uses the open NDI SDK. The compressed variant known as NDI|HX is not supported, as the NDI|HX SDK is not publicly available.
A wired Gigabit Ethernet connection (or faster) is strongly recommended for reliable NDI streaming. Wireless connections may work for low-resolution content but are not reliable at higher resolutions and frame rates, and can introduce dropped frames or latency spikes.
NDI Tools, a free application suite from NDI (Vizrt), provides a standard receiver for monitoring NDI streams on another computer. Dedicated hardware converters — such as those from BirdDog — can convert an NDI stream back to SDI or HDMI for use with traditional broadcast monitors.
Adding an NDI Device
To add an NDI video device, open Preferences / Settings → DISPLAY tab and click the Add NewTek NDI Video Device button at the bottom of the device list.
Only one network-based display protocol can be active at a time — either NDI or Syphon. When one is added, the other button is greyed out. To switch protocols, remove the active network device first by clicking its × button in the device list, then add the other.
Once added, the NDI Video Device appears in the device list like any other display device. Expand its settings by clicking the grey arrow to reveal the full set of options:
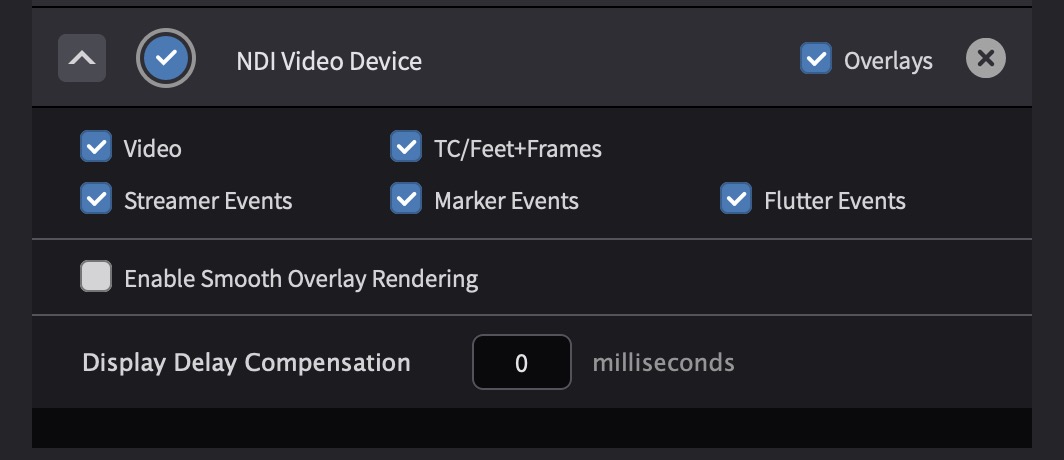
The available settings are:
Video — Enables or disables the video picture on the NDI output.
TC/Feet+Frames — Shows the timecode or feet-and-frames counter as an overlay on the NDI output.
Streamer Events, Marker Events, Flutter Events — Each checkbox controls whether that overlay type is rendered on the NDI output, allowing different outputs to show different combinations of overlays.
Enable Smooth Overlay Rendering — Decouples overlay rendering from the video frame rate for smoother Streamer motion. See the Smooth Rendering section for details.
Display Delay Compensation — Corrects for display latency on the receiving end, entered in milliseconds. See the Correcting Video Playback Latency section for how to measure this value.
Syphon Setup (Video Sync Pro only)
Setting up Syphon in Video Sync is really easy. Start by opening the Preferences / Settings and go to the DISPLAY tab.
By default, Video Sync already creates a Syphon display device here but it is not enabled. To enable it, click the blue switch on the left of the Syphon display device row in the table view. As with other display devices in Video Sync, visual overlays can be turned on or off on the Syphon display device as well.
When using Syphon in combination with a projection mapping software, the video will be displayed within Video Sync and also through the projection mapping software. This may be a problem if also using a Blackmagic device for playout as both Video Sync and the projection mapping software might want to use that device. To avoid this conflict, tell Video Sync to not use the Blackmagic device by disabling it in the Preferences / Settings → DISPLAY tab (see above).
Performance Optimisation
For each enabled video device, Video Sync renders video frames several times per second (depending on the settings and the type of device) - even if the connected display is not powered on or disconnected. Disabled video devices won't render content - which improves Video Sync's resource consumption when playing back. Thus, to maximise system performance, it is advisable to only enable the devices that are needed. Though with most modern processors this is not an issue, in the worst case with older processors & high resolution video files - this can cause some playback anomalies like, 'stuttering' & 'hiccups'.
Video file performance depends heavily on the codec and container format used. For more detail on these terms, see Understanding Video Codecs and Containers at the end of this section.
The best playback performance is achieved with intraframe-only codecs such as Apple Pro Res, Avid® DNxHD, and AVC Intra for HD material, or DV and Motion JPEG for SD. These codecs store every frame independently, so decoding is fast and scrubbing is instant. The files are larger, but the playback quality and sync accuracy are significantly better.
Interframe codecs such as H.264 and H.265 produce much smaller files but require substantially more processing power, as the decoder must reconstruct frames from surrounding data. This can lead to sluggish or uneven video playback and slower scrubbing response. Where possible, request intraframe-only files from the picture editor.
For 4K output, playback performance depends on the computer and the file itself. Most intraframe-only codecs perform well. H.264 4K files generally play back, but jumping to arbitrary positions in the file can be slow because the decoder must find and process the nearest keyframe first.
Faster storage improves overall performance. Dedicated internal SSDs are preferable. If using external drives, mains-powered drives generally perform better than bus-powered ones.
Understanding Video Codecs and Containers
A video file has two distinct layers: the codec and the container. The codec determines how the video frames are compressed and decompressed. The container is the file format that packages the compressed video together with audio, timecode, subtitles, and other metadata into a single file. Think of the codec as the language the video is written in, and the container as the envelope that holds everything together.
A codec (short for coder-decoder) describes how individual video frames are encoded when the file is written and decoded when it is played back. There are two types:
Intraframe-only codecs store every frame of the video independently. Each frame is complete on its own, so the decoder can jump to any point in the file and display it immediately. This makes scrubbing fast and playback reliable. The trade-off is larger file sizes. Common intraframe-only codecs include Apple Pro Res, Avid® DNxHD, and AVC Intra.
Interframe codecs reduce file size by storing only the differences between frames. A full frame (called an I-frame or keyframe) is stored periodically - every 5th, 10th, or 20th frame depending on the encoder settings - and the frames in between are reconstructed from the difference data. This is very efficient for file size but requires more processing power during playback, and scrubbing to an arbitrary position is slower because the decoder must first find and decode the nearest keyframe. H.264 is the most common interframe codec.
A container format defines the structure of the file itself - what types of data it can hold and how they are organised. Not all containers support the same features. Some can hold only a single video and audio track; others support multiple audio tracks, timecode, subtitles, chapter markers, and other metadata.
The QuickTime container (.mov) supports nearly all common video and audio codecs as well as timecode, multiple audio tracks, subtitles, and other metadata. This versatility is why .mov remains the standard container in post-production. Although Apple's legacy QuickTime playback engine was deprecated in macOS, the .mov container format itself remains fully supported.
UHD and 4K Playback
UHD (Ultra High Definition, 3840x2160) and 4K (4096x2160) video playback is supported in Video Sync Pro. These resolutions can be displayed on computer monitors that support them, provided the computer has sufficient processing power, video RAM, and graphics capabilities. Video Sync can also play back higher resolution files such as 8K, if the system can handle the processing requirements.
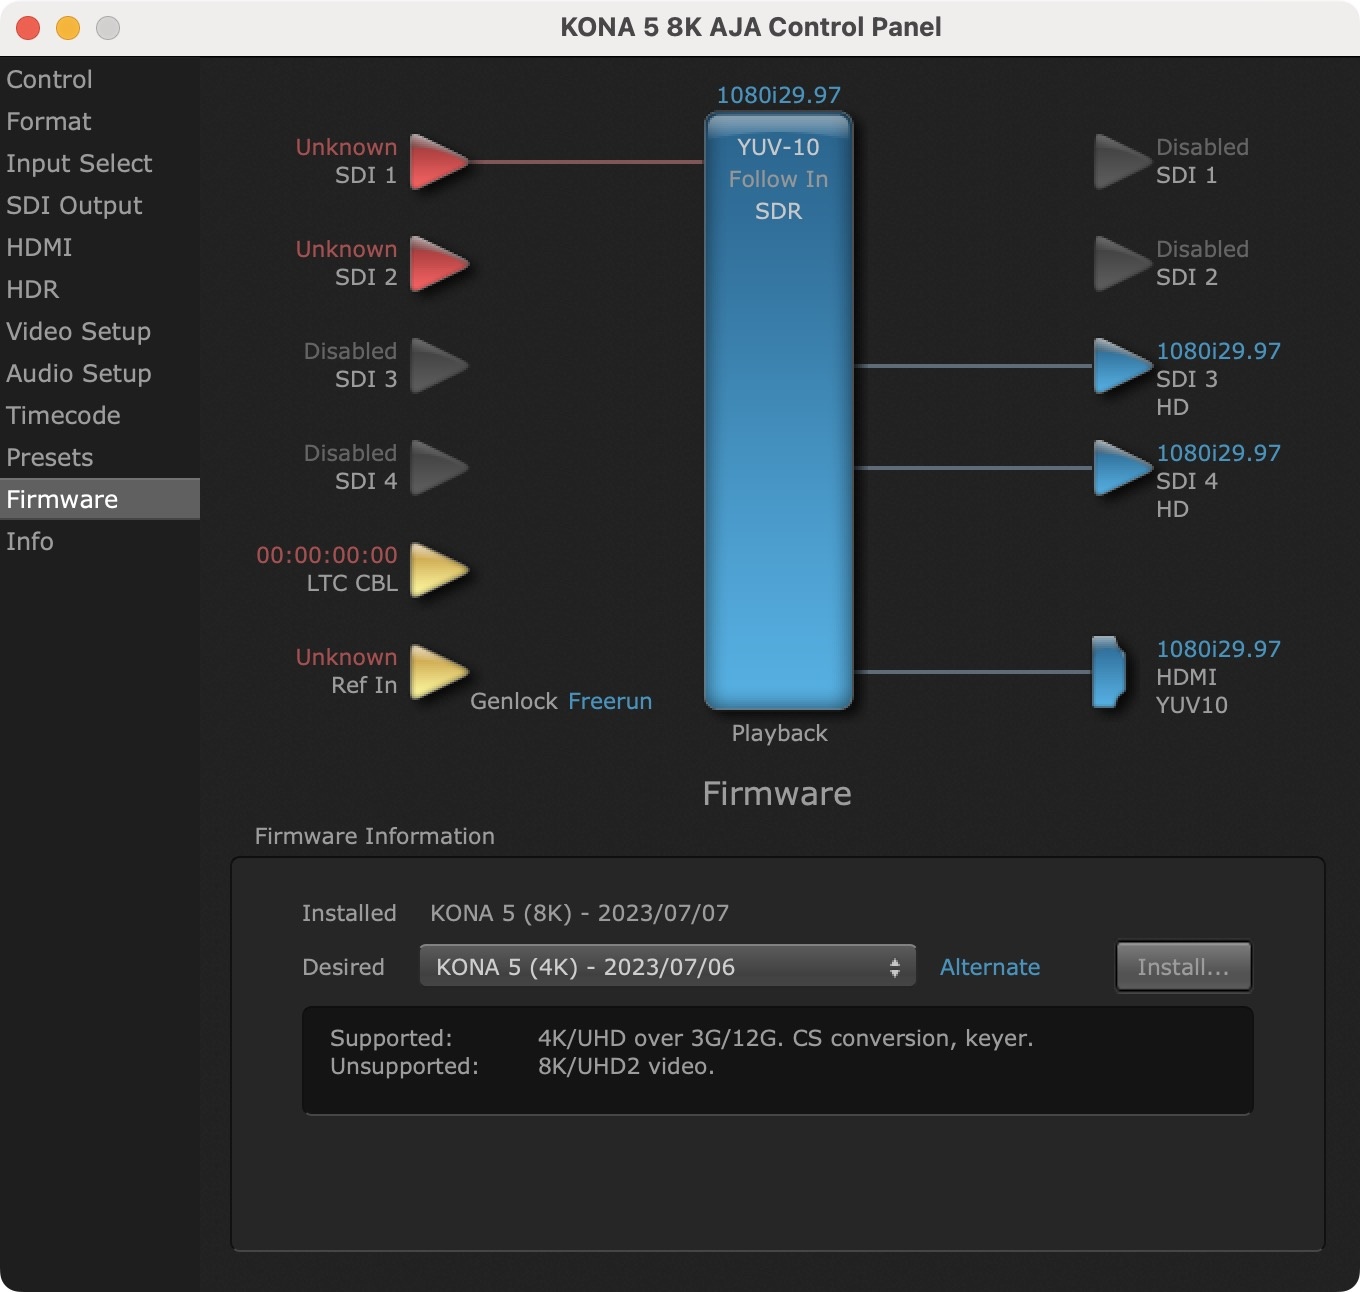
When using AJA hardware video devices, only one output can be used with UHD/4K resolutions. The only exception is the AJA Kona 5. For two simultaneous 4K outputs on a Kona 5, the card needs to be flashed with the 8K firmware variant instead of the 4K firmware. This firmware can be selected in the AJA Control Panel application:
HDR (High Dynamic Range) Playback
Video Sync plays back HDR video files in the HLG and PQ (HDR10) formats. No setup is required - HDR files are detected automatically and displayed correctly on any screen.
On displays that cannot show HDR, the video is automatically tone mapped: the HDR signal is converted for SDR display while preserving as much of the original contrast and colour as possible. On HDR-capable Mac displays, tone mapping is bypassed and playback uses the full HDR range of the display.
HDR metadata embedded in the video file - the mastering display luminance and the content light level values (MaxCLL/MaxFALL) - is read and used for accurate tone mapping. When outputting through Blackmagic or AJA hardware video devices that support HDR, this metadata is forwarded to the device along with the video signal.
With a Video Sync Pro licence, the video rendering pipeline runs at 10 bit automatically.
For 4K HDR playback, it is recommended to enable the Enable Hardware Decoding option in the Video Sync menu → Preferences / Settings → MISC tab.
Note: This option is switched off by default and is generally advised to be kept off when playing other video file types.
Video Sync Pro enables 4K playback through Blackmagic or AJA devices. For standard Video Sync, 4K output is not available.
Setting the output format of Avid®, AJA & Blackmagic Design video devices
To avoid playback issues whenever changing timelines or projects, it is vital to confirm that the frame rate & screen resolution of hardware video devices are set to match the timeline & associated video correctly. This can be done from the Output Format at the bottom of expanded settings of each Avid®, AJA or Blackmagic device in the Device List:
To reveal the Output Format, click on the left-most grey arrow of the relevant video device to show the Expanded settings - so that the arrow is pointing up.
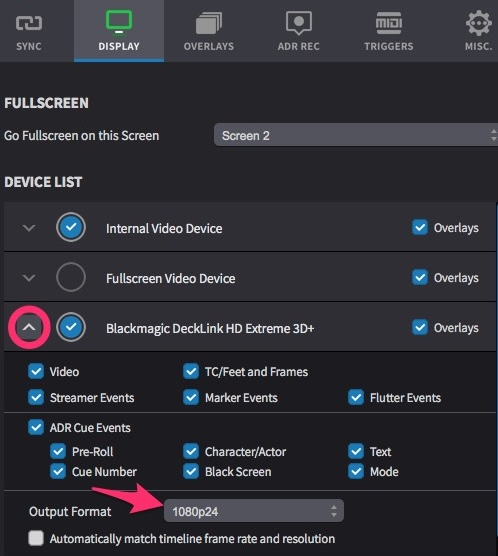
These settings are only available for Avid®, Blackmagic & AJA Video devices.
The Timeline frame rate is visible here:
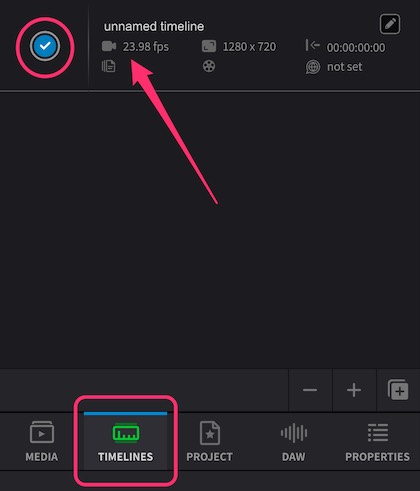
The active Timeline is denoted by the blue circular Selection to the left of the Timeline name.
If the frame rate of the video format does not match that of the timeline, the timeline frame rate will not be adjusted. So if for example a video device has a frame rate of 25 frames per second with a timeline frame rate of 24 frames per second, one frame of the timeline will be played out twice per second - resulting in 'stuttery' playback.
If the Automatically match timeline frame rate and resolution checkbox is set, an output format for the device will be chosen automatically that matches the timeline's frame rate and resolution. The best results can be achieved if the frame rate and resolution of the output device & timeline are identical because no scaling and frame rate conversion needs to take place which can otherwise lead to display quality loss.
While this can be a very easy & useful option, leaving this option enabled can lead to some playback issues like black screens when the correct settings are not auto-matched with some video files. So it is generally advised to set this off - which then relies on the frame rate & resolution being set correctly manually under Output Format.
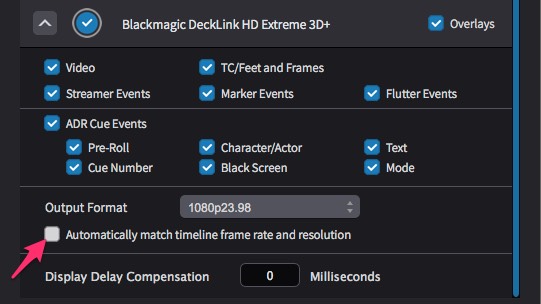
If there is no video format that matches both the frame rate and the resolution of the timeline, Video Sync will try to match only the frame rate. If there's also no video format matching the timeline's frame rate, a fallback display mode will be used.
Smooth Rendering
Video Sync includes a smooth rendering feature that decouples overlay rendering from the video frame rate, allowing overlays to be rendered at the display's native refresh rate instead. This results in noticeably smoother motion for moving overlays - Streamers benefit significantly, as their sweep across the screen appears fluid and continuous rather than stepped. The improvement is most visible when the video content runs at a low frame rate such as 24 fps, where the difference between video-rate and display-rate rendering is largest.
Note: Smooth Rendering benefits overlays that move during playback - primarily Streamers. Single-frame overlays such as Markers and Flutters do not benefit, as they appear at a fixed position for a single frame and have no continuous motion to smooth.
Enabling Smooth Rendering
To enable smooth rendering for a specific display device, open Video Sync menu → Preferences / Settings → DISPLAY tab. Locate the desired video device in the Device List and expand its settings by clicking the grey arrow to the left of the device name. Enable the Enable Smooth Overlay Rendering checkbox for that device.
 {width=60%}
With smooth rendering enabled, overlays are rendered at the display frame rate instead of the video frame rate. The actual frame rate achieved depends on the type of video device:
Internal and Fullscreen Video Devices - These devices typically render at 60 Hz, matching the refresh rate of most computer displays. This provides a significant improvement over 24 fps video content, resulting in much smoother overlay motion.
Blackmagic® and AJA® Hardware Video Devices - For hardware video devices, the smooth rendering frame rate is determined by the device's selected output format. For example, when using a 1080p50 output format, overlays render at 50 fps.
Configuring Hardware Devices for Smooth Rendering
When using Blackmagic® or AJA® hardware video devices, achieving smooth overlay rendering requires specific configuration. By default, hardware devices may be set to automatically match the timeline frame rate, which would limit overlay rendering to the video's native frame rate.
To achieve smooth overlays on hardware devices, the Automatically match timeline frame rate and resolution option must be disabled in the device's expanded settings within the DISPLAY tab. With this option disabled, manually select a high frame rate output mode from the Output Format dropdown. For example, selecting 1080p50 provides a 50 fps overlay rendering rate - a natural double of 25 fps PAL content - while 1080p60 provides 60 fps, a natural double of 30 fps content.
Note: For more information on configuring hardware video device output formats, refer to the Setting the output format of Avid, AJA & Blackmagic Design video devices section earlier in this chapter.
Performance Considerations
Smooth rendering requires additional computational resources. For each enabled video device with smooth rendering active, Video Sync must render overlay frames at a higher rate than would otherwise be necessary. This increases both CPU and GPU utilisation.
To maintain optimal system performance, enable smooth rendering on only one device at a time. Enabling smooth rendering on multiple devices simultaneously may cause playback anomalies such as stuttering or dropped frames, even on systems with adequate processing power. If smooth overlays are required on an external monitor connected via hardware video device, consider disabling smooth rendering on the internal and fullscreen video devices. Conversely, if smooth overlays are only needed on the internal display for monitoring purposes, hardware devices can remain at their standard frame rate.
When to Use Smooth Rendering
Smooth rendering is particularly beneficial for Streamer overlays. Streamers sweep across the screen during playback, and at low frame rates their motion can appear stepped or jerky. Smooth rendering produces fluid, continuous movement that is easier to follow visually. When clients or talent are viewing overlays on external displays during sessions, smooth rendering provides a noticeably more polished appearance.
For sessions using only static or single-frame overlays such as Markers and Flutters, the benefits of smooth rendering are less pronounced. In these cases, the additional resource overhead may not be justified, and standard frame rate rendering is sufficient.
Projects already using higher frame rate video - such as 50 fps or 60 fps - may not need smooth rendering enabled, as the overlay frame rate is already high enough for fluid motion at the video's native rate.
Correcting Video Playback Latency
Video Sync is able to individually correct the consistent video playback latency caused by each monitor, display screen or projector.
This does not affect the actual static start position of the video file in the timeline.
Please ensure that any Dolby Atmos Renderer hardware is first bypassed when correcting the monitor latency. Dolby Atmos Renderer latency is compensated for elsewhere & requires the Video Playback Latency to be corrected first.
There are various analysers available to measure this offset:
Dedicated hardware analysers like Sync-One2
(https://sync-one2.harkwood.co.uk)
iOS apps like Catchin' Sync (https://quietart.co.nz/catchinsync/) or SynQR (https://synqr.app)
Follow the specific directions that come with the analyser to calculate what the offset value of a particular display is. This process usually involves playing a test video file through Video Sync, while directing the device at the display so it can measure the white visual flashes in-between the black - with their corresponding audio beeps. This will provide a figure in milliseconds.
Enter this value in the Display Delay Compensation field, which can be found at the bottom of the expanded settings of the relevant video display device.
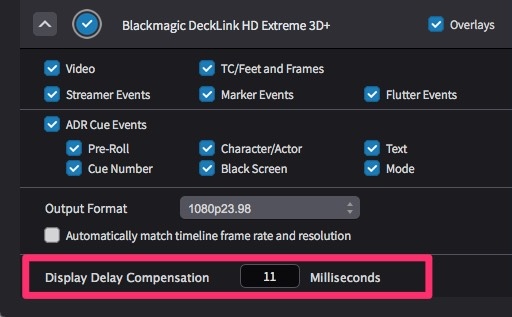
Entering for example 50 milliseconds, the video will play back 50 milliseconds earlier so that it compensates for the delayed projection - while keeping the audio in place.
Test again to confirm the offset has been correctly compensated for.
To ensure that a constant offset value is maintained by the monitor, it is advisable to turn off any automatic picture improvement settings (for example inter-frame smoothing) in the internal menu settings of the LCD or projector. This will reduce any internal processing, which prevents extra variable display latency based on the complexity of the visual content. Using the same analyser test above but with a test video file with randomly spaced flashes/beeps can help to identify this issue. Run the test again if any of these settings are changed.
Dolby Atmos Renderer Delay Compensation
Any audio that passes through a Dolby Atmos Renderer, induces some additional latency - which then introduces the need for a reverse video delay compensation when playing back in sync to a DAW.
To compensate for this, with audio passing through the renderer, measure the offset again (as detailed in the Correcting Video Playback Latency section above) - to determine the number of milliseconds that the video is ahead of the audio.
Click on the button labelled Atmos in the centre of the Video Sync main window to the left of the Timecode counter. Enter the measured offset amount into the Dolby Atmos Renderer Delay Compensation tab that appears & activate the Enable field.
Entering for example 50 milliseconds, the video will play back 50 milliseconds later so that it compensates for the delayed audio.
The Atmos button will turn blue when enabled.
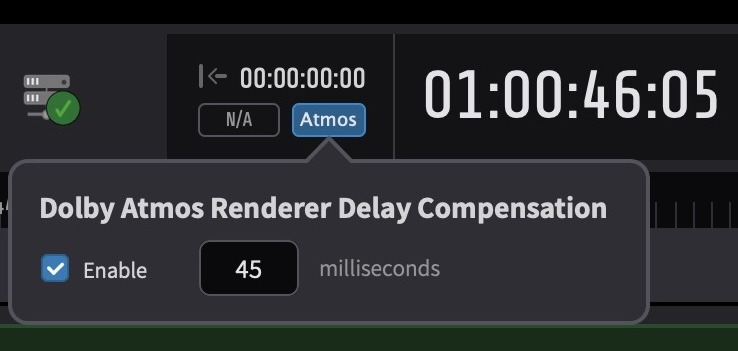
Test again to confirm the offset has been correctly compensated for.
Whenever the Dolby Atmos Renderer is not in use, disable the delay compensation by clicking on the Atmos button & deselecting the Enable field.
The Atmos button will turn grey when disabled.
Genlocked Playback & Video Reference Setup
When an external video device plays back video in sync with a DAW, there is no guarantee that the DAW's timecode and the video device's frame edge are aligned. Without a shared timing reference, the video device may receive a new frame just after its frame edge has passed, meaning the frame is not displayed until the next edge. This introduces a sync offset of up to one video frame - statistically around half a frame, or roughly 20 milliseconds at standard frame rates. Genlocking eliminates this offset by locking both the DAW and the video device to a common video reference signal, so their frame edges coincide and playback starts in true sync. For more detail on how this works, see Understanding Genlock at the end of this section.
With a Video Sync Pro licence, genlocked playback requires a Blackmagic Design, Avid® or AJA video device with a video reference input.
When starting up, Video Sync scans the system for all available video hardware and enables genlock automatically. Video Sync uses the genlock of the first card available in the system as timing and speed reference.
Note: Where more than one video device is attached, if the first device does not offer video reference, the next device that offers video reference is used.
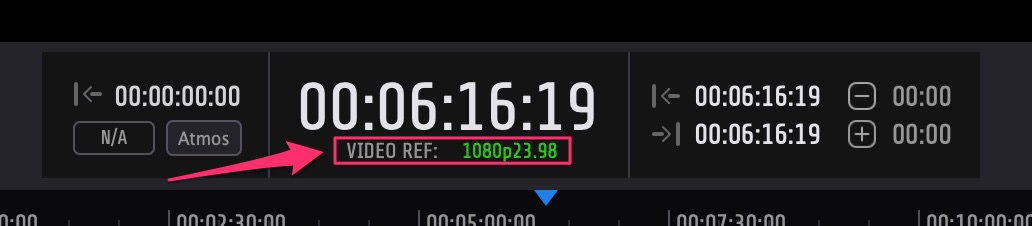
If genlock is supported with a video device, the video reference information is displayed underneath the main timecode counter.
If genlock is not supported with a video device, no video reference information is displayed underneath the main timecode counter.
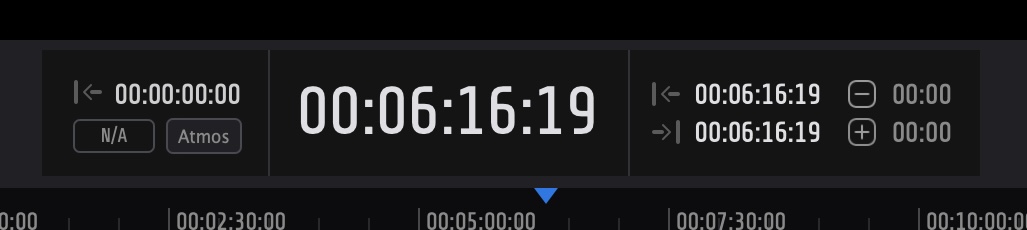
Note: This is also the case if no video reference signal is connected to an AJA video device that supports video reference.
To achieve genlock, the video reference frame rate must match the output frame rate of the Avid®, Blackmagic or AJA device. The correct output frame rate is selected for the corresponding device in Video Sync's Preferences / Settings → DISPLAY tab.
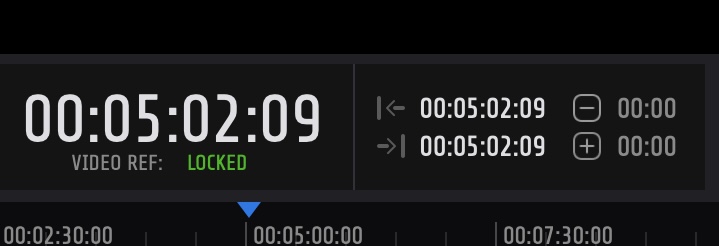
If the frame rates match with Blackmagic devices (including Avid® Artist I/O devices based on Blackmagic Design hardware such as DNxIQ & DNxID), LOCKED is shown in green after VIDEO REF.
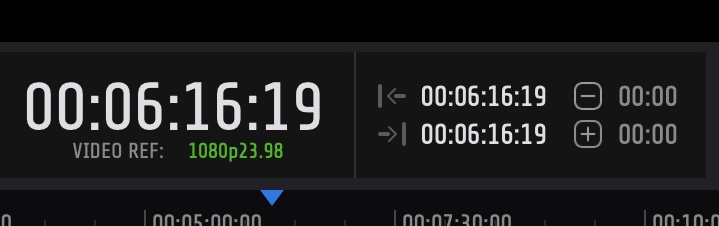
If the frame rates match with AJA devices (including Avid® Artist I/O devices based on AJA hardware such as DNxIP & DNxIV), the frame rate of the attached video reference is shown in green after VIDEO REF.
If the frame rates do not match with Blackmagic devices (including Avid® Artist I/O devices based on Blackmagic Design hardware such as DNxIQ & DNxID), not locked is shown in red after VIDEO REF.
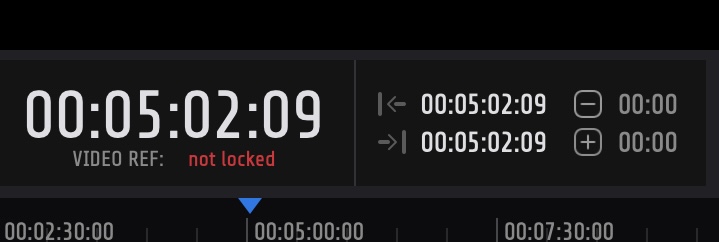
Note: This is also the case when no video reference signal is connected to a Blackmagic device that supports video reference.
If the frame rates do not match with AJA devices (including Avid® Artist I/O devices based on AJA hardware such as DNxIP & DNxIV), the frame rate of the attached video reference is shown in red after VIDEO REF.
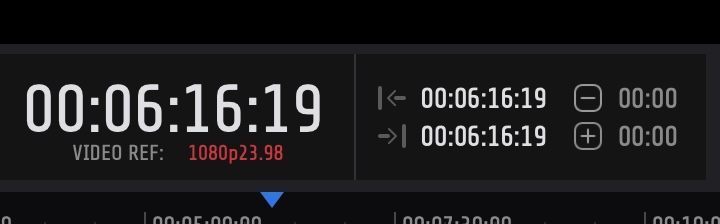
Note: The behaviour of the video output with mismatched video reference is undefined and differs depending on the hardware device and frame rate. At worst, it can lead to distorted or flashing video output, or no video being displayed at all.
Understanding Genlock
A video reference signal is a standard video signal that carries no picture information - only sync pulses. Each sync pulse marks a frame edge: the point where one video frame ends and the next begins. The number of sync pulses per second corresponds to the reference frame rate, so a 25 fps video reference contains 25 sync pulses per second.
When a video reference signal is connected to a video device's reference input, the device locks its own frame generator to the sync pulses so that its frame edges coincide with those of the reference signal. This is generator locking, or genlock.
Without genlock, the DAW sends its first timecode at an arbitrary point relative to the video device's frame cycle. The video device receives the corresponding video frame but cannot display it until the next frame edge. The following diagram illustrates this offset:

The top line shows the video frames rendered on the video device; the red lines represent the timecode addresses received from Pro Tools®. The first timecode arrives shortly after the device's frame edge, so although Video Sync writes the new frame to the device immediately, it is not visible until the next frame edge - an offset of up to one video frame.
With genlock, both the DAW and the video device are locked to the same reference signal. The DAW sends its timecode synchronised to the frame edge, so the video device receives and displays the frame at the correct moment:

Connecting a video reference to the video device alone does not solve the problem - the DAW must also be locked to the same reference. For Pro Tools®, this requires an Avid® SYNC I/O or Sync HD. When video reference is present, Pro Tools® automatically aligns to frame edge.
Display Troubleshooting
If an attached device does not show up in the device list, or does not display correctly - this is typically caused by these reasons:
Hardware Video Device Being used by other software
This can be Pro Tools®, or other audio and video applications.
Please close those apps.
If Pro Tools®, please follow the directions at the beginning of
this chapter to deactivate the Avid® Video Engine (AVE) before
relaunching Video Sync.
Incorrect video reference
When using Video Reference, it is common for many hardware video devices to show black or distorted output if the incoming video reference format does not match that of the selected output format. Please correct the incoming video reference source to match the video format exactly. Unplugging the video reference cable will help diagnose if this is the cause of the problem.
Outdated hardware driver
Ensure you are running the latest driver versions for your Blackmagic Design or AJA hardware. Running outdated drivers is a common cause of display and sync issues. See the System Requirements & Compatibility chapter for current driver information and download links.
If you are still experiencing issues, please send an email to:
support@non-lethal-applications.com
Please supply as much information as you can, including:
- Computer model
- Operating System
- DAW Type
- DAW Version
- Video File Codec type
- Video File Frame rate
- Timeline Frame rate
- Hardware Video Device Output Format setting
-
Has the issue just started occurring or has this been an issue
from when
you started using the app? -
If this is something that started happening at some point, can
you pin
it down to something specific like a new version of our app, a new OS
version or a change in your hardware setup?
Using this line of questioning, it is often possible to self-diagnose many performance issues. Try re-following the setup guides in this chapter again before sending in a support request.