CueLink Setup
Introduction
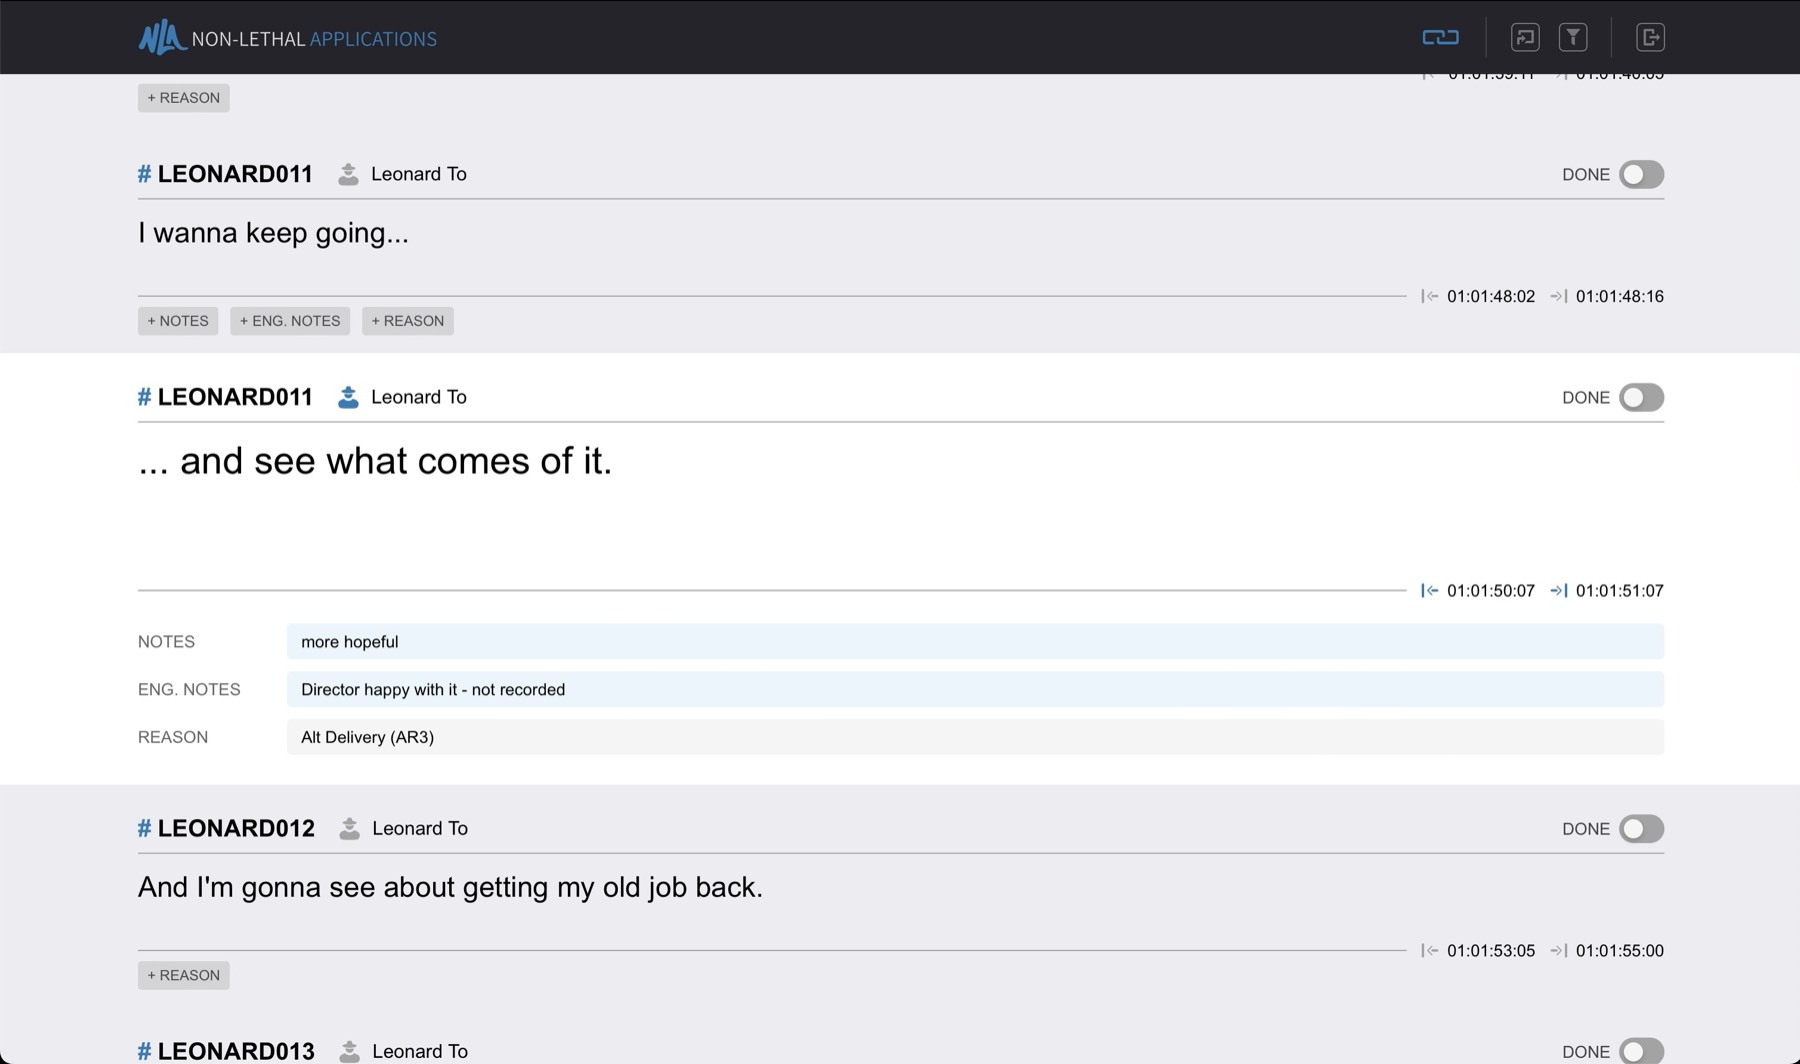
CueLink is an innovative technology that allows devices on the local network - such as Macs, PCs, tablets and smartphones - to live access ADR Cue events on the current active ADR Master Timeline. This enables any authorised participant in the recording session to follow the current cue being recorded on their own device through a web browser of their choice - without the need for any additional software.
 {width=100%}
Additionally, participants who have been granted Editor privileges - for example the Director or Dialogue Editor / Supervisor, can make changes to the current cue (or any other cue) on their devices - that are immediately updated on the displayed ADR Cue video overlays.
 {width=55%}
CueLink operates using standard networking protocols for remote access via external devices. It is very simple to set up, & has been designed to be especially user-friendly & intuitive to operate on external devices - with no or minimal explanation needed. The following chapter explains how to set CueLink up for use in your recording environment.
The Cuelink settings are stored with ADR Master's global preferences & are not project dependent. This allows for quick switching between different projects, with all users still connected.
Getting Started with CueLink
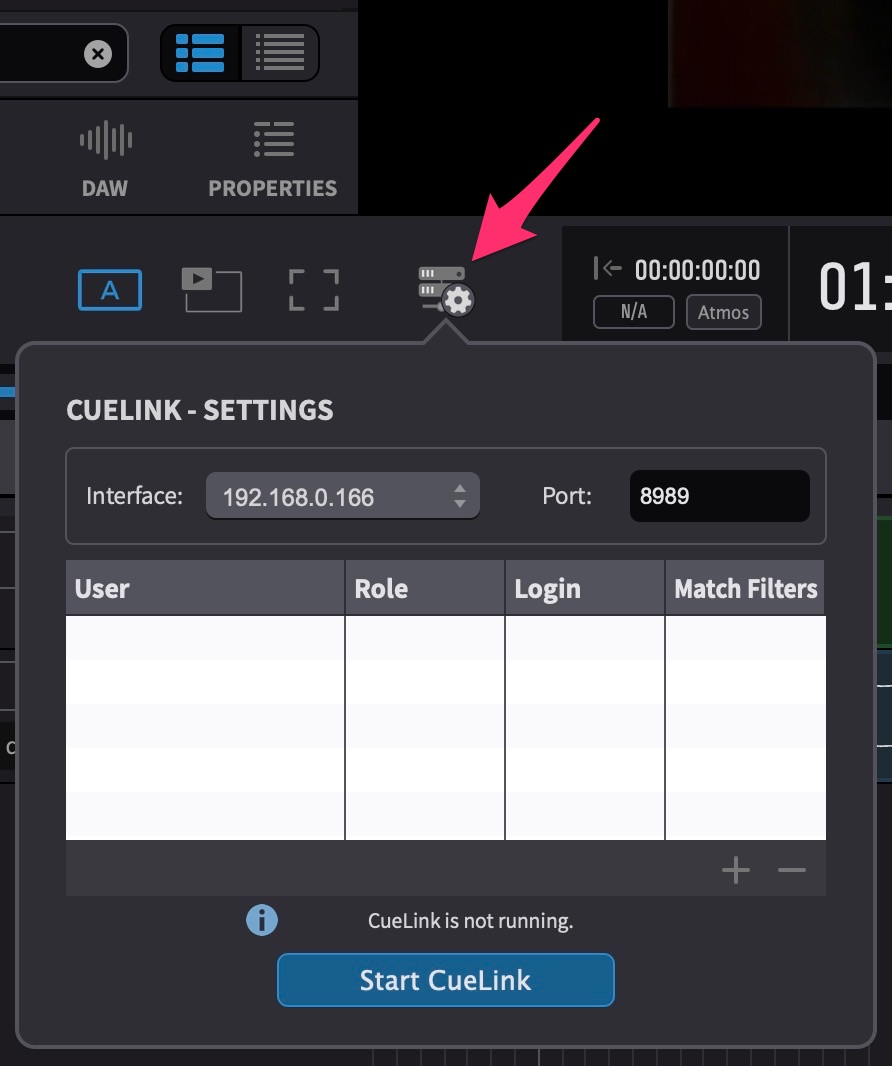
To activate CueLink and configure its settings, click the CueLink button located in the main window controller bar of ADR Master - which will open the CUELINK - SETTINGS pop-up panel.
 {width=55%}
Defining the CueLink connection address (Interface & Port Settings)
Interface
The Interface value determines the main part of the IP address that other devices will use to connect to.
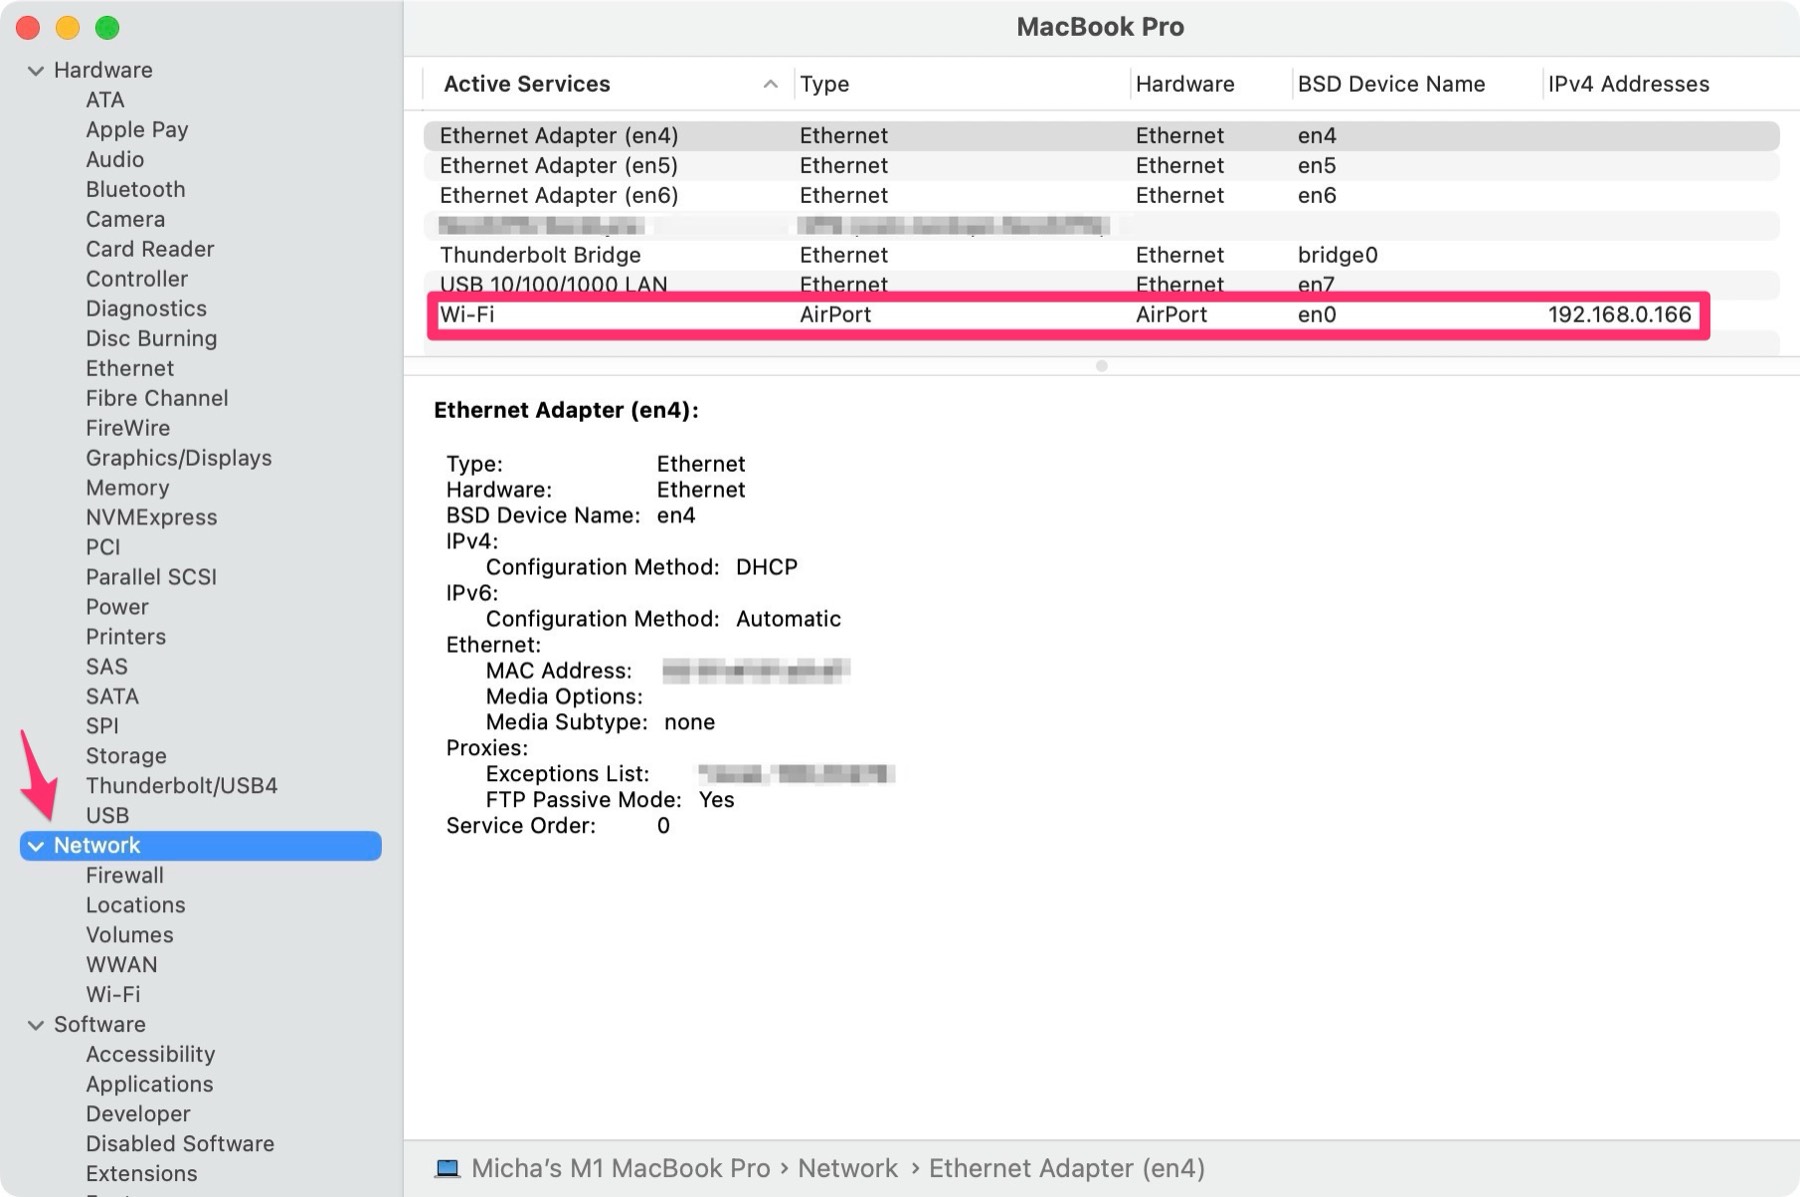
In the Interface field, select the IP address that corresponds to the ADR Master computer's address on the shared network.
In many cases, this will be the Wi-fi network address as seen in the ADR Master computer's network settings found in either Apple menu → System Settings → Network or Apple menu → About This Mac → More Info → System Report → Network.
 {width=80%}
In other cases, this may be another network connection, such as wired ethernet.
Port
By default, the Port field is set to 8989. In most basic setups, this should not require changing. However, in the event that this port number is in use by other services on the computer running ADR Master, please enter a different free port number.
If in doubt or are experiencing trouble connecting, please check the port assignments to the ADR Master computer in your router setup, or consult your network administrator.
Once the rest of this chapter's setup is complete & Cuelink is running, the combination of the Interface address and Port number is what each person attending the session should be supplied as the address to connect to in the following format: http://(IP address):(port number). So in the example above, CueLink will be accessed at: http://192.168.0.166:8989
Users
Overview
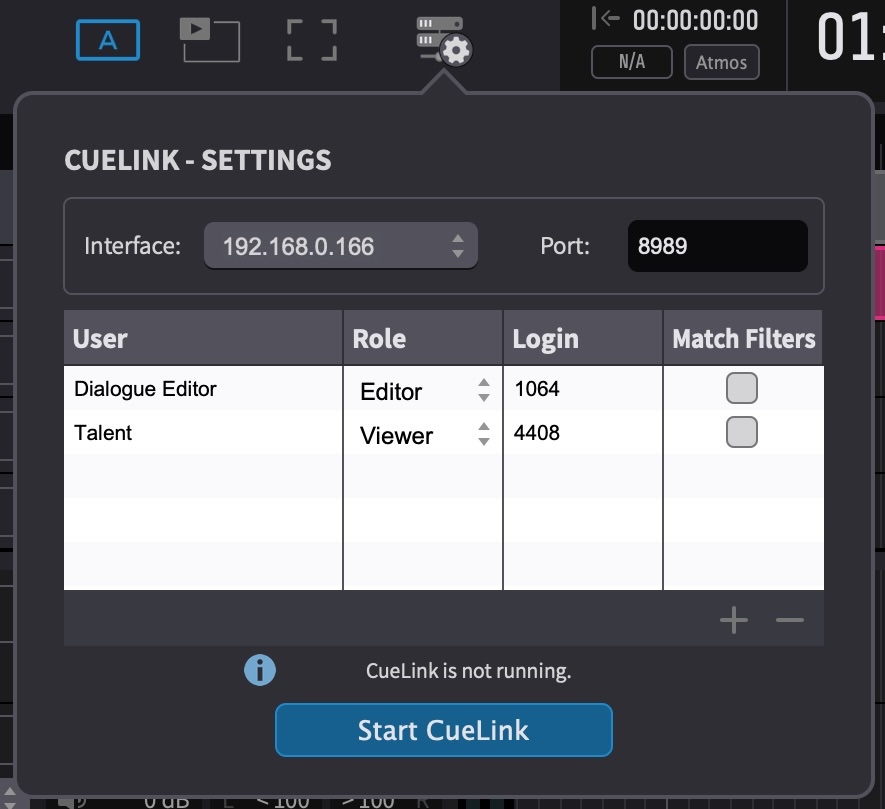
Multiple users can utilize CueLink simultaneously, such as a voice talent in a live room and an editor in a studio. Users are defined & configured in the CUELINK - SETTINGS panel. A separate User profile should be defined for each person or device connecting to CueLink.
Though it is possible for more than one person to share a defined user profile, this is generally not advisable - as it will likely cause conflicts with different settings, filters & viewing preferences set by each device sharing the same user profile.
Each user profile includes a definable User name, Role, Login code, and Match Filters setting.
Adding a new User profile
To create a new User profile, click the + icon located at the bottom right of the User table in the CUELINK - SETTINGS panel.
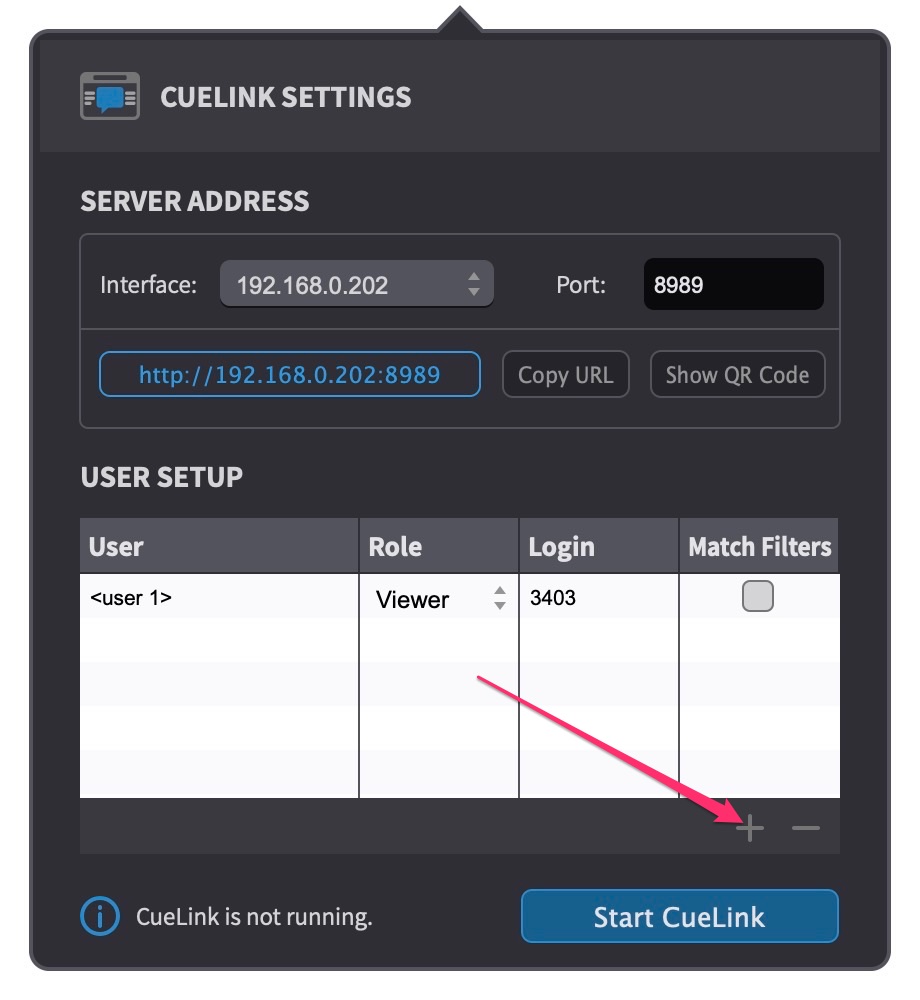 {width=55%}
The new user profile will appear in the table named <user 1>.
If another profile already exists called <user 1>, the next available number will be used, eg <user 2>.
By default, the Role field will be set to Viewer, and the Match Filters field will not be enabled.
Add as many user profiles as may be required for each person connecting with a device.
Deleting a new User profile
To delete an existing User profile, click on it in the list to select it & press backspace button, or click the - icon located at the bottom right of the User table in the CUELINK - SETTINGS panel.
This can be done for multiple User profiles selected in the list simultaneously.
Setting a User Name
Click on the User field to define a new user name for each user defined. The User name helps with organization and appears only in the settings panel - ie the user does not need to know what the user name is in order to be able log in.
Setting a User Role
The Role field specifies user permissions.
Users with their Role set to Viewer can access events in a read-only mode. The only fields viewable will be Cue number, Character name, Text, and associated Notes.
Users with their Role set to Editor will also see additional fields, such as Engineering Notes, the Done status, and a Reason field, if applicable. All fields (besides Reason Codes) can be edited live during a session by a user with their Role set to Editor.
Reason codes are currently only viewable through CueLink and cannot be modified - even if the user Role is set to Editor.
Setting a Password manually
When a new user is created, a unique numeric password is automatically assigned to each user.
In order to define a login password manually, click on the Login field and type a new 4 digit numeric code.
Once the rest of this chapter's setup is complete & Cuelink is running, each person attending the session should be supplied their login password.
Match Filters
The Match Filters feature enables users to access only those events that match the filter parameters set in ADR Master. For instance, if a filter is set in ADR Master to display only events for one character, CueLink users will also see only those events for that character. If Match Filters is not enabled, users will see all events for all characters listed in the ADR Master Timeline, regardless of any filter settings.
Enabling Match Filters is beneficial in ADR recording scenarios where only specific lines need attention, reducing distractions for the talent.
Conversely, disabling Match Filters may be preferable in foreign language dubbing scenarios where all lines are logged, and voice voice talents are accustomed to viewing the full script.
Select the option that best suits your operational needs.
Starting CueLink
To start CueLink, simply click the Start CueLink button at the bottom of the CUELINK - SETTINGS panel.
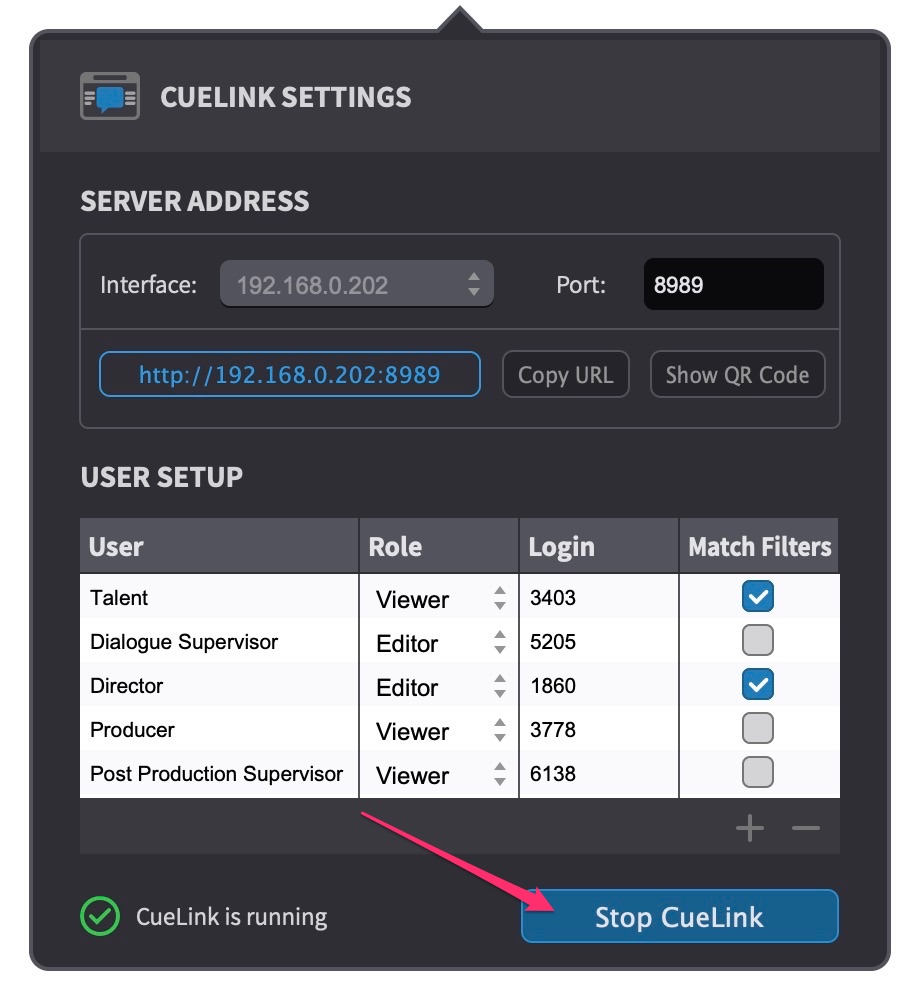 {width=55%}
Once the CueLink service has started sharing the project, the status confirmation above the button should say CueLink is running, with a green tick to the left of it.
The login address & passwords can now be shared with each user.
The CueLink connection will remain active to all devices - even if the ADR Master project is closed and another is opened.
Sharing the CueLink Login address
The CueLink login address can be shared with users on their own devices by one of three methods:
-
For mobile phone & tablet users, the quickest method is clicking the Show QR Code button. Users point their device camera at the QR code shown & once the QR code is recognised, click the link button which appears. This will then instantly direct them to the CueLink login page in their default web browser.
-
A more generic method for any device type, is to click the Copy URL button to copy the login address to the copy buffer & paste it into a message in a messanger app of choice or email.
-
The last method is to verbally quote the address as shown in the blue box to the left of the Copy URL button.
To directly access CueLink in a browser on the same computer, simply click the URL button shown in the blue box to the left of the Copy URL button. This will instantly open up the CueLink login page in the default web browser.
Terminating CueLink
To stop sharing the current ADR Master Timeline via CueLink, simply click the Stop CueLink button at the bottom of the CUELINK - SETTINGS panel.
Once the CueLink service has stopped, the status confirmation above the button should say CueLink is not running, with a blue i to the left of it.
All users that were connected will be disconnected.
As a precautionary security measure, users will automatically be logged out after 12 hours of connection.
If ADR Master is quit, the current CueLink session will also be terminated.
