
ADR Recording with ADR Master and Pro Tools
Introduction
ADR Master Studio Only: The recording features described in this chapter are available only in ADR Master Studio.
ADR Master Studio adds a complete ADR recording system to ADR Master's cueing tools. It provides track naming, a recording matrix that controls which Pro Tools tracks are heard during each phase of a recording pass, and full Rehearse/Record/Review control - all without leaving ADR Master.
Edit Mode
The Edit Mode setting (Target Event Mode vs. Timeline Range Mode) also affects recording behaviour - specifically how cue selection is handled after a recording pass and how timeline selections are mirrored between ADR Master and Pro Tools. Edit Mode is covered in the Adding and Editing Visual Events chapter; its implications for recording are noted where relevant below.
Before You Start
Before beginning a recording session, confirm the following:
-
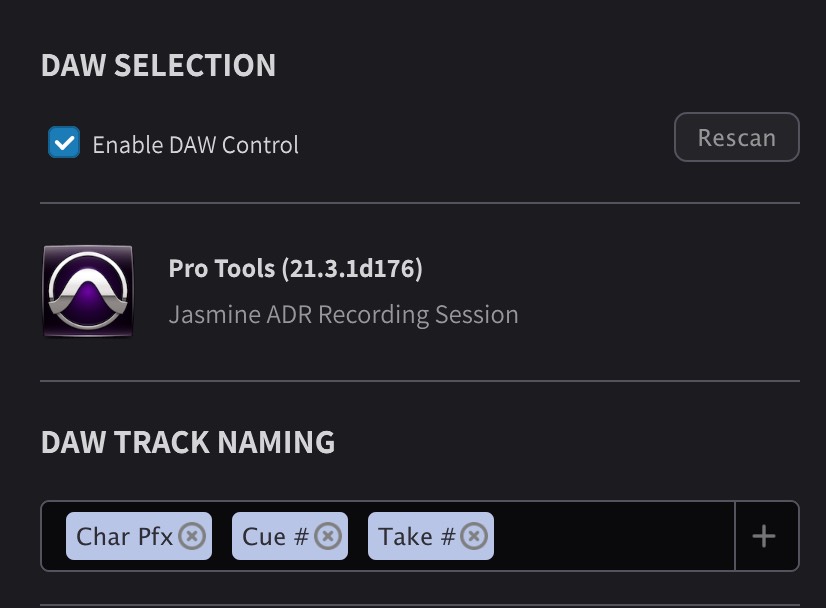
ADR Master is connected to Pro Tools. Two connections are required. First, DAW Sync must be configured and running - this provides transport and timeline communication between ADR Master and Pro Tools. See the DAW Sync chapters for setup options. Second, DAW Control must be configured and connected - this provides track state control and is required for the recording matrix to function. The Pro Tools application icon, version number, and session name should be visible in the DAW tab → DAW SELECTION section. If not, follow the DAW Control and Accessibility API Setup chapter.
-
Characters are defined and cues are ready. At least one Character Track should be set up with ADR Cues populated - either created manually or imported from a text file or TTAL file.
-
The DAW tab recording settings are configured. DAW Track Naming, record track assignments, and the recording matrix should be set up before the first recording pass. See the following sections for details.
DAW Tab Recording Settings
The recording-related track configuration is located in the DAW tab of the main window. Scroll down to find three sections, each handling a different aspect of the recording setup:
- DAW Track Naming - defines how Pro Tools names the recorded audio files
- DAW Tracks - assigns Pro Tools session tracks to ADR Master's recording roles
- Track Types - defines global, reusable templates that control track behaviour during each phase of a recording pass
Track Naming
The DAW Track Naming section controls how Pro Tools names the record track - and therefore the recorded audio file - before each recording pass.
 {width=60%}
Click the + button to add placeholder tags to the naming field. The available placeholders are:
- Char Name - the full character name
- Char Pfx - the character prefix code (e.g., LEONARD)
- Cue # - the cue number
- Take # - the take number (incremented by ADR Master for each recording pass on this cue)
- Text - the dialogue text
- Timeline - the timecode position
- Pic Version - the picture version
- Ep/Reel - the episode or reel number
Once added, placeholders appear as boxes in the naming field. Their order can be rearranged by clicking and dragging a box to the desired position. Click between placeholders to add static text - such as an underscore or hyphen - which will also appear in the track name.
Click the x on any placeholder to remove it.
Example: With Cue # and
Take # placeholders active, recording the third
take of cue LEONARD0009 would name the track
LEONARD00093. Note that without any separator, the
take number runs directly into the cue number - which can be
difficult to read. To improve clarity, click between the two
placeholders and type static text such as an underscore or the
word "Take". With Cue #, the static
text _Take , and Take #, the same
recording would produce: LEONARD0009_Take 3.
When multiple cues are selected before recording, the cue
numbers are hyphenated in the track name. For example, selecting
cues LEONARD0004, LEONARD0005, and LEONARD0007 and recording the
first pass would produce:
LEONARD0004-LEONARD0005-LEONARD0007_Take 1.
If no placeholders are added to the DAW Track Naming field, the name of the recorded file will be determined by whatever name the record track already has in Pro Tools - requiring manual naming before each pass.
ADR Master Take Counter vs. Pro Tools Take Numbering
ADR Master maintains its own per-cue take counter in the Event List (visible in the Takes: # column). This counter is intelligent: it increments for every cue that was covered during a recording pass, regardless of whether that cue was explicitly selected. If a recording pass starts at cue 3 and the talent records through cues 3, 4, 5, and 6, all four cues have their take count incremented. Even cues belonging to other characters that fall within the recorded range are counted. A cue's take count only increments if the recording passed the cue's Out Point - partial coverage does not count.
Pro Tools handles take numbering differently. The take number in the filename is based purely on whether a file with that exact name already exists - it is a filename collision check, not a per-cue counter. If the naming format is changed (different placeholder combination, different cue selection), Pro Tools treats it as a new prefix and resets to take 1, even if ADR Master's Event List shows a higher take count for that cue. Pro Tools also does not distinguish between complete and partial recordings - a false start or aborted take still increments the filename counter. This means that if a recording is stopped before completion, the next full take will carry a higher number than expected, causing the Pro Tools filename take number to drift out of sync with ADR Master's per-cue take count.
To let Pro Tools handle take numbering, omit the
Take # placeholder from ADR Master's
DAW Track Naming - Pro Tools will append its
own _01, _02 suffix automatically.
Note: When using the legacy Key Commands Only or HUI & Key Commands DAW Control modes, track naming relies on ADR Master sending keystrokes to Pro Tools to double-click the track name field and type the new name. This requires the record track's name field to be visible on screen in the Pro Tools Edit or Mix window - if it is scrolled out of view or obscured by another window (such as a plug-in), the rename will fail. If the track name or timeline selection is not applied correctly, go to ADR Master menu → Preferences / Settings → ADR REC → CONTROL SETTINGS → Keystroke Delay and try increasing the delay. Longer delays increase the time before recording starts, so keep this value as low as possible relative to system performance. With the Modern DAW Control mode, track naming is handled directly via the Pro Tools Scripting Library (PTSL) and these limitations do not apply. See the DAW Control and Accessibility API Setup chapter for more information on DAW Control modes.
DAW Tracks
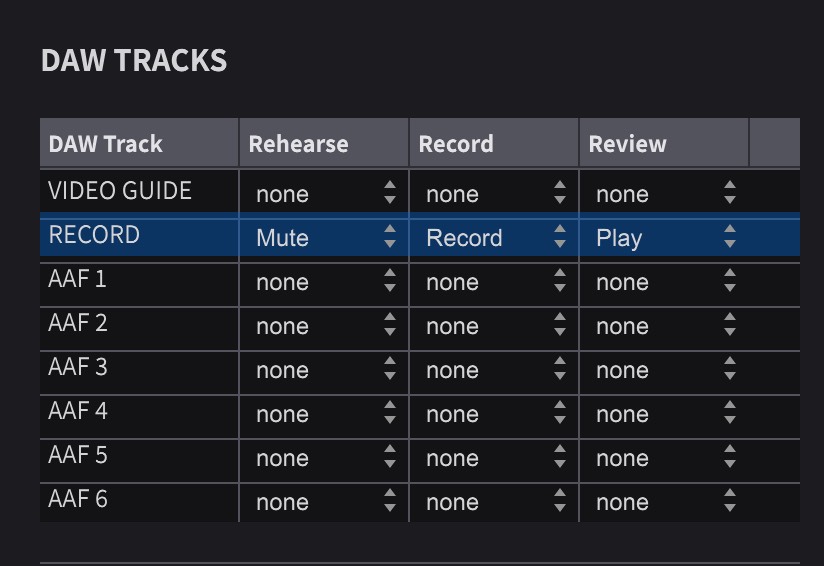
The DAW Tracks section lists every track in the currently connected Pro Tools session. For each track, three columns define what ADR Master should do with that track during each recording mode:
- Rehearse - the track's state when auditioning a cue (playback only, no recording)
- Record - the track's state during a recording pass
- Review - the track's state when playing back the last recorded take
Each column contains a drop-down where a Track Type is assigned to define the track's behaviour. Track Types are configured in the Track Types section below - they determine the Before, During, and After states for each phase of a recording pass.
 {width=60%}
Key features of the DAW Tracks section:
ADR Master reads all Pro Tools track types - audio, aux, master, VCA, and folder tracks - with the exception of video tracks. Each track displays a colour swatch and track type badge pulled live from Pro Tools - these update automatically and cannot be manually set in ADR Master.
Folder track support enables bulk control over groups of tracks. Instead of configuring each track in a Pro Tools folder individually, assign a Track Type to the folder track itself. For example, if the guide dialogue elements - such as a dialogue AAF or a full dialogue edit - are grouped in a single Pro Tools folder, assigning a Track Type with an After state of Mute to that folder will mute the entire group during the review phase - much cleaner than configuring each track separately.
Track assignments in the DAW Tracks section are per-session. They are remembered for each Pro Tools session and persist across ADR Master restarts - the assignments will be restored the next time the same session is opened. The track list updates dynamically: if tracks are added or removed in Pro Tools, the DAW Tracks list reflects those changes.
When the Move Track Matrix Settings when Moving Tracks in DAW preference is enabled (in Preferences / Settings → ADR REC → OTHER SETTINGS), reordering tracks in Pro Tools also updates their position in the DAW Tracks list - keeping assignments aligned with the correct tracks. When disabled, the DAW Tracks list order remains fixed regardless of changes in Pro Tools.
If no tracks are set to Record in the DAW Tracks matrix, ADR Master will check whether any track is already record-enabled in Pro Tools and use that track automatically. This allows the simpler workflow of manually arming a track in Pro Tools without configuring the matrix.
Note: If a Pro Tools track does not switch into the expected state (Record, Input, Mute, etc.) during a recording pass, try restarting Pro Tools and reconnecting DAW Control.
Track Types
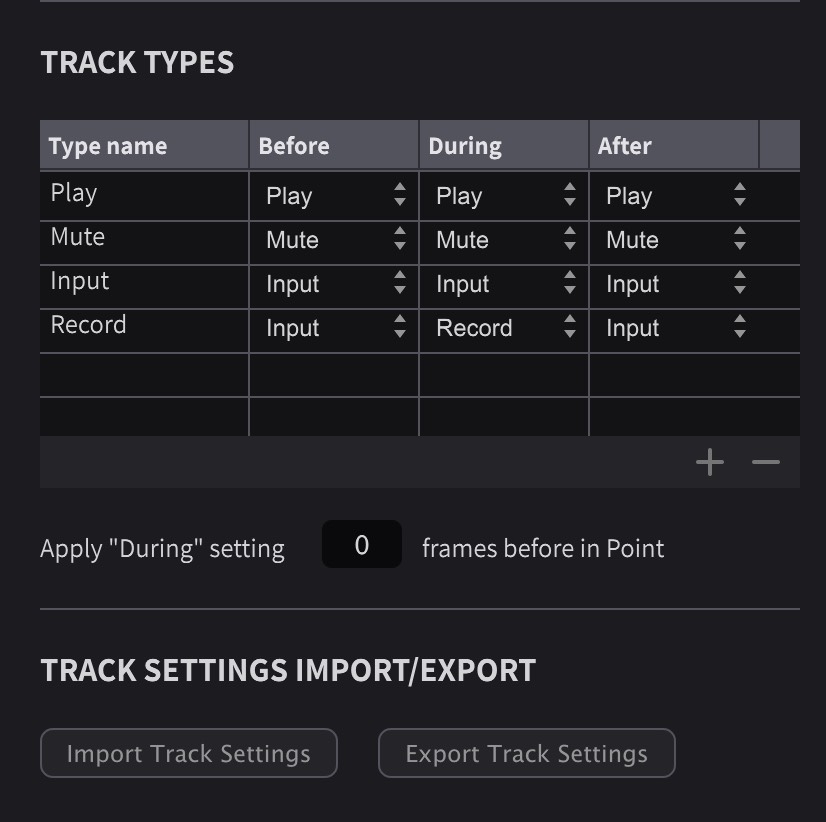
The Track Types section defines global, reusable templates that control how Pro Tools tracks behave during each phase of a recording pass. Each Track Type specifies three states:
| Column | When It Applies |
|---|---|
| Before | Before the cue's In Point is reached (i.e., during the pre-roll) |
| During | While playback or recording is within the cue's In-to-Out range |
| After | After the cue's Out Point is passed (i.e., during the post-roll, or for the remainder of the pass if not in Single mode) |
The available state values for each column are: Play, Mute, Input, Solo, and Record. The Record state is only available in the During column when the recording mode is set to Record.
 {width=60%}
Several default Track Types are provided. These can be edited or deleted, and new Track Types can be added to suit specific recording workflows, using the + and - buttons at the bottom of the Track Types section.
The Two-Tier System
Track Types and DAW Tracks work together as a two-tier system:
- Track Types are the templates - global definitions that are portable across projects. They persist in ADR Master's settings regardless of which Pro Tools session is connected.
- DAW Tracks are the assignments - each Pro Tools track in the current session is assigned a Track Type for each recording mode (Rehearse/Record/Review). These assignments are per-session.
This separation means a Track Type defined as "Record track with muted review" can be reused across any session without reconfiguration. Only the DAW Tracks assignments need updating when switching to a different Pro Tools session.
Applying the During State Early
Below the Track Types table is a preference that controls when the During state is applied. By default, the During state is applied at the In Point of the cue. However, there are scenarios where applying it slightly earlier is useful - for example, when the recording room uses a speaker rather than headphones for playback. In that case, muting the playback track a few frames early allows the sound to decay before the recording pass begins, avoiding feedback. Set the number of frames in advance using the field provided.
Practical Examples
The recording matrix and Track Types system is highly flexible. The following examples illustrate common configurations:
Standard ADR setup: The record track is set to Input (Before), Record (During), Input (After). Before the cue, the track is in input mode so the talent's microphone is live. During the cue, it records. After the cue, it returns to input. Pro Tools' Track Input monitoring behaviour determines what is heard through the track when it is in input mode: if audio exists at the current timeline position, Pro Tools can be configured to play it back; if not, it passes the live input.
Guide dialogue folder - muted on review: All guide dialogue elements are in a single Pro Tools folder. Rather than configuring each track individually, assign a Track Type to the folder track with an After state of Mute. Then assign this same Track Type to the folder track's Review column in the DAW Tracks section. During review playback, the entire folder goes silent so the recorded take is heard cleanly.
Listen-and-repeat method: Set the guide dialogue track's After state to Mute. When the cue reaches its Out Point, the original dialogue disappears - the talent then repeats what they just heard without the guide competing. This works particularly well with Single w/ open end Event Record Mode, which keeps the cue text visible on screen past the Out Point.
Timing reference at reduced volume: In Pro Tools, create two aux return tracks fed from the same guide dialogue bus - one at full volume and one reduced (e.g., -12 dB). In the DAW Tracks section, assign the full-volume aux a Track Type with a Before and During state of Play for the Rehearse column, and Mute for Record and Review. Assign the reduced-level aux a Track Type with Play for Record (so it plays quietly during recording) and Mute for Rehearse and Review. The result: the talent hears the guide at full volume during rehearsal, at reduced volume during recording (as a quiet timing reference), and not at all during review.
Track Settings Import and Export
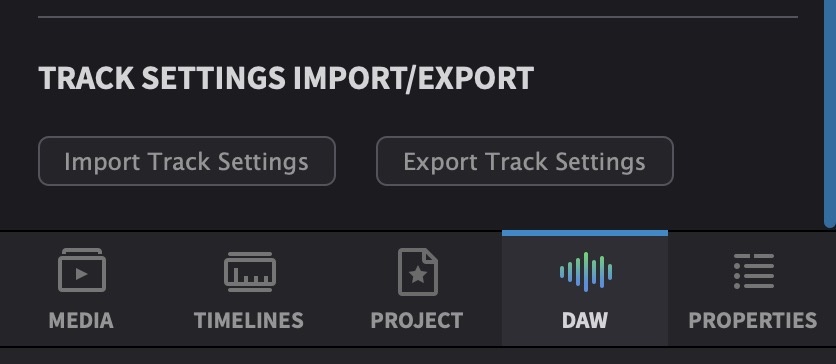
Below the Track Types section, the Import Track Settings and Export Track Settings buttons allow the current DAW track configuration to be saved for future projects or shared with other users.
 {width=60%}
Track Types are already portable (they persist across projects within ADR Master), but the export feature packages both the Track Types and the DAW Track Naming configuration into a single file. This is useful when sharing a complete recording setup between machines, studios, or other engineers - for example, saving separate ADR and Foley profiles that can be imported at different facilities.
Assigning Record Tracks to Cues
As soon as a track is set to Record in the DAW Tracks section, it becomes available in the Rec Track drop-down in the Event List, Properties tab, and Edit Event window. When only one record track is defined in the matrix, all cues default to that track - no manual assignment is needed.
When multiple record tracks are defined, the Rec Track field determines which Pro Tools track each cue records onto. This is where manual assignment or automatic checkerboarding becomes relevant.
Alternatively, the recording matrix can be bypassed entirely. Simply record-enable the desired track in Pro Tools before starting a pass. ADR Master will detect the armed track and use it automatically. With this approach, no record tracks need to be defined in the DAW Tracks matrix and the Rec Track field on cues can remain unassigned.
Automatic Record Track Assignment and Checkerboarding
Go to ADR Master menu → Preferences / Settings → ADR REC → OTHER SETTINGS → Assign Record Tracks Automatically.
When enabled, ADR Master automatically assigns each new cue to record track 1. It also checks for overlapping cues or cues in close proximity and assigns them to alternating record tracks in a checkerboard pattern - preventing audio from being overwritten when recording overlapping cues. This recheck occurs whenever the record tracks in the DAW Tracks matrix are updated. Checkerboarding only applies when more than one record track is defined - with a single record track, all cues are assigned to that track regardless of overlap.
When disabled, each new cue must have its Rec Track field manually assigned.
For more detail on the Rec Track field, including per-character default assignment, see the Recording Cue Properties Reference section later in this chapter.
Setting Pre-Roll, Post-Roll and DAW Cue Expansion
ADR Master Pre-Roll and Post-Roll
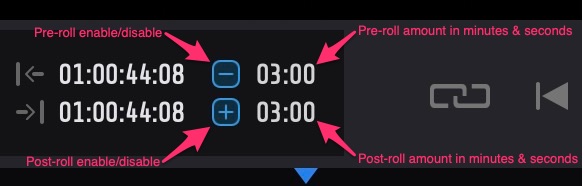
The Pre-Roll and Post-Roll duration fields and enable/disable buttons are located in the Controller Bar, to the left of the Link button. The Pre-Roll enable button is to the left of its duration field; the Post-Roll enable button is to the left of its duration field. Each field displays a full timecode counter.
To quickly toggle both Pre-Roll and Post-Roll on or off at the same time, press P on the keyboard.
 {width=50%}
Pro Tools Pre-Roll and Post-Roll
When using ADR Master's recording controls (Rehearse, Record, or Review), Pro Tools also requires suitable Pre-Roll and Post-Roll times to allow the Primary Pre Roll Streamer to be shown before the cue. Pro Tools only records during the Pre-Roll and Post-Roll when its record mode is set to Punch.
To set the Pre-Roll and Post-Roll in Pro Tools, ensure that both the Expanded Transport and Transport counters are enabled in the arrow menu at the top right of either the Transport window or the transport controls in the Pro Tools Edit window.
Mirroring Pre-Roll and Post-Roll to Pro Tools
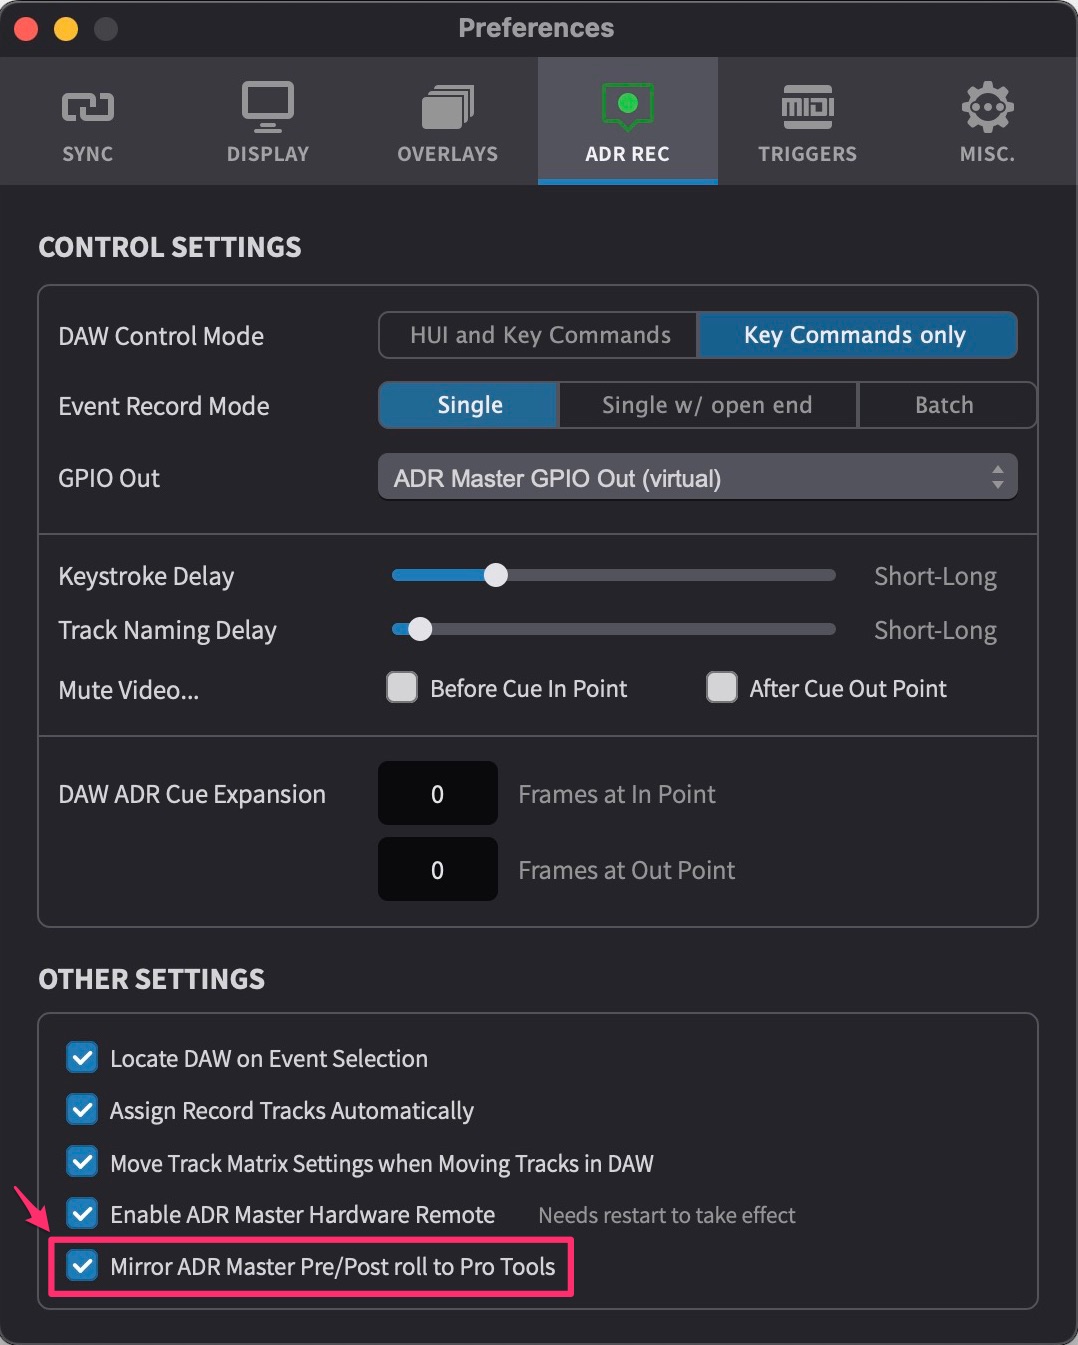
To have Pro Tools' Pre-Roll and Post-Roll settings follow the values set in ADR Master, go to ADR Master menu → Preferences / Settings → ADR REC → CONTROL SETTINGS and enable Mirror ADR Master Pre/Post-roll to Pro Tools. This preference only takes effect when one of the three recording modes (Rehearse, Record, or Review) is initiated from ADR Master.
 {width=55%}
With this setting enabled, any previous Pre-Roll and Post-Roll values in Pro Tools will be overwritten by ADR Master's values.
To control the Pre-Roll and Post-Roll times manually in Pro Tools instead, disable Mirror ADR Master Pre/Post-roll to Pro Tools. In that case, ADR Master's Pre-Roll and Post-Roll settings only affect standalone playback within ADR Master and do not change Pro Tools' values.
When controlling Pre-Roll and Post-Roll manually in Pro Tools, set the Pre-Roll to match the Streamer duration (Streamer Durn) values set for the selected events in the Event List, or the generic Pre-Roll setting in ADR Master's Controller Bar. To quickly set all ADR Cues for one character to the same streamer duration, set the relevant character filter, select all events with Command & A, and set any event to one of the available durations in the Streamer Durn column: 1, 2, 2.67, 3, 3.33, or 5 seconds.
Note: During the pre-roll, a Streamer (animated bar), Count Down, or Count Up plays on screen - giving the talent a visual cue for when the line begins. The style is set per event in the Streamer Durn and overlay settings.
DAW Cue Expansion
To ensure that the recording is not clipped at the start or end of the cue, either set the Pro Tools record mode to Punch (in which case recording starts the moment playback begins), or use the DAW Cue Expansion setting to add a recording buffer.
Go to ADR Master menu → Preferences / Settings → ADR REC → CONTROL SETTINGS → DAW ADR Cue Expansion. Set Frames at In Point to add frames before the cue's start, and Frames at Out Point to add frames after the cue's end. These values are relative to the timeline frame rate. The visual event overlays remain unchanged - only the Pro Tools selection is expanded.
If the Event Record Mode is set to Batch, only the start timecode will be expanded.
Muting Video During Pre-Roll and Post-Roll
In some workflows it is helpful to mask the video with black before the In Point or after the Out Point. Go to ADR Master menu → Preferences / Settings → ADR REC → CONTROL SETTINGS → Mute Video and enable Before Cue In Point and After Cue Out Point as desired. Both options only take effect during Rehearse, Record, or Review playback.
Choosing an Event Record Mode
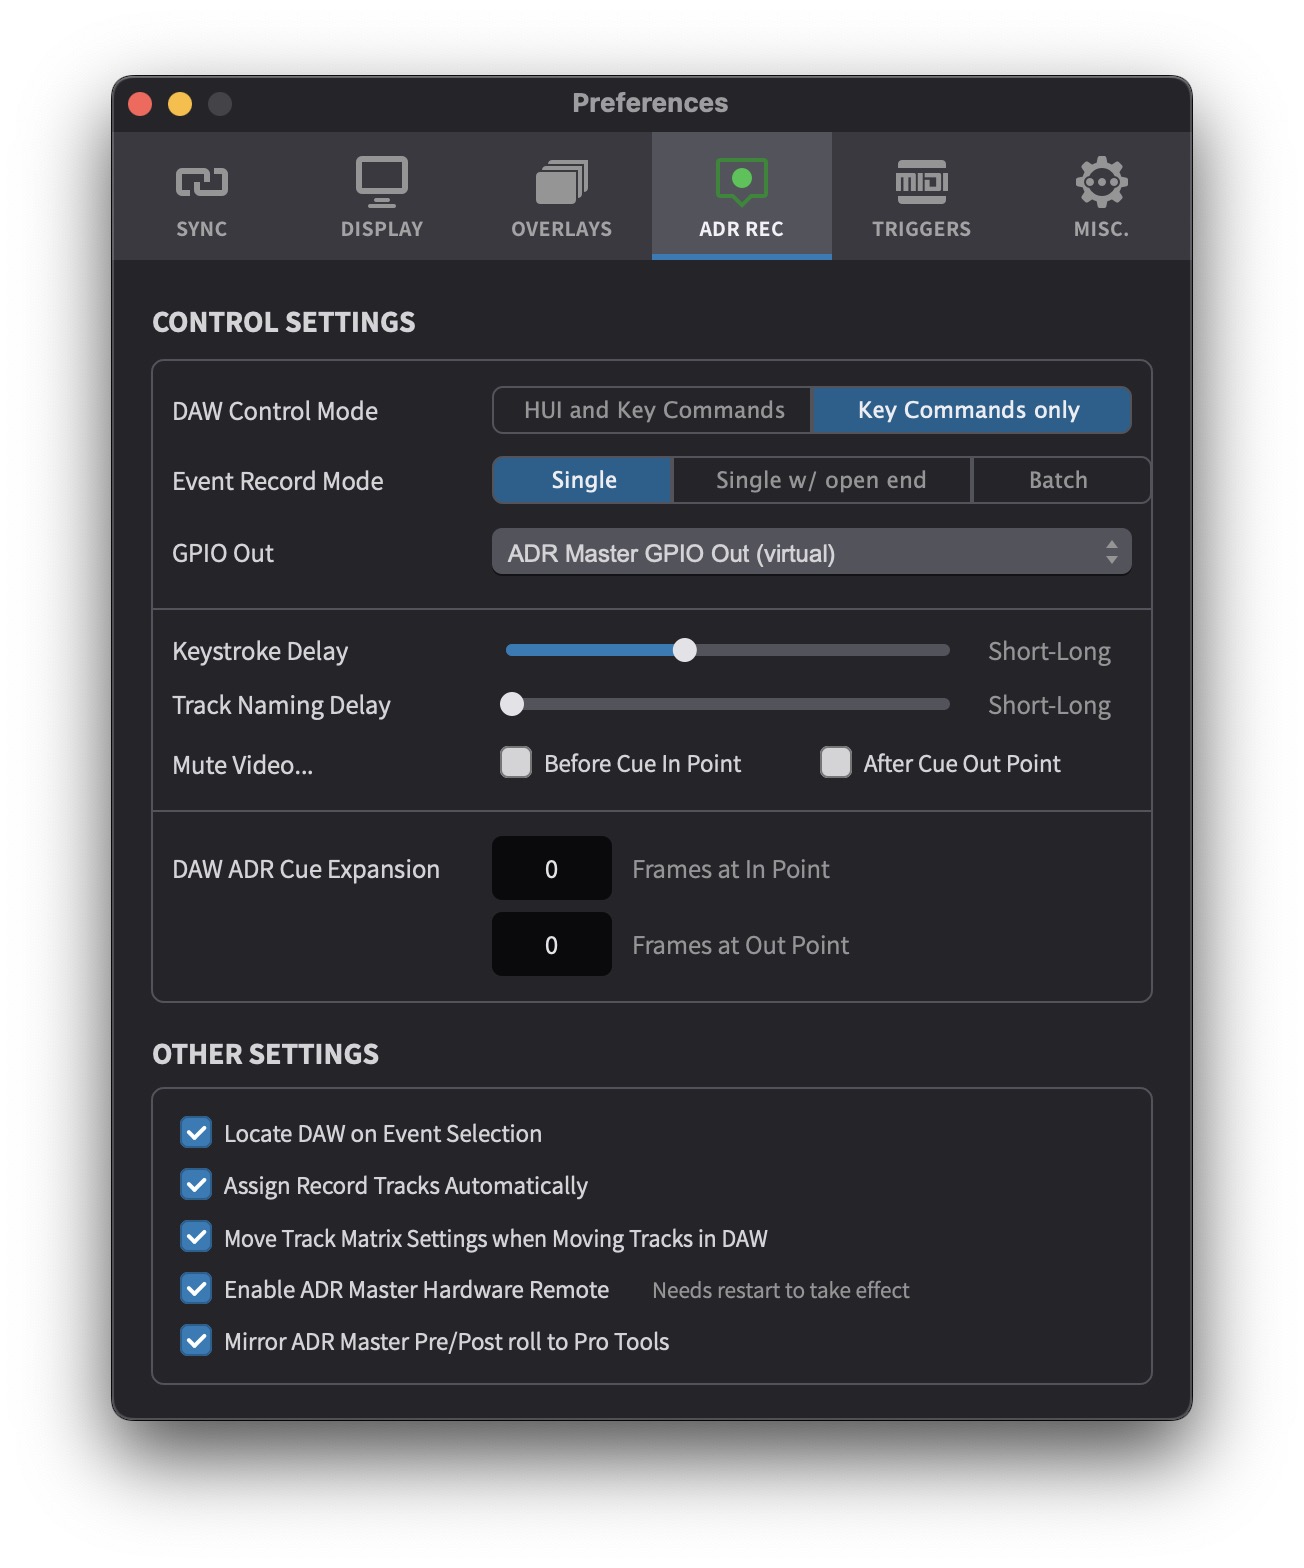
Event Record Mode determines how long Pro Tools records or plays back, and which event overlays are displayed during a recording pass. Three modes are available: Single, Single w/ open end, and Batch.
To set the Event Record Mode, go to ADR Master menu → Preferences / Settings → ADR REC → CONTROL SETTINGS → Event Record Mode.
 {width=55%}
Note: The Rehearse, Record, and Review buttons are inactive until one or more ADR Cues are selected in the Event List or timeline.
Single
ADR Master displays the overlay for the selected event(s) and stops playback or recording at the Out Point of the last selected event (plus the Post-Roll). This is the standard mode for cue-by-cue recording.
Single w/ open end
ADR Master displays the overlay for the selected event(s) but continues playback or recording past the Out Point until the Stop button is pressed. The cue text remains on screen after the Out Point - providing a visual reference while the talent repeats the line. This mode is suited to a listen-and-repeat recording style, where the talent hears the original line and then repeats it after the cue's Out Point. It is also useful when the talent wants to attempt additional wild takes within the same pass.
Individual ADR Cues can also be set to record open-ended on a per-cue basis using the Open Ended checkbox in the cue properties, regardless of the global Event Record Mode. See the Recording Cue Properties Reference section later in this chapter.
Batch
ADR Master displays the overlays for all events currently shown in the Event List (according to the active filter settings) and continues playback or recording until the Stop button is pressed. Batch plays all visible cues - including unselected cues and cues on other character tracks. This is useful when the talent wants to record multiple cues in a single continuous pass.
Which Mode to Use
Single mode is the standard choice for cue-by-cue work. Single w/ open end is ideal for listen-and-repeat workflows or when wild takes are needed after the scripted line. Batch is useful for continuous passes covering multiple cues.
Running a Recording Session
This section walks through a typical ADR recording session from start to finish.
The Event List Record Controls
The Event List is the primary control surface for ADR recording. Open it from the Window menu → Event List, or press Shift & L.
The record mode buttons are located in the Event List header:
- Rehearse - auditions the selected cue(s) by starting Pro Tools playback without recording
- Stop - stops Pro Tools playback or recording
- Record - initiates a recording pass for the selected cue(s)
- Review - plays back the last recorded take for the selected cue(s)
Keyboard shortcuts for these functions work even when ADR Master is not the frontmost application:
- Command & F1 - Rehearse
- Command & F2 - Stop
- Command & F3 - Record
- Command & F4 - Review
When any of the three active buttons (Rehearse, Record, Review) is pressed, ADR Master sets a timeline selection in Pro Tools based on the selected cue(s), applies the track name (if configured), and sets the track states according to the recording matrix.
The DAW Control Window
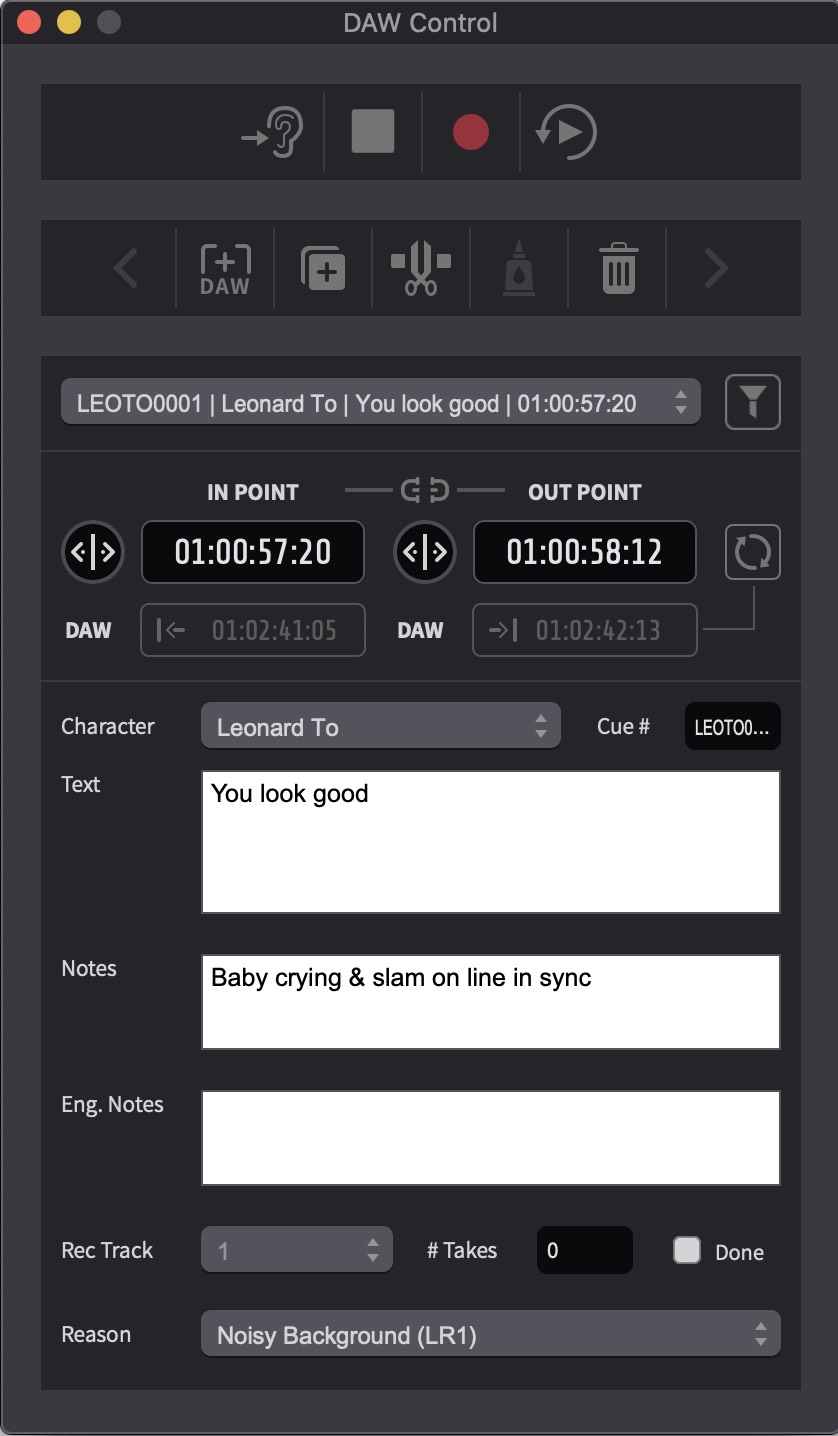
The DAW Control window provides another way of controlling recording.
 {width=60%}
The DAW Control window provides similar functionality to the Event List record controls, with buttons to rehearse, record, and review the currently selected event. It also includes event controls for navigating between events and editing event properties.
Step-by-Step: Recording a Cue
-
Filter to the character being recorded. Use the character filter in the Event List or Visual Events header to show only the cues for the current character. This keeps the Event List focused and - in Batch mode - ensures only the relevant character's cues are played.
-
Select a cue. Click a cue in the Event List, or use the Up and Down arrow keys to navigate between cues. A cue must be selected - the Rehearse, Record, and Review buttons are inactive without a cue selection. A timeline position alone is not sufficient; ADR Master needs a selected cue to determine the track name, recording matrix states, and overlay content. Additional selection methods:
- Command & A - select all visible cues
- Shift & arrow keys - select multiple consecutive cues
- Command & click - select multiple non-consecutive cues
- Option & F1 / Option & F2 - select the previous or next cue by cue number
-
Rehearse. Press the Rehearse button or Command & F1. Pro Tools plays back the cue with pre-roll and post-roll. The overlay displays the Pre Roll Streamer, dialogue text, and Progress Bar. This allows the talent to familiarise themselves with the line and its timing before committing to a recording. It also serves as a check that the text, track routing, and overlay are correct.
-
Record. Press the Record button or Command & F3. Pro Tools starts recording on the assigned record track. The same overlay sequence plays - Pre Roll Streamer, text, Progress Bar - but now audio is being captured.
-
Stop (if needed). In Single Event Record Mode, recording stops automatically at the Out Point (plus Post-Roll). If the talent misses the cue start or the take needs to be aborted, press the Stop button, Command & F2, or Space to stop recording immediately.
-
Review. After the recording pass completes (or is manually stopped), press the Review button or Command & F4. Pro Tools plays back the last recorded take. The recording matrix switches tracks to their Review states - typically muting the guide dialogue and playing the recorded take.
-
Mark selects and alternates. In the Event List, the Takes column provides three fields:
- Takes: # - shows the total number of takes recorded for this cue
- Takes: Sel - click to select which take is the preferred (select) take
- Takes: Alt - click to select which take is the alternate
If another take is needed, repeat steps 4 to 6.
-
Done status. The Done checkbox is automatically enabled after at least one recording pass. If after several takes the team decides the cue is not working and wants to return to it later in the session, uncheck Done to remove it from the completed count.
-
Advance to the next cue. Press the Down arrow key to select the next cue and repeat from step 3.
Tips for Recording
Target Event Mode keeps the current cue selected after a recording pass completes, which is useful when working through cues sequentially. Without it, the cue selection may be lost after recording. This happens because Pro Tools has an Insertion Follows Playback preference (also available as a button in the Transport window) - when enabled, Pro Tools removes the timeline selection after playback or recording stops and moves the cursor to the stop point. The Mirror Pro Tools timeline selection to ADR Master preference (in Preferences / Settings → ADR REC → OTHER SETTINGS) determines whether ADR Master follows this behaviour. When the mirror preference is enabled and Insertion Follows Playback is on, ADR Master loses the cue selection too. Disabling the mirror preference allows the engineer to keep Insertion Follows Playback enabled in Pro Tools without losing the cue selection in ADR Master. See the Selection Preservation After Recording section later in this chapter for details.
Open-ended cues: Individual cues can be set to record open-ended (past the Out Point) using the Open Ended checkbox in the cue properties. This overrides the global Event Record Mode for that specific cue - useful when most cues are recorded in Single mode but a few require extra recording time, or where a cue is a good candidate for listen-and-repeat delivery (e.g., a single word or short phrase where the talent benefits from hearing the original before performing).
Recording Cue Properties Reference
Several ADR Cue properties are directly related to the recording workflow. These properties are set per cue and can be viewed and edited in the Event List, Properties tab, or Edit Event window.
Done
The Done checkbox indicates that a cue has been successfully recorded. It is automatically set when a take is recorded for the cue and can also be toggled manually.
The Done status is used by the recording progress display (see below) to calculate how many cues have been completed.
Recording Progress
The recording progress count - displayed in the Event List header - shows how many cues have been marked as Done relative to the total number of visible cues. Two display modes are available:
- #c - cue count mode (e.g., "12 / 45" meaning 12 of 45 cues are done)
- #w - word count mode (e.g., "340 / 1200" meaning 340 of 1200 words have been recorded)
Click the progress display to toggle between modes.
Takes
The Takes: # field shows the total number of recording passes that covered this cue. ADR Master's take counter is intelligent - it counts every recording pass that covered the cue (passed its Out Point), regardless of whether the cue was explicitly selected before recording. Partial passes that stop before the cue's Out Point are not counted.
Note: The take count cannot account for false starts - if the transport was started and stopped before reaching the cue's Out Point, no take is counted, but if it passed the Out Point even briefly, a take is counted.
The Takes: Sel and Takes: Alt fields allow the preferred take and an alternate take to be designated. Click either field to open a pop-up showing all available take numbers.
Open-Ended Cues
The Open Ended checkbox on individual cues enables open-ended recording past the cue's Out Point, regardless of the global Event Record Mode setting. When enabled, recording or playback continues until manually stopped - even if the Event Record Mode is set to Single.
This is useful when most cues are recorded in Single mode but specific cues require extra recording time for wild takes or listen-and-repeat delivery.
Recording Track (Rec Track)
The Rec Track field assigns a Pro Tools record track to the cue. Only tracks that have been set to Record in the DAW Tracks section are available in the drop-down.
When Assign Record Tracks Automatically is enabled (in Preferences / Settings → ADR REC → OTHER SETTINGS), new cues are automatically assigned to record track 1, and overlapping cues are distributed across available record tracks in a checkerboard pattern.
Per-character default record track assignment can also be configured in the Character Track settings - useful when each character is always recorded on a specific track.
Selection Preservation After Recording
After a recording pass, whether the cue selection is retained in ADR Master depends on several interacting settings. Understanding these is important for maintaining an efficient recording workflow - especially when advancing through cues sequentially.
Pro Tools: Insertion Follows Playback
The Pro Tools preference Insertion Follows Playback determines whether Pro Tools moves its insertion point to the stop position after playback or recording ends. When enabled, Pro Tools removes the timeline selection and places the cursor at the stop point. When disabled, the original timeline selection is preserved.
Mirror Pro Tools Timeline Selection
The Mirror Pro Tools timeline selection to ADR Master preference (in Preferences / Settings → ADR REC → OTHER SETTINGS) determines whether ADR Master follows Pro Tools' timeline selection changes.
When enabled, ADR Master updates its cue selection to match whatever Pro Tools does. If Insertion Follows Playback is also enabled in Pro Tools, this means ADR Master loses the cue selection after every recording pass - because Pro Tools removes the selection, and ADR Master mirrors that change.
When disabled, ADR Master maintains its own cue selection independently of Pro Tools. This is the key benefit: the engineer can have Insertion Follows Playback enabled in Pro Tools while still keeping the cue selection in ADR Master after recording - regardless of which Edit Mode is active in ADR Master.
Target Event Mode
Target Event Mode (set via the Edit Mode toggle in the Controller Bar) keeps the selected cue highlighted after recording, regardless of what Pro Tools does with its insertion point. This provides another way to ensure the cue selection is retained after each recording pass - useful when working through cues one at a time.
For more information about Edit Mode and the difference between Timeline Range Mode and Target Event Mode, see the Adding and Editing Visual Events chapter.
Recommended Configuration
For recording where cues are worked through sequentially: use Target Event Mode to keep the cue selected after each pass. After reviewing a take, press the Down arrow to advance to the next cue. Alternatively, disable the Mirror Pro Tools timeline selection to ADR Master preference to retain the cue selection regardless of Edit Mode.
DAW Locating on Event Selection
Go to ADR Master menu → Preferences / Settings → ADR REC → OTHER SETTINGS → Locate DAW on Event Selection. When enabled, ADR Master sets a timeline selection in Pro Tools (and navigates to the selection start point) whenever an event is selected in the Event List.
With this option disabled, Pro Tools does not update its timeline position when an event is selected - it only updates when Rehearse, Record, or Review is next pressed.
This preference interacts with the When an Event is Selected setting in Preferences / Settings → OVERLAYS → General, which controls where ADR Master's own playhead moves when an event is selected: Go to Start (moves to the event start), Go to In Point (moves to the In Point), or Don't move Playhead.
Note: Go to Start does not work when Locate DAW on Event Selection is enabled - in that case, the DAW locating behaviour takes precedence.
When using Avid Satellite Link as the DAW Sync connection method, it is usually advantageous to have Locate DAW on Event Selection enabled.
Without Satellite Link (i.e., MTC and MMC), having this option enabled can cause a delay when navigating through cues quickly - due to the reliance on keystrokes and the chosen Keystroke Delay setting.
Hardware Controllers
For the most efficient recording workflow, an external hardware controller is recommended. Devices such as the Elgato Stream Deck or the Contour ShuttlePRO v2 allow recording shortcuts to be assigned to dedicated buttons - providing tactile, eyes-free control of Rehearse, Record, Review, and Stop without switching between applications.
Keyboard shortcuts are available for all common recording functions (see the Keyboard Shortcuts chapter for a complete list).
For setup and configuration details, see the Using Elgato Stream Deck with ADR Master and ADR Master and Contour Shuttle Pro chapters.
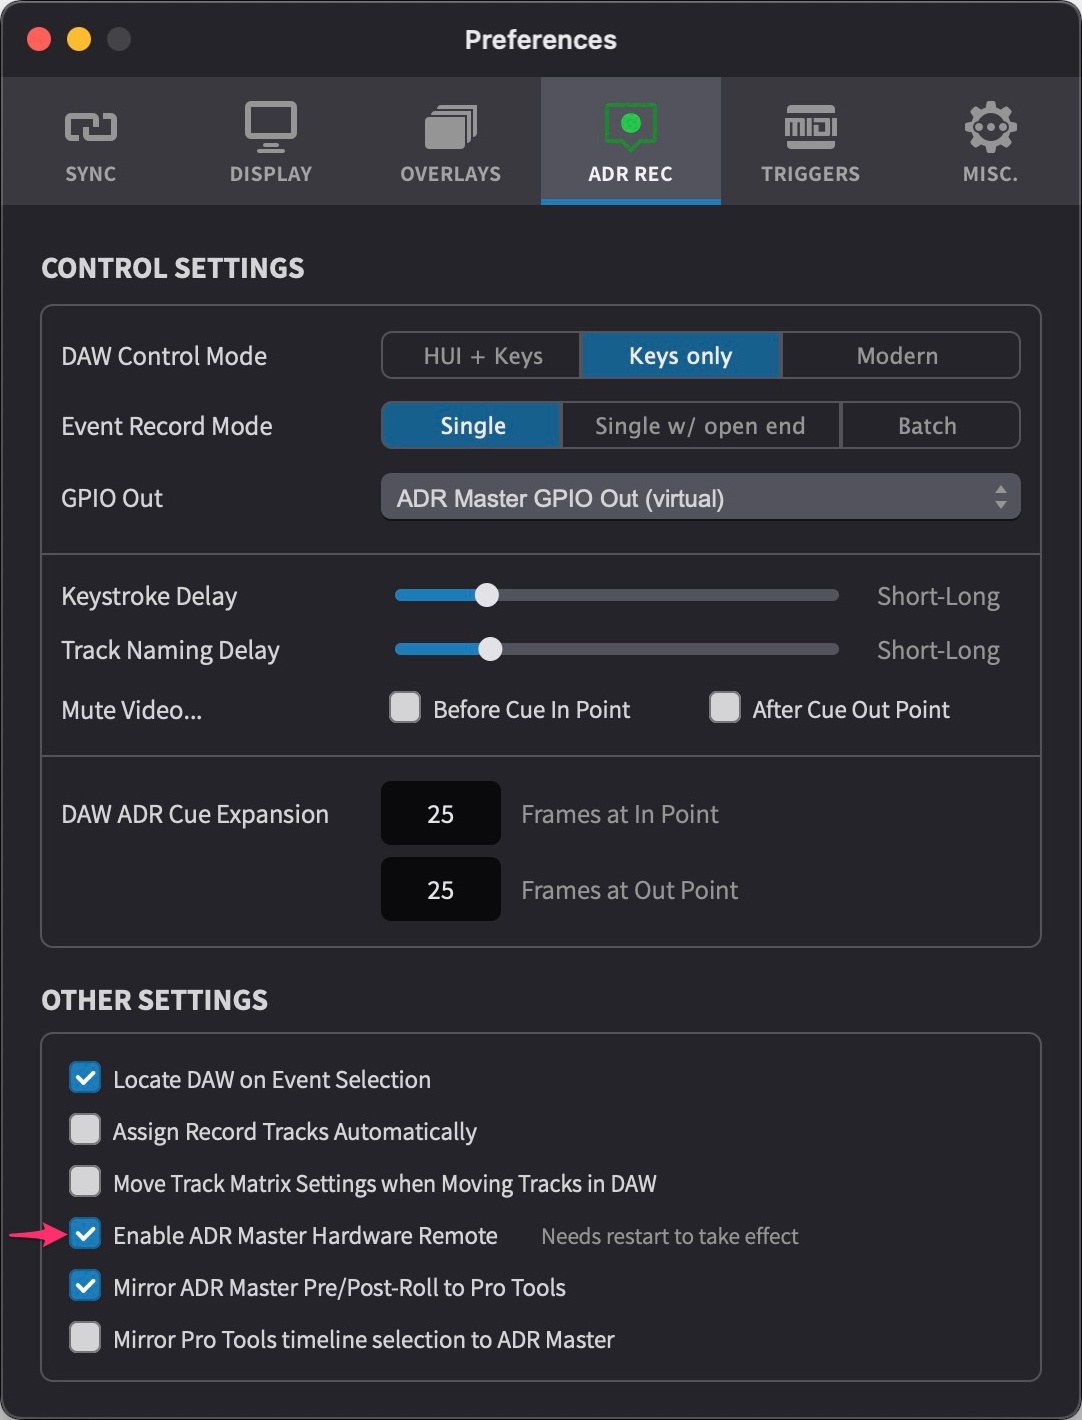
ADR Master Hardware Remote (Xkeys)
This preference controls ADR Master's support for Xkeys hardware remote devices. When enabled, ADR Master receives and responds to button presses from connected Xkeys devices.
When other applications are also configured to use the same Xkeys device, both applications receive the same button presses simultaneously, which can cause conflicts. In such cases, disable this option to prevent ADR Master from responding to Xkeys input.
 {width=50%}
To toggle this preference, go to ADR Master menu → Preferences / Settings → ADR REC → Enable ADR Master Hardware Remote.
Using Live Events to Record Pro Tools Region Group Cues
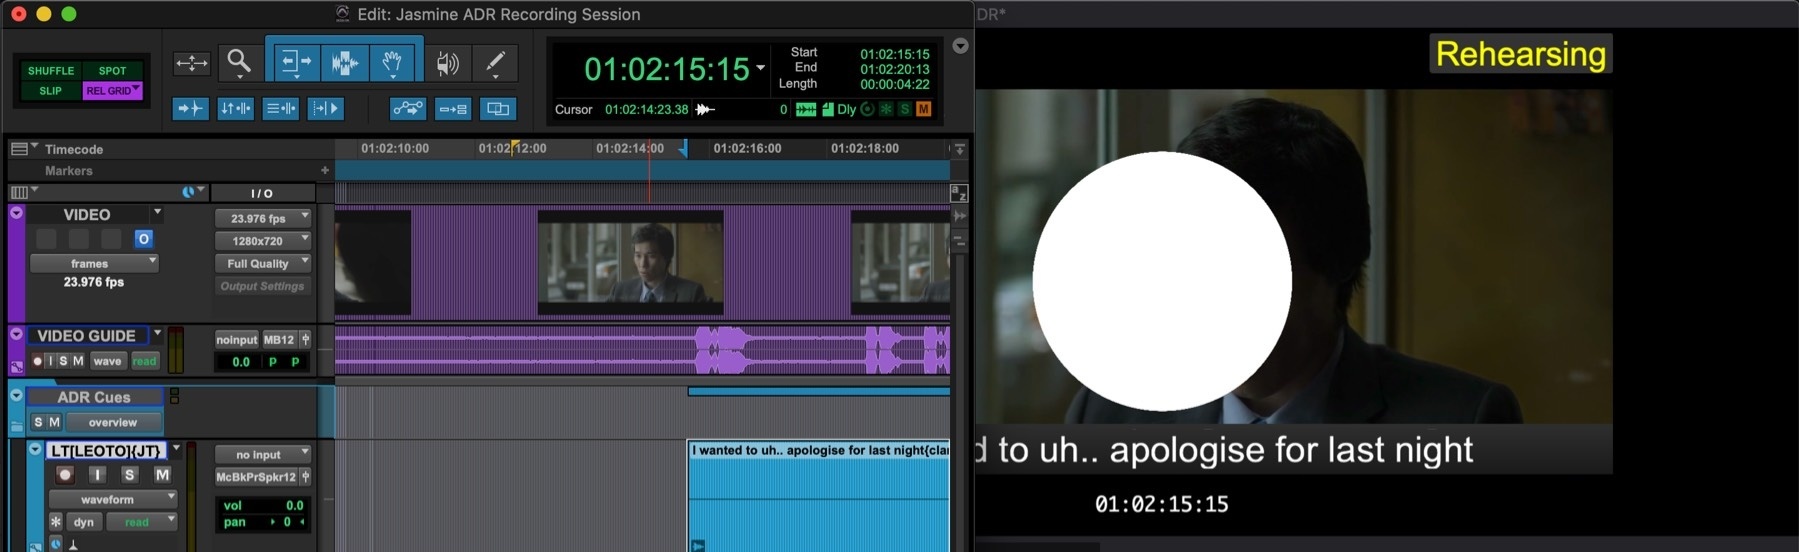
Even if there are no ADR Cue visual events present in the current ADR Master project, the Live Events feature allows instant capture, preview and recording of any existing Pro Tools region group cue - complete with text overlay, progress bar, wipes or countdown, and optional black screen before and after.
This requires that DAW Sync between ADR Master and Pro Tools is already set up using either Avid Satellite Link or MTC/MMC, and that DAW Control is connected via the Accessibility API.
Select a region in Pro Tools and press Command & Option & F1 for Rehearse, Command & Option & F3 for Record, or Command & Option & F4 for Review. ADR Master will extract the region name as well as the region's start and end point and set up a temporary live event with the region name as text.
 {width=70%}
Note: If playback does not start, make sure that the whole region is selected in Pro Tools and that Enable DAW control is enabled in the DAW tab.