Sync Setup - Pro Tools | Ultimate™ on the same computer via Satellite Link
Introduction
This is by far the most favourable DAW Sync option for use with ADR Master, as it provides the tightest & fastest sync with Pro Tools® using Avid® Satellite Link & direct control of Pro Tools® for recording & cueing using DAW Control. It is also by far the fastest & easiest setup.
To run ADR Master on the same machine as Pro Tools® with Avid Satellite Link, Pro Tools | Ultimate™ version 2021.3 or higher is required to serve as a Satellite Admin.
It is of course also possible to set up a Satellite Link connection to connect Pro Tools to ADR Master on a separate computer. However, ADR Master's DAW Control features are not supported with Pro Tools® on a separate computer, as they rely on Apple's Accessibility API for advanced recording controls, like track naming, muting, record enabling etc. The Accessibility API requires the app to be controlled (i.e. Pro Tools) and the controlling app (i.e. ADR Master) to be on the same computer.
Avid® Satellite Link Setup in ADR Master
Setting up Satellite Link is quite simple and straight-forward & should only need to be done once to have ADR Master connected to the Satellite Link network. Many of these settings should already be correctly setup by default - it's just a case of manually confirming they are correct.
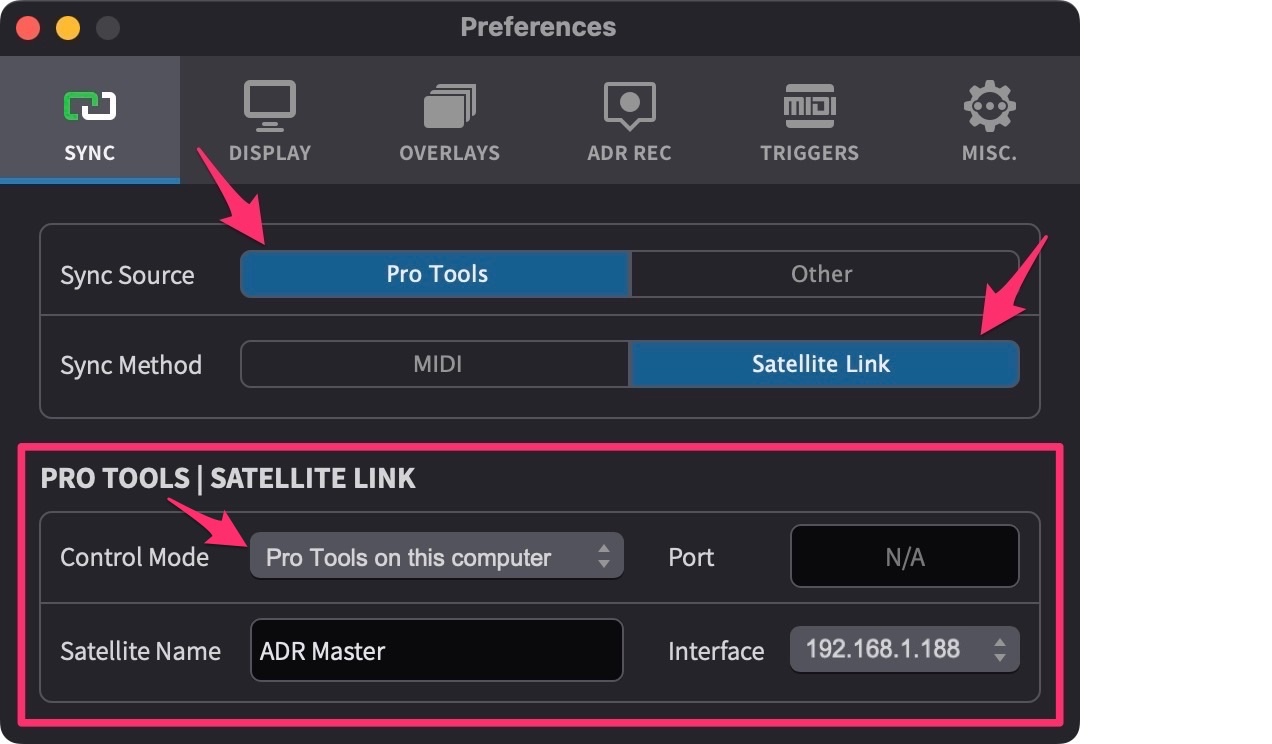
To show the Satellite Link options, first navigate to the SYNC tab of the Preferences / Settings window.
 {width=70%}
Set the Sync Source field to Pro Tools.
Set the Sync Method field to Satellite Link.
In the Pro Tools | Satellite Link settings box, set the Control Mode field to Pro Tools on this computer.
This will hard set the Port field to N/A.
To give this computer's ADR Master instance a unique Satellite name that would show up in the Pro Tools® Satellite options, type it in the Satellite Name field. This is especially useful for identifying each instance of ADR Master, if running multiple ADR Master Satellites on the same network.
The Network Interface address selection allows for selecting the network interface to use. When connecting to Pro Tools® on the same machine, make sure to select the same interface also used in the Pro Tools® Satellite settings.
The steps up until this point in ADR Master should only need to be done once. After that - ADR Master should always be automatically connected to the Satellite network when it is available - unless the Satellite settings are changed.
Next go to the timeline tab top left & make a note of the timecode rate of the current timeline being used, so that can be matched in Pro Tools®.
Mis-matched Pro Tools® Session Frame Rate & ADR Master Timeline Frame Rate will cause out-of-sync playback. This needs to be checked which each different session.
Avid® Satellite Link Setup in Pro Tools® | Ultimate™ / Pro Tools | HD™
In Pro Tools®, go to the Session Setup window and confirm that the timecode rate & range match those set in ADR Master.
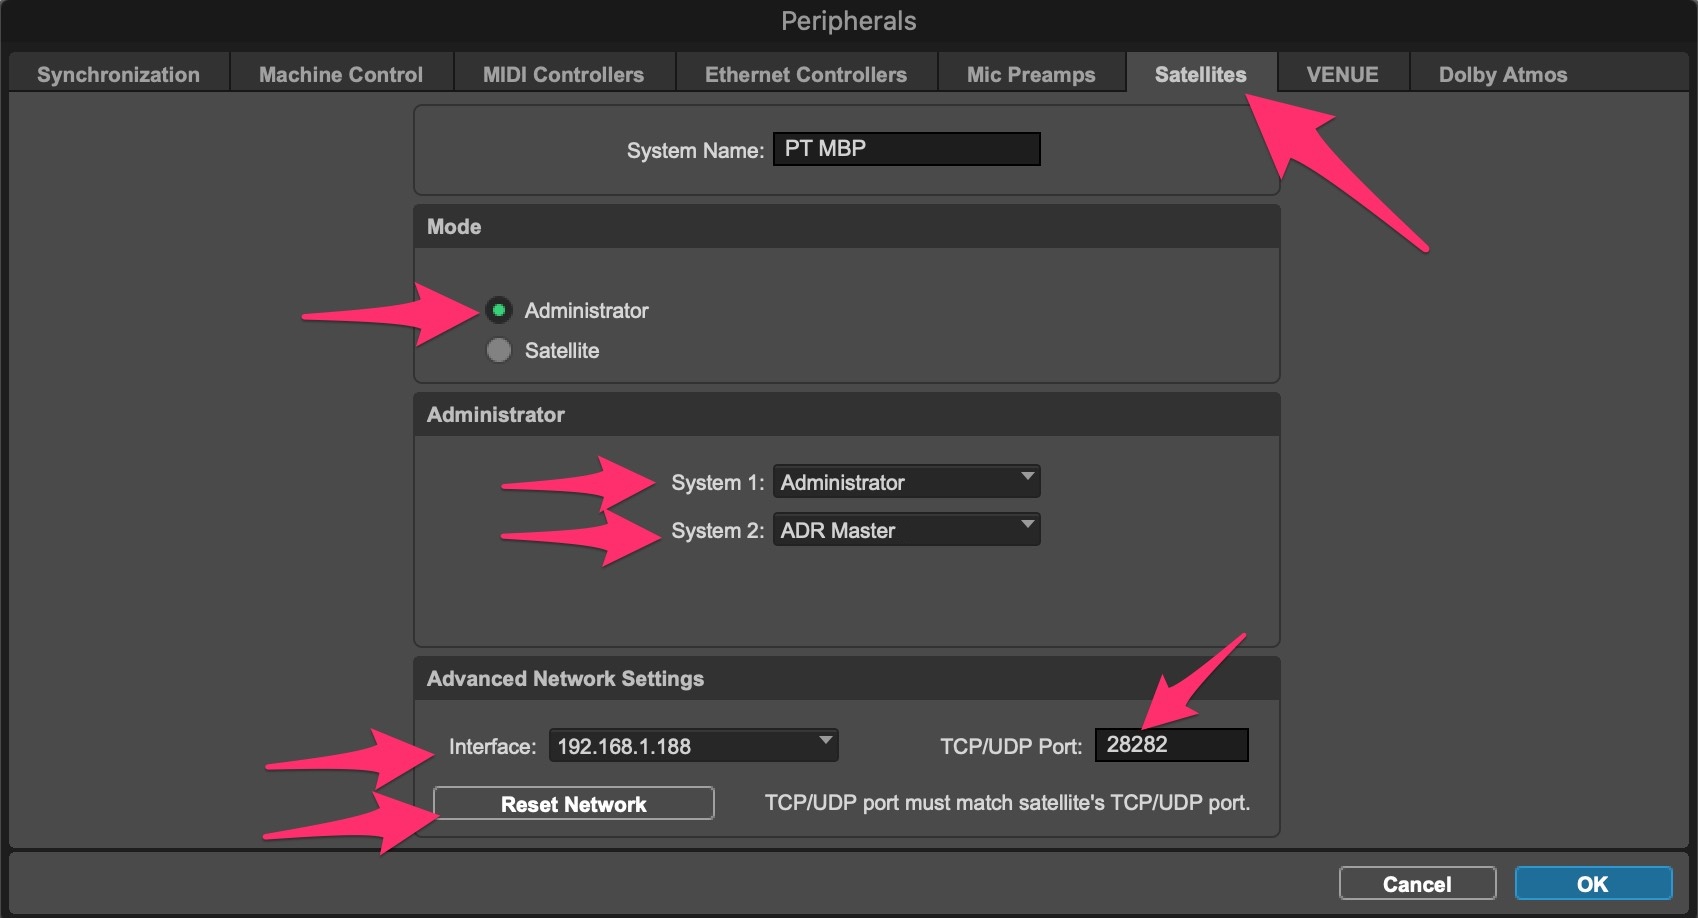
Then go to the Setup menu > Peripherals > Satellites tab.
 {width=80%}
Under the Advanced Network Settings, check that the Interface tab is set to the same network that was chosen in ADR Master, and that the IP addresses match.
When using ADR Master on the same machine, the TCP/UDP Port: value used is not relevant. This can be left set to the Pro Tools default value which is 28282.
Make sure that Administrator is selected under the Mode box.
In the Administrator box, make sure Administrator is selected as System 1:.
Select the ADR Master instance with the name defined earlier from the dropdown menu for the next available System (2 by default if no other Satellites connected).
If for any reason ADR Master does not show up in the list, re-check all the settings & hit the Reset Network button. If you are still unable to get ADR Master to appear, there is likely an issue with your network configuration. Please refer to the Troubleshooting section at the end of this chapter for more information on how to solve this.
Click OK.
ADR Master is now connected to the Satellite network, but will not yet start syncing until it is online in the Pro Tools® Transport window.
Enabling Synchronised playback
In Pro Tools, check that the expanded Satellite Synchronisation box is showing in the Transport window by clicking on the downwards pointing arrow on the top right of the window, & making sure the Synchronisation controls are enabled.
Enable the Satellite Devices that now appear in the Transport Bar in Pro Tools®. There should be one for Pro Tools® and one for ADR Master.
Enable the orange Transmit Play Selection up arrow button & the green Receive Play Selection down arrow button to the right of the Satellite Devices.
 {width=70%}
These same Transmit & Receive Play Selection options are also accessible from **Setup → Preferences → Synchronization → Satellites.
This will also automatically enable the Sync button to the left of ADR Master's Transport controls.
 {width=30%}
ADR Master Satellite Link is now online & ready to go. Hit play in Pro Tools® and ADR Master will play back in sync.
Satellite Link Network Troubleshooting
As Satellite Link is a network based protocol, the vast majority of problems with connecting ADR Master to a Pro Tools system are likely to be caused by a network configuration issue. So if you have confirmed that the Sync Method field in ADR Master is set to Satellite Link, yet the ADR Master Satellite still does not appear in the Pro Tools Satellites System setup tabs, it is likely due to one of the following issues below.
Erroneous IP Address
Each device in the network needs to have a unique IP address to communicate with other devices in the network. Devices obtain their IP addresses in one of two ways: automatically from a DHCP server (a network device that assigns IP addresses to devices), or through a manual assignment by the user. In most cases, your router will be the DHCP server.
If your device is configured to use a DHCP server but the server is not configured correctly, macOS will assign an automatic IP address because it could not obtain one from the network’s DHCP server. However, this automatic IP address prevents your device from communicating effectively on the network. You can tell if this is the case if the interface field in either or both ADR Master & Pro Tools are set to a value that begins with 169.254.x.x. (these addresses are called “Automatic Private IP Addressing” (APIPA) addresses).
Another way to confirm if this is the case, is by opening the macOS System Settings (or System Preferences in older versions of macOS) and selecting the Network section. From there, select your primary network interface and select “Details…” & check if the IP address currently assigned to the chosen network interface starts with “169.254.x.x”
How to fix it:
- Use a DHCP Server: Ensure your network has an active DHCP server that has been enabled & correctly configured to assign IP addresses. This is managed by your router or a dedicated DHCP server on larger networks.
If you are unsure about configuring your device’s network settings, please consult the device’s manual or reach out to your network administrator for assistance.
If it has been confirmed that the DHCP Server is active & setup correctly, rebooting your router can sometimes resolve this issue by refreshing the DHCP settings and allowing your device to receive a correct IP address.
- Assign a Manual IP Address: If using a DHCP server is not an option, or does not resolve the issue, you may need to manually assign an IP address to your device. This involves selecting an IP address that fits within your network’s address range but is not already in use.
Manual IP Address assignment may require additional network information, such as the Subnet Mask, Gateway, and DNS servers, which you can obtain from your network administrator or the network settings of another device on the network.
Choosing the correct network interface
If it has been confirmed that the correct IP adresses have been assigned, there may be a conflict with multiple network connections. Many computers have more than one network interface built-in - usually wired ethernet and WiFi. When using SatelliteLink, it can be a possible cause for connection problems if both are enabled at the same time - even though only one is being used.
How to fix it:
- Please make sure to disable all other network adapters that are not required for use with SatelliteLink. The preferred network interface is ethernet, hence disabling the Wi-Fi interface in from Apple menu → System Settings → Network is strongly advised.
Firewalls
It is vital to ensure that if any Firewalls are active acrosss the network, that they are allowing Satellite Link network traffic to pass.
How to fix it:
-
Unless specifically required, please ensure that the macOS Firewall has been disabled. This can be done from Apple menu → System Settings → Network.
-
If the macOS Firewall must be kept active, please ensure that the chosen & default port value (28282 by default) - are configured to allow communication on these port values.
Please consult the device’s manual or reach out to your network administrator for assistance.
- If a Firewall service is running on your router or a dedicated server, please ensure that communcation to the chosen computers has been allowed on the chosen port numbers (28282 by default).
