Audio Setup
Introduction
ADR Master has some very sophisticated audio features that will help you in your every-day workflow.
When dropping a video file onto the timeline, ADR Master will automatically create audio tracks and regions for all audio tracks the movie contains.
But it doesn't just play them back, you can also route every single track to your desired output destination on your particular hardware device.
Most common modern audio file types can be played back on the Timeline.
The Audio Settings Window
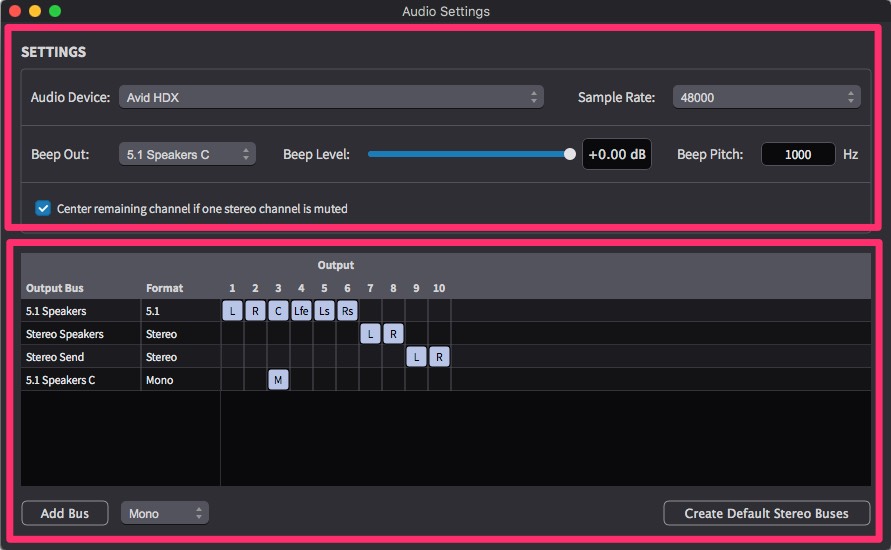
The Audio settings window contains most audio related settings and the audio hardware output routing matrix. It can be displayed by going to the Window menu and selecting Audio Settings or by using the shortcut Shift & A.
The window is separated into two sections: the settings section at the top, and the actual routing section at the bottom.

The settings chosen here are applied globally to ADR Master - and are independent of specific Project or Timeline settings. This allows for an integrated generic audio output routing setup in your studio for example to a mixing console - that is consistent across every project. This way, the beeps can always be on one channel on the mixing console, & the same for Guide Mix, the Dx, Fx, & Mx Stems.
Settings Section
Output device - ADR Master will scan your system for all available audio devices when it starts. These devices will be listed here. Pick the one to be used by default for audio output.
ADR Master will store and restore all the individual output busses and their routing using the matrix below on a per-device basis.
Sample Rate - Selects the sample rate you want ADR Master to use. If a DAW is running on the same computer, please make sure that this is set to the same sample rate as the DAW.
If the computer is only running ADR Master, it may be better to match the audio sample rate of your video file, typically 48kHz is the best starting setting to use.
Beep Out - Selects the output for the beeps during streamer and ADR Cue events.
Beep Level - Selects the output level of the audio beeps.
A Beep On/Off toggle switch is found in the application's preferences in Overlays > Streamer > Play Audio Beeps and Overlays > ADR Cue > Play Audio Beeps during Pre-roll.
Beep Pitch - Selects the preferred pitch of the audio beeps.
Center remaining channel if one stereo channel is muted - If one channel of a stereo file is muted by right-clicking the mute button, ADR Master will center the remaining channel if this checkbox is ticked.
Routing Section
At the bottom of the window, ADR Master displays a routing matrix which allows you to define output busses and route their individual output channels to physical output channels of your audio interface.
The greater the number of audio outputs available on your hardware device, the bigger this matrix window will appear.
To create a new channel, click the "Add Bus" button at the bottom. Use the popup menu next to the button to select which kind of bus you want to create. You can choose from Mono up to 7.1.
If stereo output pairs are good enough, you can have ADR Master create those for you by clicking the "Create Default Stereo Busses" button on the bottom right.
When a new bus is created, you can edit its name by double-clicking the row header in the list.
To delete an output bus, select the row by clicking the row header on the left and hit backspace.
Routing of the individual channels to physical outputs of the device is done by simply dragging the channel icon around.
Every output bus created in the routing matrix will be selectable as an output destination for audio tracks in the track view of the main window.
If the audio track's channel count doesn't match the output bus' channel count, ADR Master will up-mix or down-mix the audio content automatically.
5.1 Playback with Stereo Monitoring
When working with 5.1 audio content but monitoring through stereo outputs, ADR Master will automatically down-mix the 5.1 channels to stereo during playback.
For 5.1 audio playback, ADR Master assumes SMPTE channel order (Left, Right, Center, LFE, Left Surround, Right Surround). This order is only relevant when using the automatic up-mix or down-mix functionality.
ADR Master will always display audio channels in the order they are stored in the file. However, if the playback doesn't sound correct after automatic down-mixing, you can adjust the speaker output order in the Audio Settings routing matrix by moving the speaker channels around until the playback is correct.
