DAW MTC/MMC Setup
MIDI REMOTE - DAW MTC/MMC SETUP
Learn what you need to do to establish a connection between our MIDI Remote app and your PC or Mac. Our MIDI Remote app works without configuration. To do that, it needs to have a two-way connection with the host machine. Your DAW will send MIDI timecode to the app for timecode info during playback and also MIDI Machine Control messages while scrubbing in your DAW. This assures that your DAW and the app are always in sync with each other.
Our MIDI Remote Control is connected to your machine using a technology called network MIDI. To set it up, you first need to create a network session in Apple's Audio-MIDI Setup.
- Open Audio-MIDI Setup (located in Applications->Utilities)
- Show the MIDI window if it isn't shown (Window -> Show MIDI window)
- Double-click the "Network" icon
- In the top left section, click the "+" button to create a new session. This new session will be used to connect our DAW machine to the MIDI remote.
- Name it whatever you like, e.g. "to MIDI Remote"
- Enable the session on the top right
- Change the value of the dropdown menu in the bottom left of the window to "Anyone".
It should look similar to the screenshot below.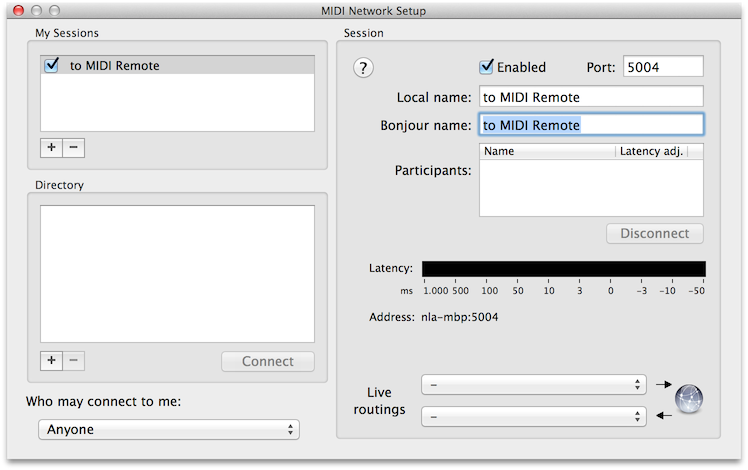
- Set up your DAW (Instructions below)
- Go back to Audio-MIDI Setup
- Open the app on your iPhone
- A new item with the name of your iPhone will appear in the "Directory" view of the "Network" window
- Select the network session "to MIDI Remote", click on item with the name of your iPhone and hit "Connect" on the right.
- You're ready to go!
All DAW related settings will be saved on a per-session basis and don't need to be done over and over again. The network MIDI session is also saved. Thus, all you need to do whenever you want to use the MIDI Remote is connecting your iPhone with the network session
How it works
Our MIDI Remote app works without configuration. To do that, it needs to have a two-way connection with the host machine. Your DAW will send MIDI timecode to the app for timecode info during playback and also MIDI Machine Control messages while scrubbing in your DAW. This assures that your DAW and the app are always in sync with each other.
Our MIDI Remote will in turn send MIDI Machine Control messages back to the remote for scrubbing, play, stop and record. The following sections will explain the setup steps needed in your DAW.
 AVID Pro Tools®
The following explanation corresponds to Pro Tools 10 but the steps will be similar for other versions.
MTC
Go to Setup -> Peripherals to open the window shown below. Switch to the Synchronization tab.
Choose the desired MIDI output (in our case, this would be "to MIDI Remote") in the MTC Generator Port dropdown menu.
Click OK to close the window.

Hit the Gen MTC button as shown below. If you don't see the button, hit the triangle button on the right and choose "All" to show all control elements.
![]()
MMC
To enable MMC in Pro Tools, open the Peripherals window once again and switch over to the Machine Control tab.
Select the MIDI port you want to use to send MMC from the drop-down menu. You have to use the same one as for MTC ("Network, to MIDI Remote").

Set the Enable checkbox and enter 127 in the ID field.
Also enable the MIDI Machine Control Remote (Slave) checkbox, but choose a different ID (e.g. 126).
Close the window.
Open up the Preferences window by choosing Pro Tools -> Preferences.
Switch over to the Synchronization tab.
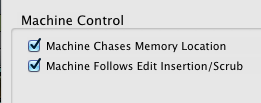
When Machine Chases Memory Location is enabled, Pro Tools will send an MMC Locate command whenever you navigate to a specific memory location. With the Machine Follows Edit Insertion/Scrub checkbox checked, Pro Tools will send MMC Locate commands every time the position of the edit insertion is changed.

 Steinberg Nuendo®/Cubase®
The following explanation and screenshots are related to Nuendo 4 but the steps will be similar for other versions. The settings in Cubase should also be similar (if not identical).
MTC/MMC
Go to Transport -> Project Synchronisation Setup... to open the window shown below.
"to MIDI Remote Win" is a network MIDI connection set up with rtpMIDI on a Windows machine. You would be using "to MIDI Remote" instead.
Select the corresponding in- and outputs for "Machine Control Input", "Machine Control Output" and "MIDI Timecode Destination". As Timecode Source, select "Internal Timecode".
Click OK to close the window.
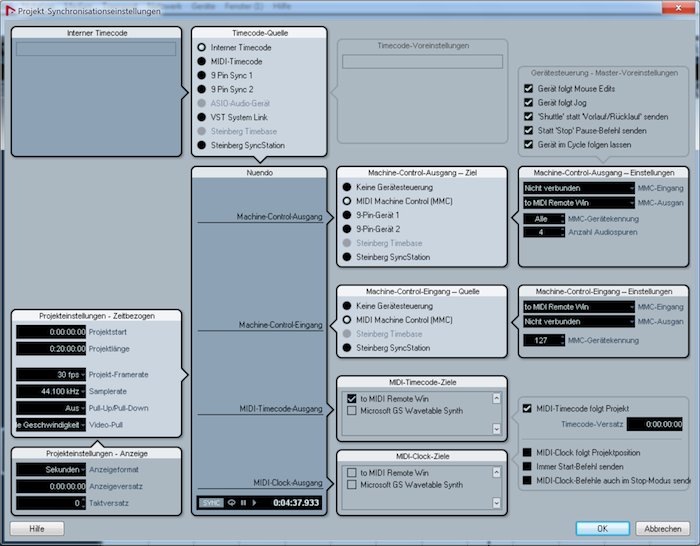

The synchronisation needs to be set to internal (as shown in the Transport panel above).
 Apple Logic Pro®
MTC/MMC
With your project opened, go to File->Project Settings -> Synchronization...
Go to the MIDI tab. You should see the window shown below.
Check the "Transmit MTC" checkbox and select your desired MTC output in the dropdown menu underneath. To also transmit MIDI Machine Control, also check the "Transmit MMC" checkbox.
