Bulk ADR Cue Import from Pro Tools
Exporting a Pro Tools® Region Group Cues Session as Text
When you're done creating your cues in Pro Tools®, you can transfer the cues to ADR Master for Recording. To do that, just export Pro Tools Session Info as a text file by selecting File>Export>Session Info as Text.
Copy these settings as shown:
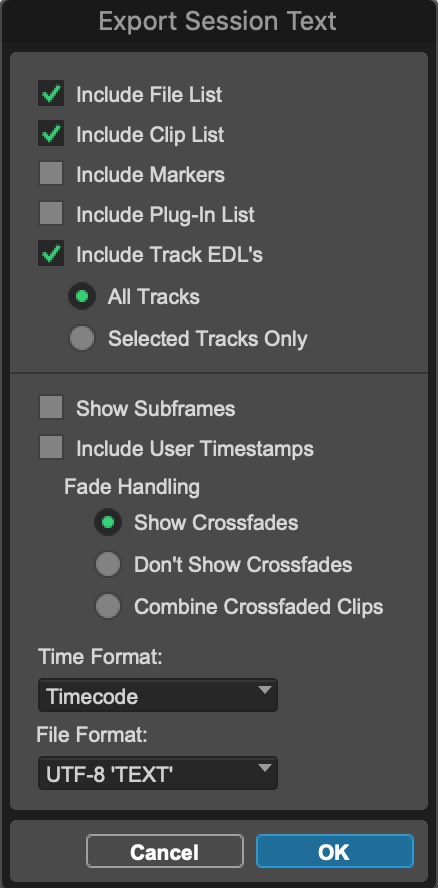
Make sure to select Timecode as the time format. We recommend to use UTF-8 'TEXT' as the File Format as this also supports non-ASCII characters like Umlauts and other non-US character sets.
ADR Cue Numbering Scheme
Before import, the chosen ADR Cue numbering scheme for imported cues should first be set in the PROJECT tab in the top left of the ADR Master window.
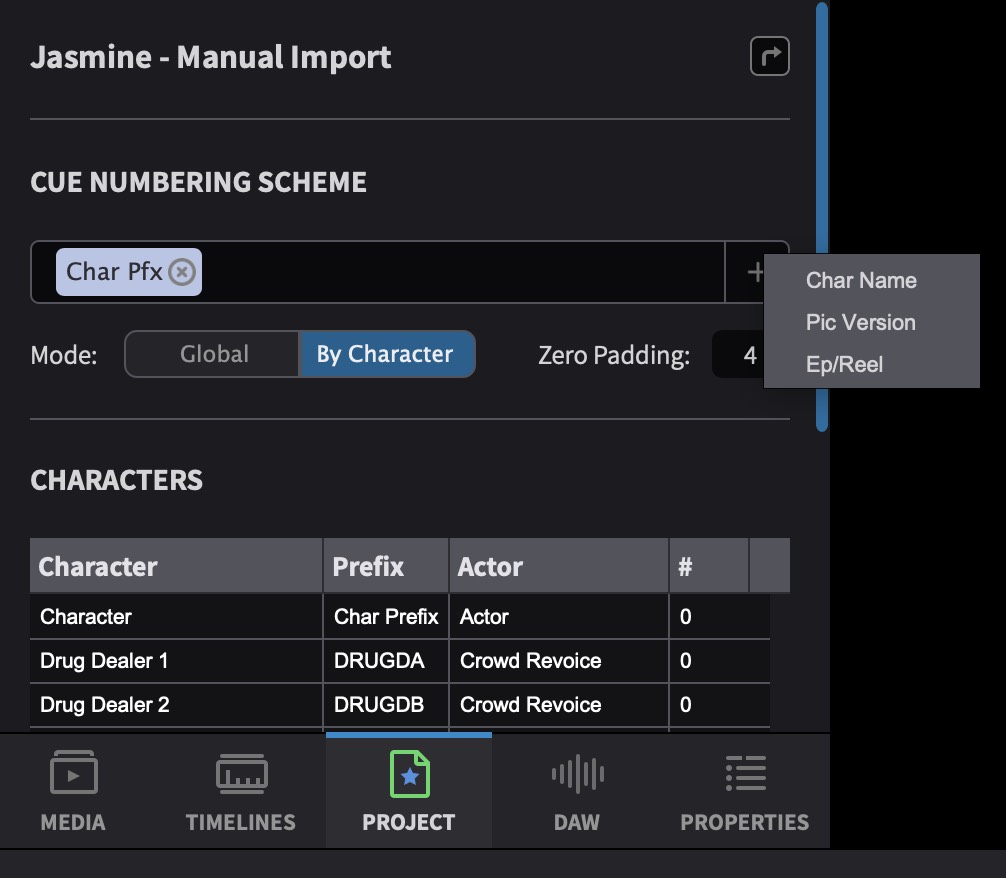
Click the + on the right of the Cue Numbering Scheme field. There are 4 fields to chose from:
- Char Name
- Char Pfx
- Pic Version
- Ep/Reel
Once the desired fields are added, they appear as boxes in the field box to the left. Their order can be shuffled by clicking a box and moving it to the desired point in the cue name. Additionally, you can click between, before or after them to add fixed text that will be used as part of the cue number.
To choose whether cues are named Globally or By Character, use the Mode selector.
Use the text box to the right of Zero Padding to select the number of digits in the cue number. This is done by adding zeroes to the start of the cue number so that all cue numbers are the same length, e.g. 0001, 0164, 1265, etc. With a zero padding of 3 ADR will add leading zeros to all numbers so they are all 3 digits long (e.g. 001).
Setting the Timeline frame rate
It is vital that the frame rate of the Timeline is set correctly before importing cues. Failure to do so, will cause discrepancies in the duration & location of the cues - especially when the correct frame-rate video is eventually added to the Timeline. Setting the frame rate is done either automatically by simply adding video to the current Timeline; or if no video is present, by clicking the pencil icon to the top right of the active Timeline & in the Edit Timeline Settings window that appears, selecting the relevant frame rate from the TC Frame Rate pulldown menu.
Importing
Select File > Import Events from File and choose the Pro Tools® Session Info text file from the browser window & click Open.
It is not possible to import directly from a Pro Tools session file - the session must first be exported as a text file from within Pro Tools as detailed earlier in this chapter.
The ‘Select Tracks to Import’ window
The Select Tracks to Import window appears, allowing for selection of which character tracks to import.
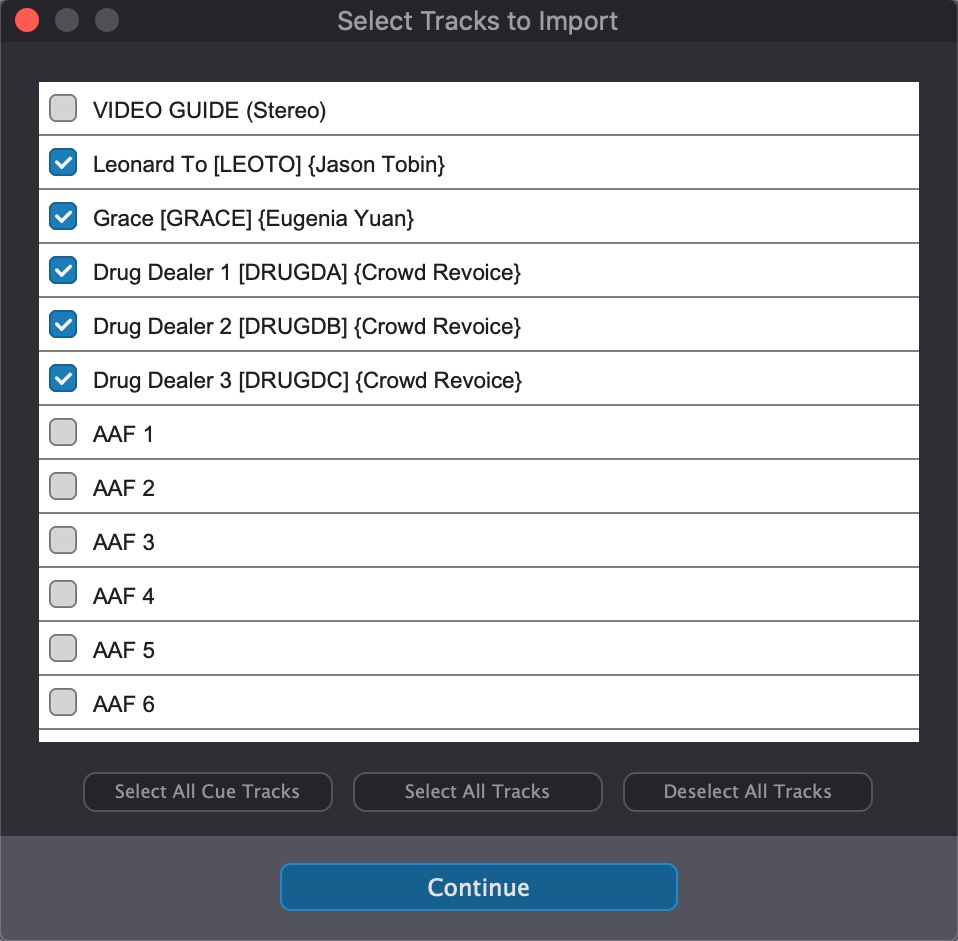
This window does not appear for any other file formats.
There are a few useful buttons to help select more tracks quickly. These include:
Select All Cue Tracks - Activates only the tracks with recognised ADR cues.
Select All Tracks - Activates all tracks
Deselect All Tracks - Deactivates all tracks
Once the desired tracks have been chosen, click the Continue button at the bottom.
The ‘Import Visual Events from File’ window
The Import Visual Events from File window will appear next.
The window is separated into two sections: the top section shows the column mapping of the ADR cues in a table-like manner; and the bottom shows the import settings.
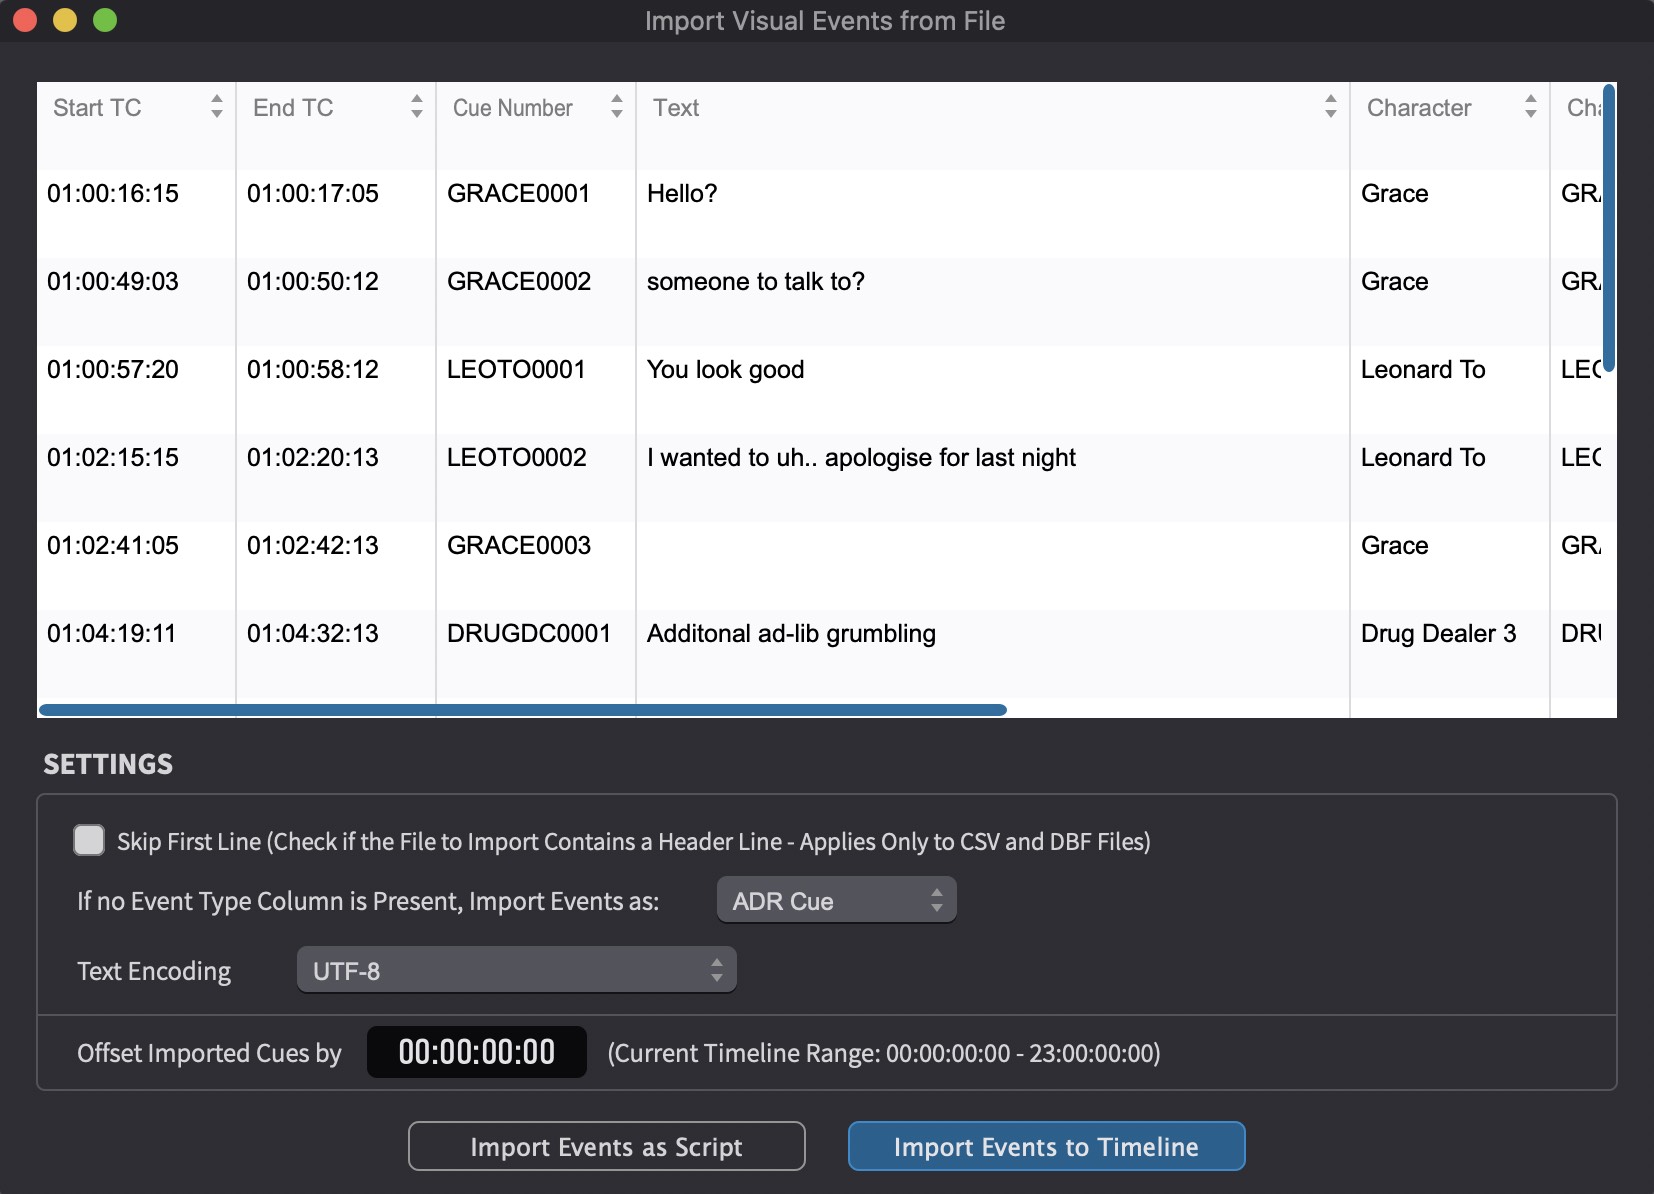
ADR Cue Column Mapping Table
For Pro Tools Import, these column headings are fixed to prevent any import errors.
ADR Cue Import SETTINGS section
The bottom half of the Import Visual Events from File window contains a number of import related settings.
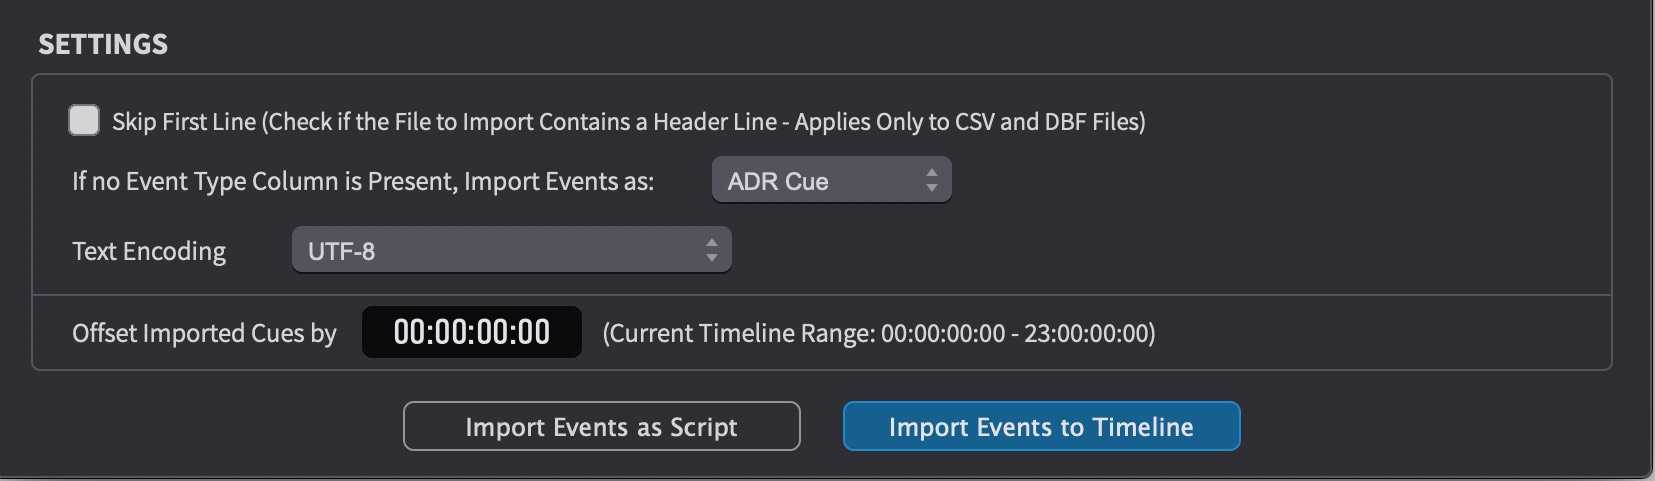
Skip First Line - this setting is not applicable for Pro Tools import.
Set the If no Event Type Column is Present, Import Events as: field to ADR Cue.
Text Encoding - Set this to UTF-8 or the same setting as used when exporting the Pro Tools Session text file.
If you are unsure of the exact text encoding format of the file, UTF-8 is a good default starting point as it also supports non-ASCII characters like Umlauts and other non-US character sets.
Every text file has an internal text encoding. The encoding determines how the file content should be interpreted. A text file basically is nothing more than a sequence of bytes and ADR Master needs to know which character set to use to decode the bytes into human readable characters. That is why it is important to match the same export & import Text Encoding types. It is unfortunately not easily possible to detect the character set programmatically (it usually works for UTF-16 and for UTF-8). If you're uncertain about the text encoding used in the text file, try different text encodings until the best results are achieved. Problems will usually be visible with special characters like German Umlauts for example.
Offset Imported Cues by - add or subtract a defined timecode offset to all cues when importing them. For example, if the timeline start timecode is set to 10:00:00:00, but the imported cue sheet references a 1 hour start, you could simply enter 09:00:00:00 in the text box here to offset all imported cues by 9 hours.
Negative values are also permitted.
To bulk import the cues into the timeline, click the Import Events To Timeline button. The events will appear in the Timeline & in the Event list.
Or to show the cues as a script to add each event manually one by one using the Import Script window, click Import Events as Script.
